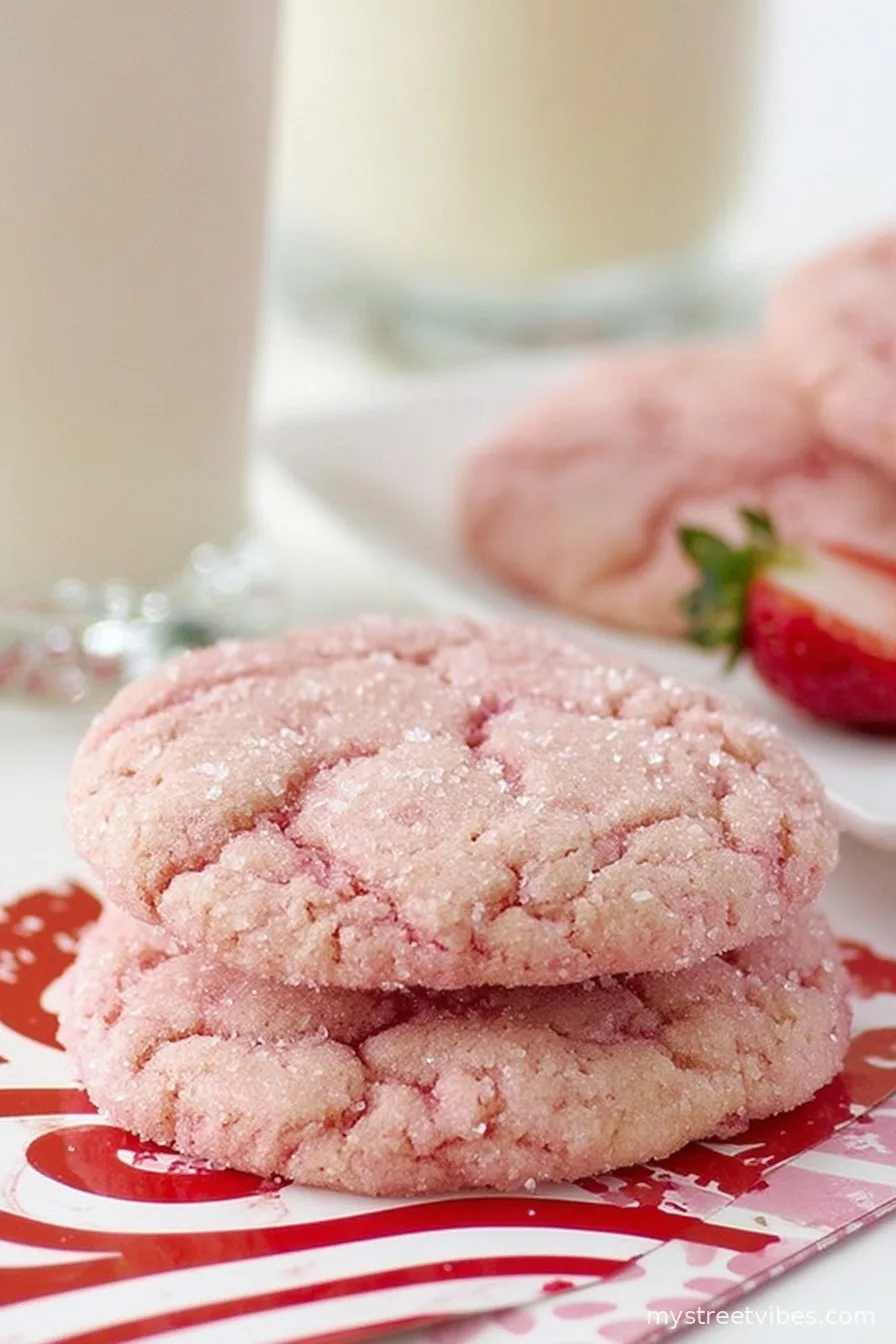
Let Me Tell You About These Strawberry Sugar Cookies
Okay, you know when you get a craving for something sweet but you seriously can’t face another chocolate chip (as if that’s ever a problem, but just go with me)? That’s when these Strawberry Sugar Cookies save the day, or at least a Tuesday night. I started making these out of pure curiosity and honestly, a little bit of laziness—because rolling out dough is above my pay grade after 7pm. My niece actually requested them for her birthday bake-off; it’s become our little tradition to see who can get the kitchen messiest, and let’s just say, strawberry dough knows how to travel.
Why You’ll Love These Cookies (Or Why My Family Does, at Least)
I make this whenever I want something that’s just a bit extra—sweet, a bit tangy, and pretty enough that people think you’ve made way more effort than you actually did (shhh). My daughter always begs me to add sprinkles, which is absolutely not traditional, but honestly, they’re tasty either way. Also, these cookies are soft in the middle—no dry rocks here, thank you. One time I forgot to chill the dough and, well, they turned into strawberry pancakes. We ate them anyway; no regrets.
What You’ll Need (Ingredients With My Weird Substitutions)
- 2 1/2 cups all-purpose flour (sometimes I swap 1/2 cup for almond flour if feeling fancy)
- 1/2 teaspoon baking powder
- 1/4 teaspoon baking soda
- 1/2 teaspoon salt (skip if using salted butter—I never remember to check)
- 3/4 cup unsalted butter, softened (but my grandma used margarine; I won’t judge you either way)
- 1 cup granulated sugar
- 1 large egg
- 2 teaspoons vanilla extract
- 1/4 teaspoon almond extract (optional, but I swear it just makes berries pop)
- 1/3 cup strawberry puree (from about 5-6 ripe strawberries, or use good-quality jam if that’s all you’ve got)
- Pink or red sanding sugar for rolling (or regular sugar in a pinch—I’ve even used colored sprinkles in a moment of desperation)
- 1-2 drops pink food coloring, optional (on those days when I want extra wow)
How To Make Them (Step-by-Step)
- Preheat your oven to 350F (175C) and line two baking sheets with parchment. If you’re anything like me, you’ll forget the parchment half the time and then stress-scrape your cookies off the tray later. Highly recommend not skipping it (learned the hard way!)
- In a medium bowl, whisk together flour, baking powder, baking soda, and salt. This is one of those steps I used to skip, but then my cookies got weird lumps, so just do it. Set aside.
- In a large mixing bowl, beat the softened butter and sugar together until it gets pale and fluffy. This is where I sneak a taste and then try not to eat all the dough.
- Beat in the egg, vanilla, almond extract, and strawberry puree. If your puree looks a little runny, it’s fine—just means slightly more pink goodness.
- If you really, really want them pink (like unicorn-level pink), add a drop or two of food coloring now. I usually do this when making them for birthdays or just a random Tuesday that needs some color.
- Add the dry mix to the wet, a little at a time. Mix until everything’s just combined. Don’t overmix—unless you like tough cookies (some do, and that’s their business).
- Chill the dough in the fridge for at least 30 minutes. Yes, I know. I also hate this step, but actually, I find it works better if you wait—otherwise, you get cookie puddles. The longer you chill, the puffier the cookies.
- Once chilled, scoop out heaping tablespoons of dough. Roll them into balls—flour your hands if it’s sticking—and roll each one in sanding sugar or sprinkles (as the mood strikes you).
- Arrange on your baking sheets, a couple inches apart so they have room to spread. Press down gently with your palm so they get that classic sugar cookie look.
- Bake for 10-13 minutes until just set at the edges (the centers should look a smidge underdone; they’ll finish up on the tray). Let them cool for 3-5 minutes on the pan before moving; or eat one hot and regret nothing.
Notes: Stuff I’ve Learned The Messy Way
- If your strawberries aren’t sweet, toss them with a bit of sugar before puréeing.
- Jam works in a pinch, but you might want to skip the extra sugar coating—otherwise it can get cloyingly (yes, that’s a real word!) sweet.
- Sanding sugar is fancy, but really—don’t let the lack of it stop you from making the cookies. Regular sugar does just fine. Or nothing. They still taste awesome.
- I once mixed everything in one bowl just to see if it was worth saving dishes. It’s not.
Variations (And One That Wasn’t Great, Oops)
- Tried adding chopped freeze-dried strawberries—amazing crunch, and extra flavor.
- Lemon zest in the dough: lovely, especially if you like a tangy twist.
- Subbed raspberry puree for the strawberries once—worked well, a bit more tartness.
- Chocolate chips? Didn’t love it. The flavors fought each other. Wouldn’t recommend, but hey, you do you.

Equipment: Use What You’ve Got
- Electric mixer (but a sturdy spoon and elbow grease works, if you’re up for a workout)
- Baking sheets and parchment—though foil with a good slather of butter will work if you’re out
- Mixing bowls—at least two, though I’ve done it with one (see above disaster)
- Cookie scoop or just grab some spoons, no one’s judging
Storage (If They Last… They Never Do Here!)
Put the fully cooled cookies in an airtight box. They’ll stay soft for 2-3 days on the counter, but in my house, they’re usually just a memory by the end of the day. If you ever do get leftovers, you can freeze them—just don’t expect them to last a round in the freezer either.
How We Like To Serve Strawberry Sugar Cookies
Honestly, these are perfect with a big mug of tea (or a glass of cold milk if you’re channeling your inner child). Sometimes I sandwich a little buttercream between two for parties—super cute, but honestly, a bit rich for every day. My son likes them alongside vanilla ice cream, but you do you.
What I Wish I’d Known (Pro Tips)
- I once skipped chilling the dough because I was in a rush; the cookies merged into a strawberry sheet pan. Tasted fine, but didn’t win any beauty contests.
- Actually, soft butter is important, but if it melts, the dough will be greasy. If you forget to soften it (I do, all the time), just zap it in the microwave for 10 seconds at a time. But not more, or you’ll get a puddle.
- This dough freezes well—shape the balls and freeze, then just bake straight from frozen (add a minute or two at the end).
FAQ – Real Questions I’ve Gotten (and a Tangent or Two)
- Can I use frozen strawberries? You can, but thaw and drain them first or the dough goes runny. Fresh is best, but I get the appeal of using what’s in the freezer.
- Do I have to use a mixer? Nope! I grew up using a big wooden spoon, but expect some arm ache. Honestly, sometimes that’s half the fun (or at least it makes you feel you’ve earned dessert).
- Why did my cookies flatten out? Probably because the dough was too warm or you skipped the chill. Try leaving it in the fridge a bit longer next time.
- Can these be made gluten-free? Yes, I’ve tried them with a 1:1 gluten-free flour blend. The texture is slightly more crumbly, but nobody at my table ever complains.
- Do I need to refrigerate leftover cookies? Not unless you’re keeping them for more than a couple of days—though if it’s really humid, fridge is safer. But honestly, if you can resist eating them all, you’re stronger than me!
- Help! My dough is too sticky. Just wet your hands a little or pop it back in the fridge for ten minutes. It’ll sort itself out, promise.
- Wait, can I add sprinkles? Absolutely. Life’s too short not to.
Seriously, if you’ve never tried mixing strawberries into a sugar cookie, give it a whirl. It’s a game-changer—probably. Or at least a sweet surprise.
Ingredients
- 2 1/2 cups all-purpose flour (sometimes I swap 1/2 cup for almond flour if feeling fancy)
- 1/2 teaspoon baking powder
- 1/4 teaspoon baking soda
- 1/2 teaspoon salt (skip if using salted butter—I never remember to check)
- 3/4 cup unsalted butter, softened (but my grandma used margarine; I won’t judge you either way)
- 1 cup granulated sugar
- 1 large egg
- 2 teaspoons vanilla extract
- 1/4 teaspoon almond extract (optional, but I swear it just makes berries pop)
- 1/3 cup strawberry puree (from about 5-6 ripe strawberries, or use good-quality jam if that’s all you’ve got)
- Pink or red sanding sugar for rolling (or regular sugar in a pinch—I’ve even used colored sprinkles in a moment of desperation)
- 1-2 drops pink food coloring, optional (on those days when I want extra wow)
Instructions
-
1Preheat your oven to 350F (175C) and line two baking sheets with parchment. If you’re anything like me, you’ll forget the parchment half the time and then stress-scrape your cookies off the tray later. Highly recommend not skipping it (learned the hard way!)
-
2In a medium bowl, whisk together flour, baking powder, baking soda, and salt. This is one of those steps I used to skip, but then my cookies got weird lumps, so just do it. Set aside.
-
3In a large mixing bowl, beat the softened butter and sugar together until it gets pale and fluffy. This is where I sneak a taste and then try not to eat all the dough.
-
4Beat in the egg, vanilla, almond extract, and strawberry puree. If your puree looks a little runny, it’s fine—just means slightly more pink goodness.
-
5If you really, really want them pink (like unicorn-level pink), add a drop or two of food coloring now. I usually do this when making them for birthdays or just a random Tuesday that needs some color.
-
6Add the dry mix to the wet, a little at a time. Mix until everything’s just combined. Don’t overmix—unless you like tough cookies (some do, and that’s their business).
-
7Chill the dough in the fridge for at least 30 minutes. Yes, I know. I also hate this step, but actually, I find it works better if you wait—otherwise, you get cookie puddles. The longer you chill, the puffier the cookies.
-
8Once chilled, scoop out heaping tablespoons of dough. Roll them into balls—flour your hands if it’s sticking—and roll each one in sanding sugar or sprinkles (as the mood strikes you).
-
9Arrange on your baking sheets, a couple inches apart so they have room to spread. Press down gently with your palm so they get that classic sugar cookie look.
-
10Bake for 10-13 minutes until just set at the edges (the centers should look a smidge underdone; they’ll finish up on the tray). Let them cool for 3-5 minutes on the pan before moving; or eat one hot and regret nothing.
CLICK FOR NUTRITION INFO
↑
Approximate Information for One Serving
Serving Size:
1 serving
Calories:
120cal
Protein:
1 gg
Fat:
5 gg
Saturated Fat:
0g
Trans Fat:
0g
Cholesterol:
0mg
Sodium:
0mg
Potassium:
0mg
Total Carbs:
17 gg
Fiber:
0g
Sugar:
0g
Net Carbs:
0g
Vitamin A:
0
Vitamin C:
0mg
Calcium:
0mg
Iron:
0mg
Nutrition Disclaimers
Number of total servings shown is approximate. Actual number of servings will depend on your preferred portion sizes.
Nutritional values shown are general guidelines and reflect information for 1 serving using the ingredients listed, not including any optional ingredients. Actual macros may vary slightly depending on specific brands and types of ingredients used.
To determine the weight of one serving, prepare the recipe as instructed. Weigh the finished recipe, then divide the weight of the finished recipe (not including the weight of the container the food is in) by the desired number of servings. Result will be the weight of one serving.
Did you make this recipe?
Please consider Pinning it!