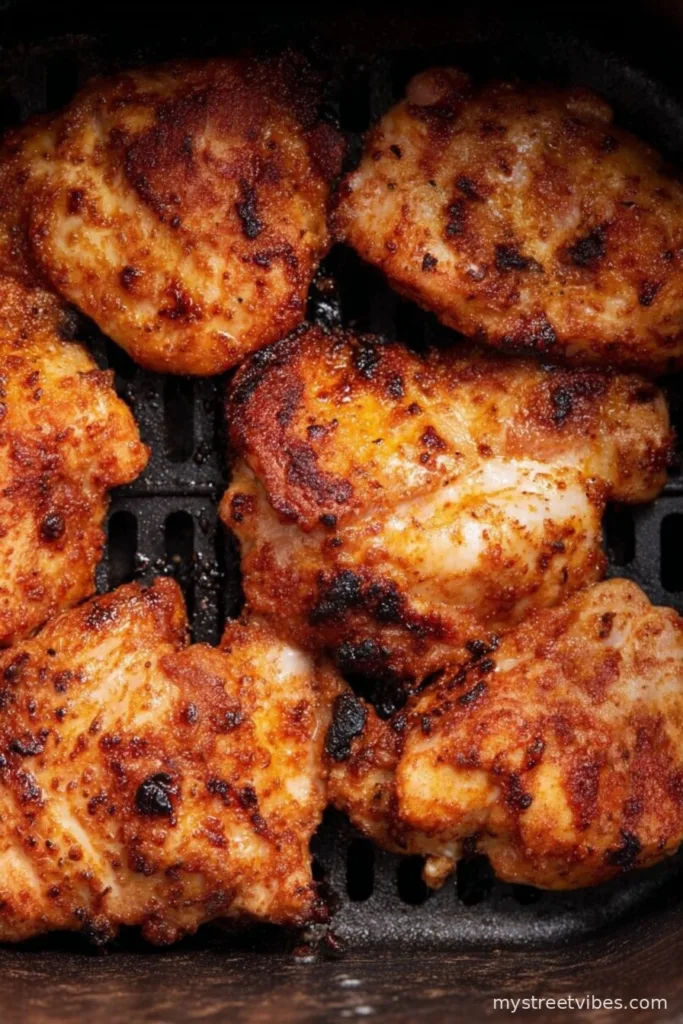
The Crispy Chicken Thighs That Win Dinner
Okay, real talk: If you’ve never tried tossing boneless, skinless Chicken Thighs in the air fryer, you’re probably missing out—at least, that’s what I said to my neighbor after she wondered what that amazing smell coming from my window was. I first cooked these on a Tuesday when, quite honestly, I barely had the energy to open the fridge (you know those days). Now, the air fryer does most of the work, and the chicken comes out golden and crispy, but juicy—sort of like the food you think you deserve after folding a week’s worth of laundry in one go.

Actually, this recipe is a bit of a mashup of what my grandma used to fry (in way too much oil!), but without the mess or the need to open every window in the house. My son calls these ‘magic meat pillows.’ I’m just glad he eats them without the chicken side-eye he reserves for my less successful efforts.
Why You’ll Love This (and Sometimes Crave It Out of Nowhere)
- I pull out this recipe when I want dinner ready before anyone has time to ask ‘what’s for dinner?’
- My family goes absolutely bonkers for these. (Even that one picky cousin, though he claims he ‘doesn’t like chicken.’ Sure, buddy.)
- No splattering oil, practically no cleanup, and, bonus, I don’t have to scrub the stove after.
- This recipe rescued many a night when I just couldn’t face another box of macaroni. Though, mac and cheese as a side still rocks.
The Ridiculously Simple Ingredient List
- 1.5 pounds boneless, skinless Chicken Thighs (I’ve actually used drumsticks when I ran out. Works, but you have to watch for bones. Grandma would cringe.)
- 2 tablespoons olive oil (Sometimes I wing it with avocado oil overall pretty similar)
- 1 teaspoon garlic powder (Granulated garlic works too, if that’s what’s lounging in your pantry)
- 1 teaspoon smoked paprika (Regular paprika if you must, but I’m partial to the smokey note—the family doesn’t notice either way)
- 1/2 teaspoon onion powder
- 1/2 teaspoon salt (I just pinch and scatter, but for you, here’s a measurement)
- 1/2 teaspoon black pepper (My uncle insists on white pepper but… it’s not the same)
- 1/2 teaspoon dried thyme (You can use Italian seasoning, but honestly, who’s checking?)
- 1 teaspoon cornstarch (Actually, this is my secret weapon for extra crispiness. You can skip it if you’re out.)
How I Actually Make These Crispy Air Fryer Thighs
- Pat the chicken thighs dry with some paper towels. Seriously, it helps—don’t skip, even if you’re in a rush (yes, I learned this the hard way once when they came out sort of mushy).
- Toss chicken in a big bowl. Glug in the olive oil and sprinkle all the spices, salt, and cornstarch right on top.
- Now, use your hands. It’s messy but you don’t get the same flavor if you skip this step (trust me, I tried mixing with a spoon one night—meh results).
- Preheat your air fryer to 400°F (about 200°C) for maybe 3–5 minutes. Actually, sometimes I forget this step and it still works. But preheating feels official.
- Arrange the chicken thighs in the basket in a single layer. A little overlap is fine, but don’t pile them up unless you want to do the world’s slowest batch cooking.
- Cook for 10 minutes. Open, flip them (I usually use tongs, though I’ve used a fork when the tongs were hiding in the dishwasher), and air fry for another 7–10 minutes. Peek at 7 minutes—if they look crispy, they’re ready.
- This is where I usually poke a piece with a knife just to be sure—juices should run clear, but if you see pink, cook another 2–3 minutes.
- Let the thighs rest for 5 minutes before wolfing them down (the patience part is tough here, but you really do get juicier chicken if you wait).

Notes (Things I Learned the Not-so-Fun Way)
- If you skip drying the chicken, it won’t crisp as well (and yeah, you might feel like you overcooked it, though it’s just wet)
- I tried adding fresh herbs before air frying—it got weird and burnt. Stick to dried for the cooking part, save fresh herbs for later
- Some air fryers run hotter. If yours makes toast in 30 seconds, maybe check the chicken halfway through
My Air Fryer Variation Experiment Log
- Parmesan crust? Actually, this is awesome: mix some grated Parmesan in with the spices
- I tried marinating the thighs overnight in yogurt—sounds fancy, but they kinda steamed instead of crisping. Wouldn’t do that again
- Lemon zest mixed in with the paprika? Yes, please. Just a half teaspoon, it’s lovely

What You Need (Or What You Can Use When You Don’t Have the Gadget)
- Air fryer—obviously. But, real talk, oven at 425°F and a wire rack does the trick in a pinch (takes a bit longer, not as crispy, but almost as good)
- Mixing bowl (or just use a big zip-top bag if you’re not in the mood for dishes)
- Tongs or a big fork—really, last Tuesday I used clean hands to flip and survived to tell the tale
Will They Keep?
Leftovers can chill in the fridge up to 3 days, in a covered container. Though honestly, in my house it never lasts more than a day! If you want that crisp back, a super quick (like 3–4 minute) spin in the air fryer does wonders. Cold, straight from the fridge, it makes a mean sandwich, though.
How We Serve (And Sometimes Fight Over the Last Piece)
These go with just about anything; I love them sliced up over a tangy slaw or with good old mashed potatoes (my brother dunks his in ranch, which I don’t quite get, but hey, to each their own). If you’re like us and have that one person who insists on rice, you’re covered too. And on sultry August nights, I actually like it cold with salad—call me weird, but it works!
Tricks and Trouble Spots (Learned Mostly the Hard Way)
- Once I rushed the mixing step. The seasoning clumped, so pepper bomb in one bite and bland in the next. Really, rub it all in well
- Piling up too many thighs slows everything down and you lose that beautiful crisp edge. More batches are better than chicken that tastes like it skipped leg day
- Skipping preheating? Sometimes it’s fine. Other times the bottom’s soggy. So, I mostly preheat… but I won’t lie, not always
Some Real FAQ (Because People Actually Ask Me These Things!)
- Can I use bone-in thighs?
- Yup, but they’ll need a good 10 extra minutes (sometimes even more, depending on size). Check them with a thermometer—it should read 165°F.
- Is cornstarch absolutely necessary?
- No, but I think it helps with crispiness. Flour works in a pinch, but cornstarch gives that almost fried effect.
- Can I skip the oil?
- You can, but I’d say they come out much juicier with a little oil. I once tried without and, well, let’s not do that again.
- Can you freeze these?
- Totally – but I like the texture way more freshly done. If you must freeze, cool first then freeze in a single layer before stacking. Re-crisp in the air fryer for that magic crunch.
- What temp should I set my air fryer to?
- 400°F/200°C usually works spot on, but if your machine is a bit cranky, check at 8 and 15 minutes just to make sure you’re not making chicken jerky.
And if you catch yourself tasting one before serving the whole batch: trust me, happens every single time. (If anyone asks, you’re just testing for doneness, right?)
Ingredients
- 1.5 pounds boneless, skinless chicken thighs (I’ve actually used drumsticks when I ran out. Works, but you have to watch for bones. Grandma would cringe.)
- 2 tablespoons olive oil (Sometimes I wing it with avocado oil overall pretty similar)
- 1 teaspoon garlic powder (Granulated garlic works too, if that’s what’s lounging in your pantry)
- 1 teaspoon smoked paprika (Regular paprika if you must, but I’m partial to the smokey note—the family doesn’t notice either way)
- 1/2 teaspoon onion powder
- 1/2 teaspoon salt (I just pinch and scatter, but for you, here’s a measurement)
- 1/2 teaspoon black pepper (My uncle insists on white pepper but… it’s not the same)
- 1/2 teaspoon dried thyme (You can use Italian seasoning, but honestly, who’s checking?)
- 1 teaspoon cornstarch (Actually, this is my secret weapon for extra crispiness. You can skip it if you’re out.)
Instructions
-
1Pat the chicken thighs dry with some paper towels. Seriously, it helps—don’t skip, even if you’re in a rush (yes, I learned this the hard way once when they came out sort of mushy).
-
2Toss chicken in a big bowl. Glug in the olive oil and sprinkle all the spices, salt, and cornstarch right on top.
-
3Now, use your hands. It’s messy but you don’t get the same flavor if you skip this step (trust me, I tried mixing with a spoon one night—meh results).
-
4Preheat your air fryer to 400°F (about 200°C) for maybe 3–5 minutes. Actually, sometimes I forget this step and it still works. But preheating feels official.
-
5Arrange the chicken thighs in the basket in a single layer. A little overlap is fine, but don’t pile them up unless you want to do the world’s slowest batch cooking.
-
6Cook for 10 minutes. Open, flip them (I usually use tongs, though I’ve used a fork when the tongs were hiding in the dishwasher), and air fry for another 7–10 minutes. Peek at 7 minutes—if they look crispy, they’re ready.
-
7This is where I usually poke a piece with a knife just to be sure—juices should run clear, but if you see pink, cook another 2–3 minutes.
-
8Let the thighs rest for 5 minutes before wolfing them down (the patience part is tough here, but you really do get juicier chicken if you wait).
CLICK FOR NUTRITION INFO
↑
Approximate Information for One Serving
Serving Size:
1 serving
Calories:
265cal
Protein:
30 gg
Fat:
14 gg
Saturated Fat:
0g
Trans Fat:
0g
Cholesterol:
0mg
Sodium:
0mg
Potassium:
0mg
Total Carbs:
3 gg
Fiber:
0g
Sugar:
0g
Net Carbs:
0g
Vitamin A:
0
Vitamin C:
0mg
Calcium:
0mg
Iron:
0mg
Nutrition Disclaimers
Number of total servings shown is approximate. Actual number of servings will depend on your preferred portion sizes.
Nutritional values shown are general guidelines and reflect information for 1 serving using the ingredients listed, not including any optional ingredients. Actual macros may vary slightly depending on specific brands and types of ingredients used.
To determine the weight of one serving, prepare the recipe as instructed. Weigh the finished recipe, then divide the weight of the finished recipe (not including the weight of the container the food is in) by the desired number of servings. Result will be the weight of one serving.
Did you make this recipe?
Please consider Pinning it!