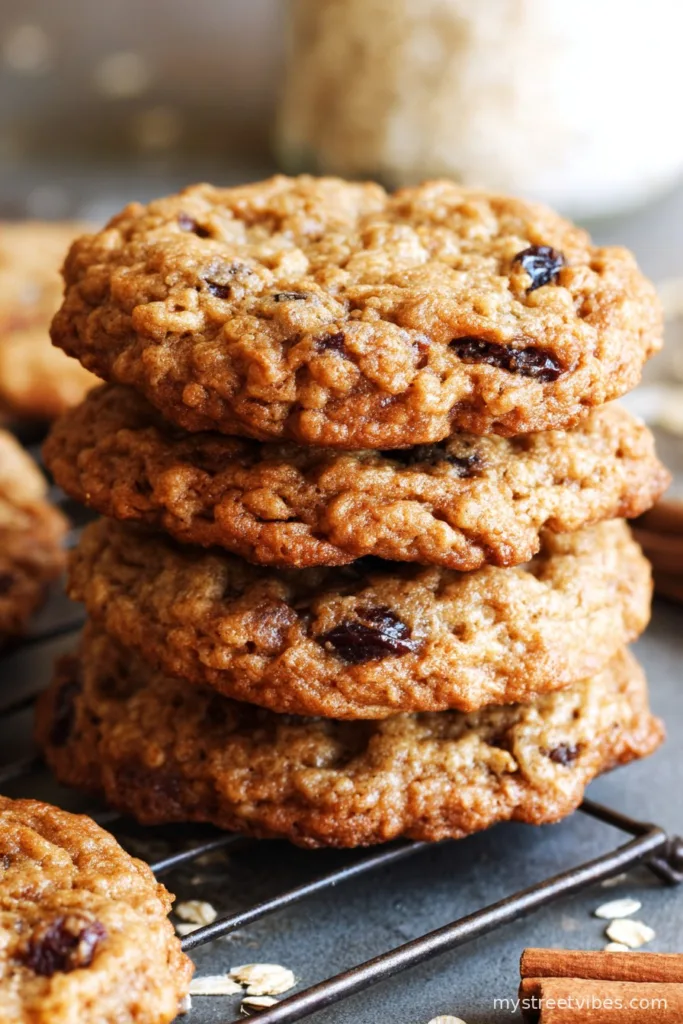
So, About These Chewy Oatmeal Raisin Beauties
Let me tell you, I used to think oatmeal raisin cookies were just the “pretend you’re being healthy” dessert at church potlucks. You know, the ones you only eat when the chocolate chip platter is empty? But—somewhere around the 18th batch (don’t ask), I finally figured out how to make these silly things so thick, so soft, and so perfectly chewy that now my brother actually requests them instead of anything with chocolate or peanut butter. Madness. The real confession: I’d bake these just for the smell alone—it’s pure coziness in the oven, and it sort of makes cleaning up flour footprints off the floor worthwhile.

Why I Keep Making These (And Why My Family Fights Over Them)
I make this recipe whenever the weather turns a bit grumpy or I get nostalgic for Sunday kitchen chaos. My dad swears they taste just like the ones his auntie Dot used to make, but honestly, I think he’s just buttering me up for a second (third) batch. My family goes absolutely bananas for them because they’re not dry cardboard (no offense, store-bought kinds) and the raisins don’t turn into weird little pebbles. Plus, if you’re like me and have a few baking fails under your belt (who hasn’t forgotten the baking soda once?), this recipe is forgiving enough to still turn out lovely.
What You’ll Need (And What You Can Get Away With)
- 1 cup (225g) unsalted butter, softened — if you only have salted, just skip the extra salt. Or be lazy like me one time and melt it because you forgot to set it out. Still works!
- 1 cup (200g) packed light brown sugar — on rare desperate days, dark brown gives a more caramelly vibe
- 1/4 cup (50g) granulated sugar — sometimes I just eyeball it and call it good enough
- 2 large eggs — my cousin once swapped in flax eggs and said it was fine, fyi
- 2 teaspoons vanilla extract — my grandmother always insisted on Nielsen-Massey, but honestly any version works fine
- 1 1/2 cups (185g) all-purpose flour
- 1 teaspoon baking soda
- 1/2 teaspoon salt
- 1 1/2 teaspoons ground cinnamon — or more, if you’re feeling sassy
- 3 cups (270g) old-fashioned rolled oats — I sometimes use quick oats if that’s what’s left in the tin. Still chewy, don’t panic
- 1 1/4 cups (175g) raisins — or a mix of raisins and chopped dates for extra gooeyness
- 1/2 cup (65g) chopped walnuts or pecans (optional, but I kinda love the crunch)
Here’s How It Actually Goes Down
- Preheat your oven to 350 F (175 C). You can line a couple of baking sheets with parchment if you want less cleanup later, but if not, just give ‘em a quick greasing. I sometimes forget and just use the same pan twice (it’s fine).
- Cream together the softened butter with both the brown and granulated sugar in a big bowl until it’s light and fluffy. I use a hand mixer, but an old wooden spoon works if you need a workout. This is where I usually sneak a tiny fingerful, just for quality control. Don’t tell.
- Beat in the eggs one at a time, followed by the vanilla extract. Don’t worry if it looks a bit weird at this point – I promise it always does.
- In a separate bowl, mix the flour, baking soda, salt, and cinnamon. Dump this into the wet stuff and stir until it’s just combined — don’t overthink it.
- Stir in the oats, raisins, and nuts (if using). The dough should be thick and kind of hefty. If it’s really sticky, pop it in the fridge for 20 minutes. Or just bake as is if you’re impatient, just know they’ll spread a bit more.
- Scoop big-ish spoonfuls (about 2 tablespoons or a golf ball-sized chunk) onto your prepared sheets. Space ‘em out or they’ll fuse together into a mega-cookie. Not that that’s the worst thing that could happen.
- Bake for about 11 to 13 minutes. The edges should look set but the centers will seem a touch gooey. Take them out anyway—trust me, carryover heat makes magic happen.
- Let them cool right on the tray for 5 minutes; then transfer to a rack (or, you know, just eat straight from the sheet if you can’t wait…guilty as charged).
What I’ve Figured Out by Fudging Things
- If the dough seems impossibly sticky, chilling really does help. I tried skipping this once (impatience) and ended up with pan-sized cookies.
- The cookies will look underdone in the middle, but that’s exactly what you want.
- You can totally swap out the raisins—my neighbor puts chocolate chips, and I’ll admit, it’s excellent in its own way (just don’t tell dad).
- On humid days, your cookies might spread more. I usually just blame the weather for everything that goes sideways in the kitchen anyway.
Cookie Experiments and Oddball Variations
So, I’ve added dried cranberries (pretty tangy; nice), chopped dried apricots (a bit too sweet for me), and once, disastrously, banana chips (don’t do it—they turn weirdly chewy in a bad way). I sometimes throw some coconut flakes in for beach day vibes, or mix half chocolate chips, half raisins—my indecision, your gain. Pro tip: don’t try subbing all oats with steel cut ones—they never soften up. Ask me how I know.

What If I Don’t Have Fancy Gear?
I use an electric hand mixer when I can find both beaters, but a regular old whisk, a big spoon, and some elbow grease totally do the trick. As for cookie scoops—meh, a tablespoon or ice cream scoop is fine. Or, clean hands work; just wash up first. Nobody ever sends cookies back for being slightly misshaped.
How These Cookies Actually Keep
Store them in an airtight tin or, honestly, any old plastic container you have—just toss a piece of parchment in between layers if you’re fancy. They’ll stay chewy for 3 days at room temp (maybe? I can’t say for sure, they never last past day one here), or you can freeze the dough balls and bake cookies on demand. Dangerously enabling, but useful for late-night cravings.
How We Serve (and Occasionally Squabble Over) Them
I love these warm with a cold glass of oat milk, but my sister dunked hers in coffee once and now that’s our unofficial midafternoon snack ritual. During the holidays, my aunt likes to crumble them over vanilla ice cream for a kind of “lazy apple crisp” situation. There’s no wrong way, I say.
Baking Regrets and Pro Tips (Oof, the Stories)
- Let the cookies sit for a few minutes out of the oven—if you try to remove them right away, you’ll have delicious oatmeal shrapnel instead of cookies (been there).
- I once tried baking two trays at once, but the bottoms got weirdly dark so, actually, one pan at a time works better if you can.
- Don’t rush the creaming step; otherwise, the cookies come out a bit dense instead of fluffy. Yes, I learned this the hard way.
FAQ—Because Yes, People Actually Ask Me
- Can I make these gluten-free? Yep, just use a good cup-for-cup GF blend and make sure your oats are certified GF. Textures a bit different, but still tasty.
- Do I have to soak the raisins first? You can, but I almost never remember. They’re juicier if you soak ’em in warm water for 10 minutes, though. Sometimes I just pretend I did.
- Can I freeze the baked cookies? Absolutely. Thaw them at room temp or—okay, don’t judge—I sometimes microwave one for 10 seconds. Still soft!
- Why did my cookies turn out flat? Could be overmixing, or the dough being too warm—it happens. Sometimes it’s cosmic. Or maybe too much butter? (I’m still trying to work this one out myself.)
- Is this recipe halved easily? For sure! Or double it if your neighbors are popping round.
And one last thing—if you find a forgotten raisin on the counter while you’re cleaning up, that’s not a sign to start another batch. Probably. Unless you want to.
Ingredients
- 1 cup (225g) unsalted butter, softened — if you only have salted, just skip the extra salt. Or be lazy like me one time and melt it because you forgot to set it out. Still works!
- 1 cup (200g) packed light brown sugar — on rare desperate days, dark brown gives a more caramelly vibe
- 1/4 cup (50g) granulated sugar — sometimes I just eyeball it and call it good enough
- 2 large eggs — my cousin once swapped in flax eggs and said it was fine, fyi
- 2 teaspoons vanilla extract — my grandmother always insisted on Nielsen-Massey, but honestly any version works fine
- 1 1/2 cups (185g) all-purpose flour
- 1 teaspoon baking soda
- 1/2 teaspoon salt
- 1 1/2 teaspoons ground cinnamon — or more, if you’re feeling sassy
- 3 cups (270g) old-fashioned rolled oats — I sometimes use quick oats if that’s what’s left in the tin. Still chewy, don’t panic
- 1 1/4 cups (175g) raisins — or a mix of raisins and chopped dates for extra gooeyness
- 1/2 cup (65g) chopped walnuts or pecans (optional, but I kinda love the crunch)
Instructions
-
1Preheat your oven to 350 F (175 C). You can line a couple of baking sheets with parchment if you want less cleanup later, but if not, just give ‘em a quick greasing. I sometimes forget and just use the same pan twice (it’s fine).
-
2Cream together the softened butter with both the brown and granulated sugar in a big bowl until it’s light and fluffy. I use a hand mixer, but an old wooden spoon works if you need a workout. This is where I usually sneak a tiny fingerful, just for quality control. Don’t tell.
-
3Beat in the eggs one at a time, followed by the vanilla extract. Don’t worry if it looks a bit weird at this point – I promise it always does.
-
4In a separate bowl, mix the flour, baking soda, salt, and cinnamon. Dump this into the wet stuff and stir until it’s just combined — don’t overthink it.
-
5Stir in the oats, raisins, and nuts (if using). The dough should be thick and kind of hefty. If it’s really sticky, pop it in the fridge for 20 minutes. Or just bake as is if you’re impatient, just know they’ll spread a bit more.
-
6Scoop big-ish spoonfuls (about 2 tablespoons or a golf ball-sized chunk) onto your prepared sheets. Space ‘em out or they’ll fuse together into a mega-cookie. Not that that’s the worst thing that could happen.
-
7Bake for about 11 to 13 minutes. The edges should look set but the centers will seem a touch gooey. Take them out anyway—trust me, carryover heat makes magic happen.
-
8Let them cool right on the tray for 5 minutes; then transfer to a rack (or, you know, just eat straight from the sheet if you can’t wait…guilty as charged).
CLICK FOR NUTRITION INFO
↑
Approximate Information for One Serving
Serving Size:
1 serving
Calories:
190 caloriescal
Protein:
3gg
Fat:
8gg
Saturated Fat:
0g
Trans Fat:
0g
Cholesterol:
0mg
Sodium:
0mg
Potassium:
0mg
Total Carbs:
28gg
Fiber:
0g
Sugar:
0g
Net Carbs:
0g
Vitamin A:
0
Vitamin C:
0mg
Calcium:
0mg
Iron:
0mg
Nutrition Disclaimers
Number of total servings shown is approximate. Actual number of servings will depend on your preferred portion sizes.
Nutritional values shown are general guidelines and reflect information for 1 serving using the ingredients listed, not including any optional ingredients. Actual macros may vary slightly depending on specific brands and types of ingredients used.
To determine the weight of one serving, prepare the recipe as instructed. Weigh the finished recipe, then divide the weight of the finished recipe (not including the weight of the container the food is in) by the desired number of servings. Result will be the weight of one serving.
Did you make this recipe?
Please consider Pinning it!