Alright, pull up a chair and let’s chat cinnamon rolls. You know how some recipes are just destined to become your rainy Sunday tradition? That’s these beauties. The first time I made gluten free cinnamon rolls, I was convinced they’d turn out as hard as hockey pucks (or maybe frisbees, depends what sport you’re into). Actually, they were a little weird-shaped, but my sister still asked for thirds, so, mission accomplished. The smell alone—cinnamon and sugar puffing through the house—made my dog park himself by the oven, staring at me like I owed him a slice. Little does he know, chocolate is more my jam when I bake for myself, but these rolls hold up their end of the bargain every time.
Why I Keep Making These (Even When I’m Outta Milk)
I make this when it’s snowing outside, or when I need something to bribe my kids to get out of bed before midday—either works, honestly. My family goes bananas for these because, unlike a lot of gluten free bakes, they’re actually soft. Not “good enough for what they are” soft, but I’d-serve-these-to-gluten-eaters-and-not-tell-them soft. Plus, it’s a pretty forgiving recipe. I mean, sure, I’ve spilled flour everywhere, used almond milk instead of regular, and once grabbed brown sugar instead of white for the filling (not a bad move, for the record).
What You’ll Need (Plus Some Substitution Shenanigans)
- 2 cups gluten free all-purpose flour (I use Bob’s Red Mill, but honestly, any blend that says ‘1:1’ on the package usually plays nice.)
- 1 tbsp baking powder (Yeah, my gran swore by baking soda, but trust me—stick with powder here unless you want a kitchen chemistry experiment…which, hey, maybe you do!)
- 1/4 tsp salt
- 3 tbsp granulated sugar (Have definitely swapped this for coconut sugar; tastes slightly nuttier)
- 1/2 cup unsalted butter, melted and cooled a bit (No butter? I’ve used coconut oil in a pinch, but it changes the vibe—still good, just more… tropical.)
- 2/3 cup milk of choice (Almond, oat, regular dairy, whatever you’ve got. I once used hazelnut ‘cause it was all I had. Worked.)
- 2 eggs, at room temp
- For the filling: 1/2 cup brown sugar (or demerara, but it’s a pain to stir in), 2 tbsp cinnamon, 3 tbsp softened butter
- For the icing: 1 cup powdered sugar, 1–2 tbsp milk, 1/2 tsp vanilla extract
How To: My (Sometimes Rambling) Step-By-Step
- Preheat to 350°F (or about 180°C if you use that system) and rub a bit of oil on your baking tin. If you forget this, just make peace with a stuck-on bottom. Been there.
- Whisk flour, baking powder, salt, and sugar together in a big bowl. In a separate bowl (or the same one, if you don’t feel like washing extra dishes), mix melted butter, milk, and eggs together.
- Add the wet to the dry, stir until it just comes together. Don’t overthink it—it’ll be sticky. Gluten free dough rarely looks like those bread ads, so relax if it’s shaggy. Sometimes I use a spatula, sometimes just my hands (clean, promise). If it feels unrollable, sprinkle on a little extra flour. This is where I usually sneak a taste (raw eggs; I know, I know… but honestly, I still do it).
- Dump the dough on a floured piece of baking paper. Pat it with floury hands into a rough rectangle, about a half inch thick—mine’s usually kind of oval. No big deal.
- Slather on the softened butter (use your hands if you’re impatient). Mix the brown sugar and cinnamon, sprinkle over evenly. (I say evenly, but sometimes it’s a little lopsided. Still good.)
- Roll it up longways, using the paper to help if it’s sticky. Don’t worry if it cracks here and there—just patch it. Gently slice—should make about 8-10 rounds. Pop those straight into your greased tin.
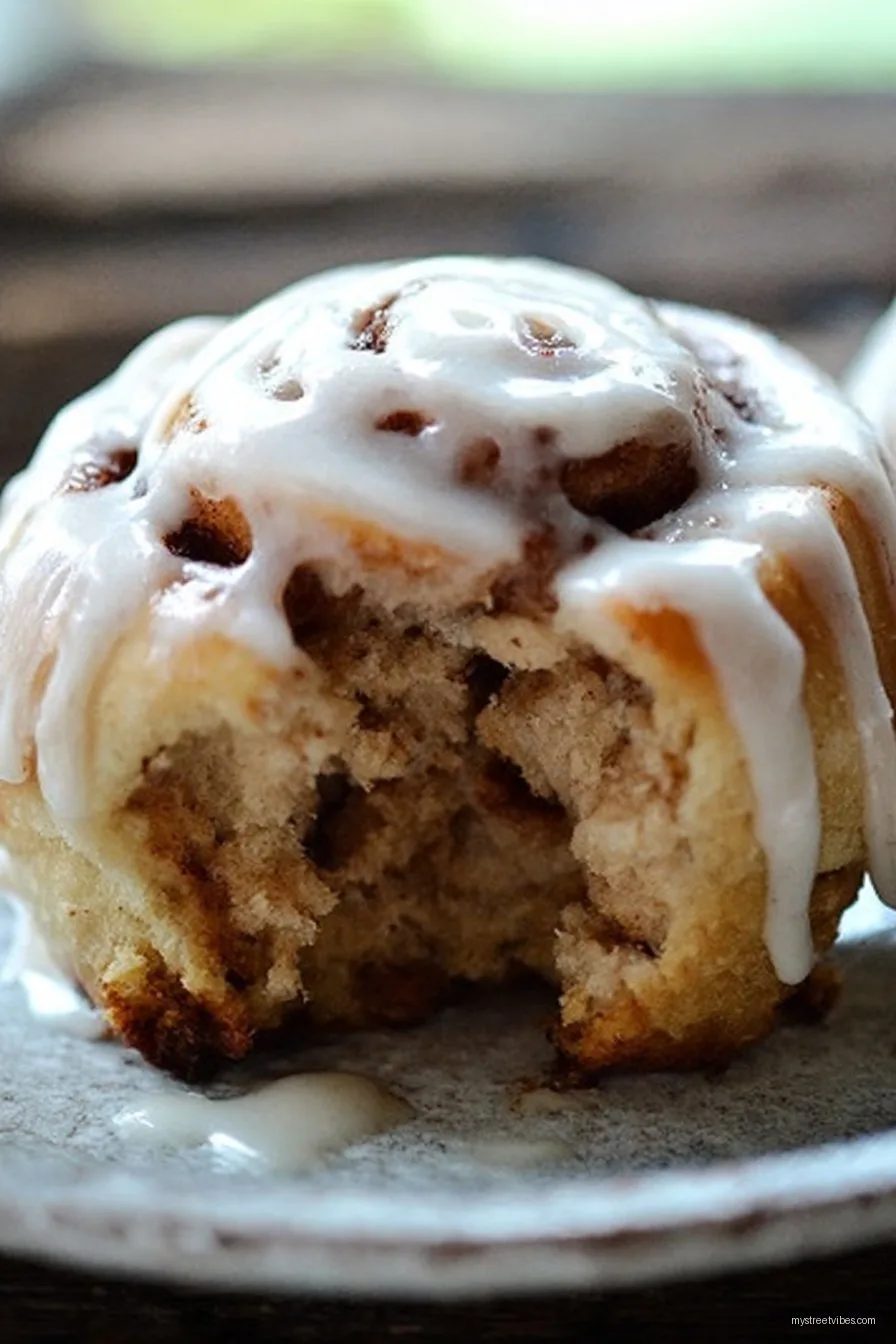
- Bake 22–28 minutes. They’re done when they’re puffed, golden at the edges, and you can’t resist the smell any longer. If the tops look pale but a toothpick comes out clean, trust your nose more than your eyes.
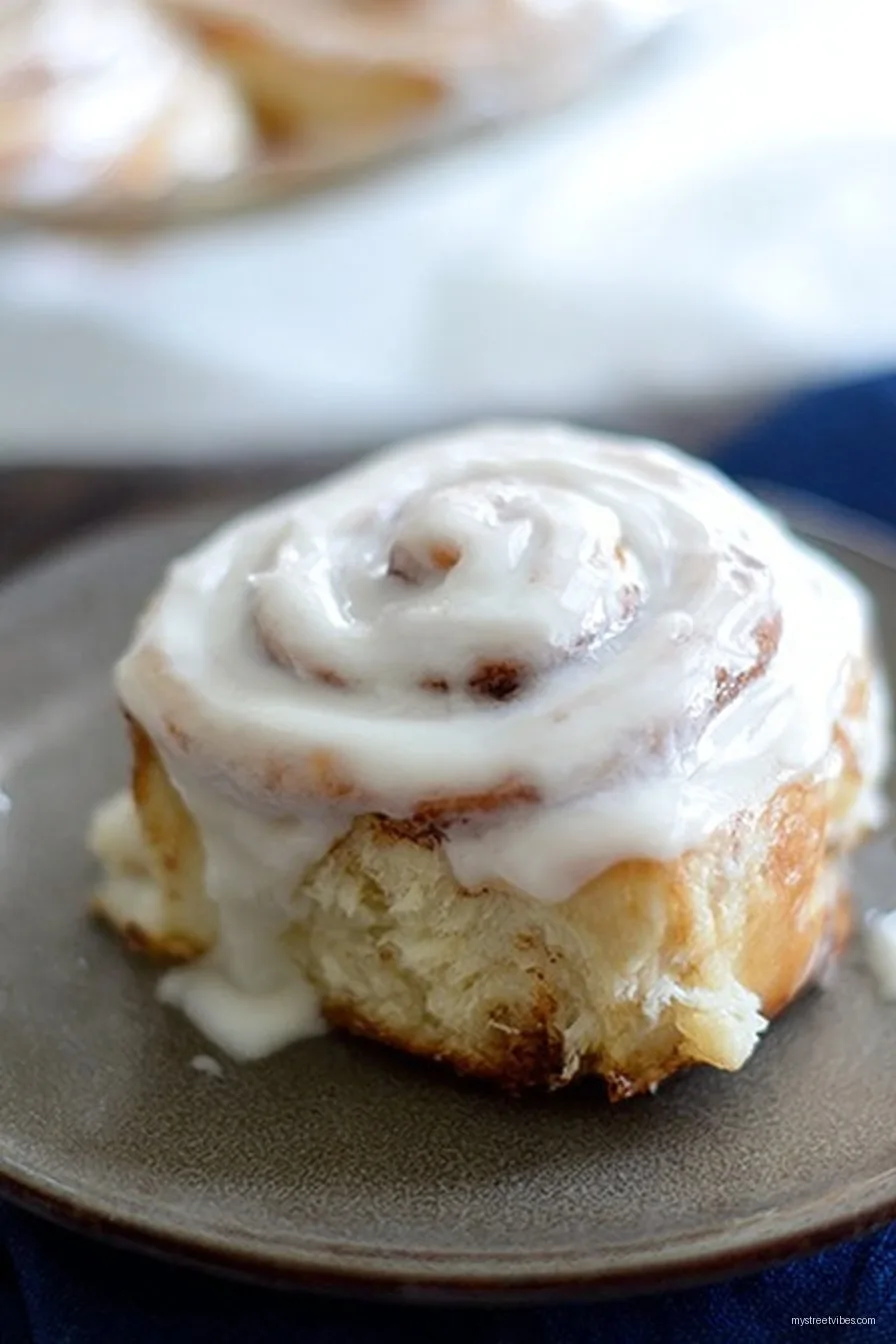
- While they’re baking, whisk up your icing. Add milk bit by bit; you want it drizzly, not runny. Spoon generously over the warm rolls. The ooze factor is key, I reckon.
Random Notes (Learned the Hard Way… Usually)
- The dough isn’t like regular cinnamon roll dough and that’s okay; if it’s really sticky, chill it for 10 mins. I only figured this out after half a dozen batches—it helps.
- Not all gluten free blends are created equal. If your dough feels weirdly wet, add a smidge more flour. If it’s dry, splash more milk. Admittedly, it took me too long to trust my gut on this instead of the bag instructions.
- If your edges look a little burnt but you feel they’re not done… foil hats (pieces of foil) over the tops fix that quick.
What I’ve Tried (And What I Plain Gave Up On)
- Adding chopped pecans to the filling is awesome. Raisins were divisive. My mum cheered; my kids mutinied.
- Subbing maple syrup for sugar in the filling sounded good but turned the middle kind of goopy and runny. Not my greatest idea.
- Lemon zest in the icing? Weirdly nice—especially in spring.
Kitchen Gear (But Here’s What To Do If You Don’t Have It)
I use a rolling pin, but on those mornings when it’s somehow vanished (kids, maybe?), a clean wine bottle works just as well—seriously. Don’t stress about fancy stand mixers; a big wooden spoon and elbow grease does the trick (see Sally’s Baking Addiction for more homemade cinnamon roll chat). And if you have a pizza cutter, it slices the dough logs up beautifully and makes me feel a bit more professional.
How to Store These (If You Ever Have Leftovers… Ha!)
Keep ‘em in a tin or airtight thing at room temp max 2 days. Fridge works too, but they firm up (a zap in the microwave brings ‘em back to life). To be honest, these are rarely around longer than breakfast in my house!
Serving Ideas—and a Side Note About Breakfast Traditions
I reckon these cinnamon rolls are best with hot coffee (pot brewed, none of that pod nonsense). Sometimes, if it’s a special occasion, I’ll sprinkle extra cinnamon on top or serve with cream cheese frosting instead of the simple glaze. On Christmas mornings, I’ve even made a double batch. Full confession: cold leftover rolls, next day, with strong tea? My favourite.
Some Lessons I Learned by Messing Up First
- I once rushed the rising time because I was running late—don’t bother; they really do need at least 20 mins rest pre-bake to loosen up, or you’ll get squat, sad rolls.
- Don’t overspread the butter or the filling will leak, bubble, and cement your rolls to the tin. That clean-up is no joke.
- Actually, I find it works better if you don’t cut them too thin; fatter rolls stay softer.
Roll Call: People Actually Ask Me This Stuff!
- Can I make these vegan? Yep—just use flax eggs and vegan butter. I’ve only tried it once, and it was fine, but the texture’s slightly less pillowy. Still gets eaten, no worries!
- Why is my dough so sticky? Oh, that’s normal for gluten free! Just chill it for a few minutes, maybe dust a little more flour on when rolling. Or, use wet hands (I know, sounds weird, works great).
- Can I freeze these? Sure thing! Freeze after baking; you can reheat them in the microwave or oven, but icing them after thawing is less messy.
- What about making them ahead? You can assemble, cover, and chill the rolls overnight; bake in the morning. Makes for better sleep and an impressive breakfast.
- Do I have to use cinnamon? I mean… they’re cinnamon rolls. But hey, cardamom is good too, or mixed spice. Never tried chili powder—don’t think I will.
If you’re as into all-things-cozy as me, I totally recommend checking out Minimalist Baker’s variation too. But at the end of the day, this recipe’s my home base, imperfection and all. Let me know what wild experiments you pull off with it—unless you try chili, then maybe don’t tell me.
Ingredients
- 2 1/2 cups gluten free all-purpose flour blend
- 1/4 cup granulated sugar
- 1 packet instant yeast (2 1/4 tsp)
- 1/2 teaspoon salt
- 3/4 cup warm milk (dairy or non-dairy)
- 1/4 cup unsalted butter, melted
- 2 large eggs
- 1/2 cup brown sugar (for filling)
- 2 teaspoons ground cinnamon
- 3 tablespoons softened butter (for filling)
- 1/2 cup powdered sugar (for glaze)
- 1-2 tablespoons milk (for glaze)
Instructions
-
1In a large bowl, mix together gluten free flour, sugar, yeast, and salt until combined.
-
2Add warm milk, melted butter, and eggs to the dry ingredients. Mix until a sticky dough forms.
-
3Transfer the dough onto a floured surface. Roll out into a rectangle about 1/4-inch thick.
-
4Spread softened butter over the dough, then sprinkle with brown sugar and cinnamon.
-
5Carefully roll up the dough and cut into 8 equal rolls. Place them in a greased baking dish.
-
6Bake in a preheated oven at 350°F (175°C) for 22-25 minutes or until golden. Whisk powdered sugar and milk for glaze and drizzle over slightly cooled rolls.
CLICK FOR NUTRITION INFO
↑
Approximate Information for One Serving
Serving Size:
1 serving
Calories:
280 caloriescal
Protein:
5 gg
Fat:
9 gg
Saturated Fat:
0g
Trans Fat:
0g
Cholesterol:
0mg
Sodium:
0mg
Potassium:
0mg
Total Carbs:
44 gg
Fiber:
0g
Sugar:
0g
Net Carbs:
0g
Vitamin A:
0
Vitamin C:
0mg
Calcium:
0mg
Iron:
0mg
Nutrition Disclaimers
Number of total servings shown is approximate. Actual number of servings will depend on your preferred portion sizes.
Nutritional values shown are general guidelines and reflect information for 1 serving using the ingredients listed, not including any optional ingredients. Actual macros may vary slightly depending on specific brands and types of ingredients used.
To determine the weight of one serving, prepare the recipe as instructed. Weigh the finished recipe, then divide the weight of the finished recipe (not including the weight of the container the food is in) by the desired number of servings. Result will be the weight of one serving.
Did you make this recipe?
Please consider Pinning it!!