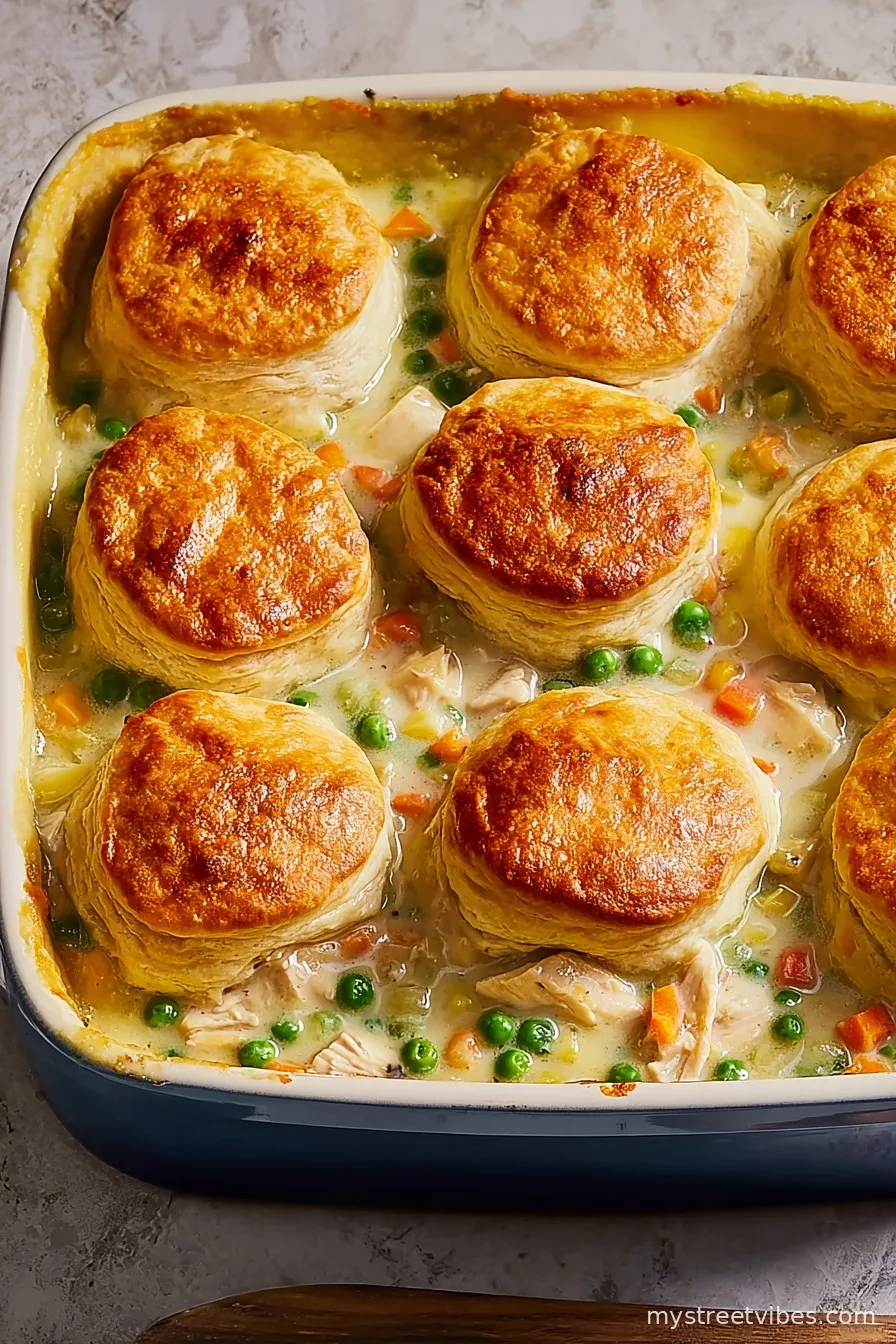
Catching Up & My (Messy) Love Letter to Chicken Pot Pie Casserole
So, the other day I was elbows-deep in flour looking for that rolling pin (which, of course, had disappeared right when I needed it most—a minor kitchen mystery for the ages), and all I could think about was how this Chicken Pot Pie Casserole has followed me around since I was a kid. It’s honestly less of a fancy recipe and more like a big ol’ edible hug. Way back, my mum would toss together something similar with leftovers and, weirdly, frozen peas that ALWAYS managed to find their way to the bottom of the pan. And I’ve sort of riffed on it ever since. If you’re after something humble and hearty—with a good chance of coming out wearing a bit of flour—here it is. (And if you’re anything like me and occasionally forget to preheat the oven, you’ll fit right in!)
Why I Keep Making Chicken Pot Pie Casserole (Over and Over…)
I make this on those nights where the idea of pie-crust seems deeply optimistic, but I still want something that feels like a Sunday dinner even if it’s, you know, Tuesday. My family goes absolutely wild for this because it’s a full meal—veggies, chicken, gravy, and that biscuit topping that’s never the same thickness twice. Plus, real talk: If I forgot to thaw chicken, I just grab a rotisserie bird from the shop. (Been there more times than I’d admit.) If there’s one thing I’ve learned: nobody gets fussy about homemade vs. shortcut, especially after a long day. Oh, and the leftovers (if—big if—there are any) reheat into something even better the next day. Or maybe that’s just my wishful thinking.
Here’s What You Need (& What I Sometimes Substitute)
- 2 cups cooked chicken, diced or shredded (rotisserie is my usual, but honestly any pre-cooked chicken—even leftover roast from yesterday—works)
- 1 medium onion, chopped (if I’m short on time, frozen mixed veg does the trick)
- 2 carrots, diced (sometimes I leave these chunky if I’m feeling lazy; my mum would probably roll her eyes)
- 1 cup frozen peas (or whatever green thing is threatening to go limp in the back of the fridge)
- 2 cloves garlic, minced (I use that jarred stuff sometimes, no shame)
- 1/3 cup butter (Grandma swore by salted, but I’ve used unsalted and it’s fine…probably)
- 1/3 cup all-purpose flour (I tried whole wheat once—it was edible, kinda dense)
- 2 cups chicken broth (Trader Joe’s is good, but use what you have)
- 1 cup milk (oat milk if feeling trendy; honestly, no one noticed)
- Salt & black pepper, to taste (I throw in extra pepper and regret it about one in five times)
- Biscuit topping:
- 2 cups biscuit mix (like Bisquick, or your own scratch biscuit dough if you’re ambitious)
- 2/3 cup milk (or just enough to make a soft dough—here’s where eyeballing is actually your friend)
Let’s Get Cooking! (Don’t Stress… It All Comes Together)
- Preheat your oven to 400°F. (Unless you forget, in which case just do it now—no judgment.)
- In a big ol’ skillet, melt the butter over medium heat, and add the onions and carrots. Cook these until they’re just a little soft—around 4-5 minutes. Toss in garlic, cook for about a minute. If you like a bit of bite, leave the carrots on the crisp side; if not, go longer.
- Stir in the flour and give it a good mix. This’ll look lumpy and weird—don’t freak out, it’s just roux doing its thing.
- Very slowly pour in the chicken broth and milk, whisking (or vigorously stirring with whatever is clean). Bring it to a simmer. It should thicken up after a couple minutes; kind of like a thick gravy. This is about where I start getting hungry and sneak a bite (careful, it’s hot!).
- Turn off the heat, then add in the chicken and peas. Season with salt and pepper (I taste here, but if you ask me my taste buds are a bit wild after 7pm).
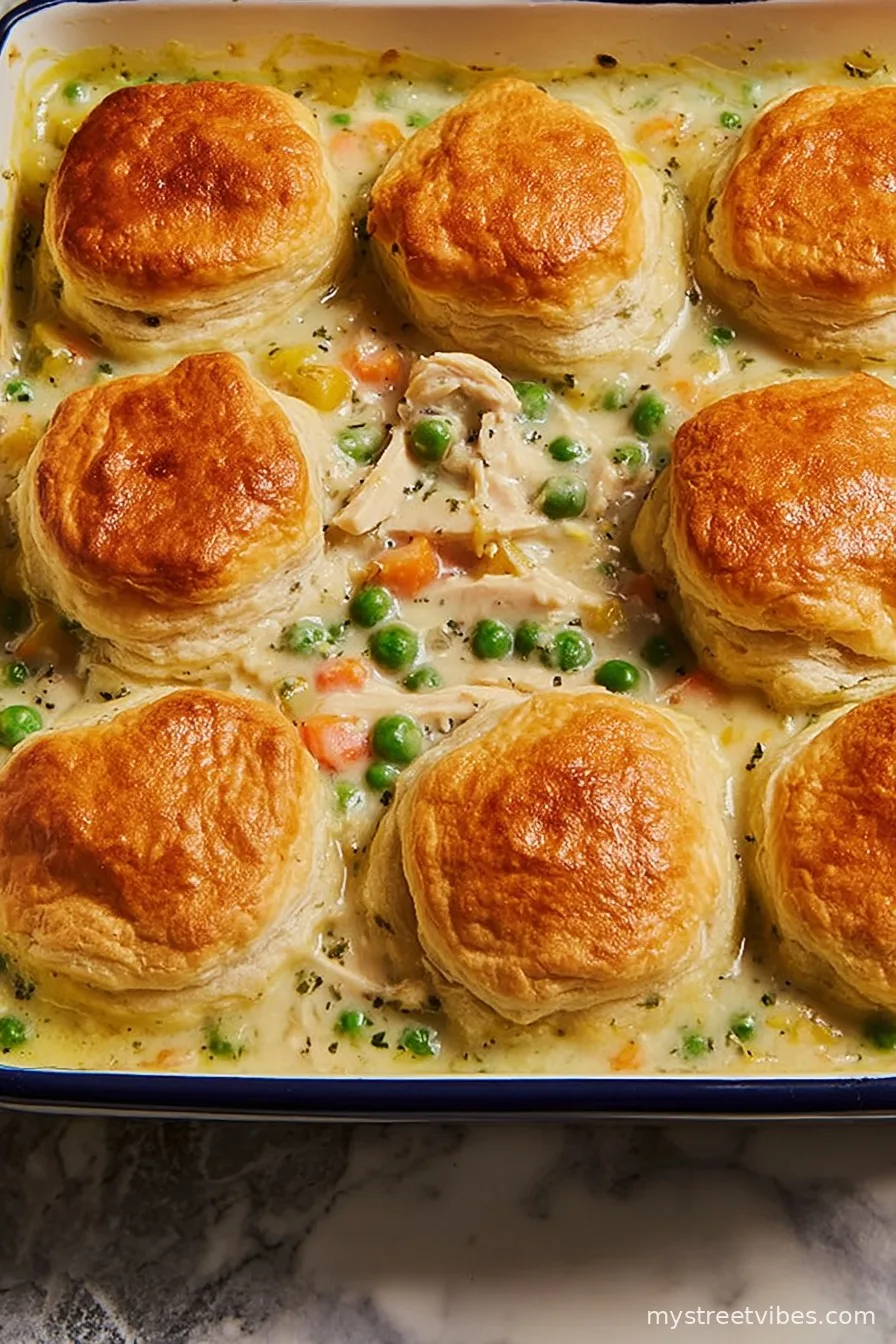
- Pour (well, scrape and ladle and nudge) that filling into a greased 9×13 baking dish. Sometimes I use a deep pie dish if I can’t find the right pan, and on second thought, the pie dish looks a bit fancier for guests.
- Mix up your biscuit dough in a separate bowl. If it looks a bit soupy, add another handful of mix. Drop by big spoonfuls over the top of the filling. No need to be fussy; imperfect blobs bake up beautifully.
- Bake in your hot oven for 25–30 minutes, or until the biscuit topping is golden and, if you peek underneath, bubbling and hot. This is where I once opened the oven too soon and had half a mushy topping—it was still good, just kinda…soggy.
- Let it sit for at least 10 minutes to firm up before you dig in. If you can’t wait, you’re not alone.
Some Notes (Learned the Hard Way…)
- If you use extra milk in the biscuit topping, it can get a bit gluey. Less is more (I learned that one night after a kitchen “experiment”).
- Biscuit blobs don’t need to be perfectly even. Some cookbooks disagree; I say chaos tastes better.
- If the top is browning too fast, just lay a bit of foil over—kind of like tucking it in for a nap.
- I once added fresh thyme—amazing. Dried rosemary? Absolutely not, it just pokes you in the gums.
Wild Variations I’ve Tried (and One I Regret)
- Turkey instead of chicken (post-Thanksgiving rescue mission—works a charm!)
- Added corn and diced potato—tasted fine but it was basically stew at that point
- Vegan version with mushroom broth and plant-based “chicken”—not bad, but next time I’d add more spice. Or maybe less, actually.
- Attempting a puff pastry top? It sure looks fancy but gets soggy underneath, at least for me
Equipment You Don’t Really Need
- Skillet or big saucepan. (No skillet? I’ve used a regular pot. Works. Less Instagrammable, but who cares?)
- 9×13 dish or deep pie plate (I once made mini versions in big mugs—those were fun but, uh, overflowed badly)
- Mixing bowl, spatula, courage
How I Store (Or Don’t Store) Leftovers
Okay, technically, you can wrap this up and chuck it in the fridge for 2-3 days. But honestly… it’s never survived more than 24 hours in my house. If you somehow manage to have extra, airtight containers are your friend. Reheat gently (microwave works, but oven’s best for keeping the top crispish).
Serving It Up The Way We Do
I serve big scoopfuls with a green salad (when I remember to buy lettuce). My brother used to douse his serving in ketchup—don’t ask me why. Sometimes we eat it straight from the pan on the sofa, which sounds uncouth but feels just right on a rainy weeknight.
Here’s What I Wish I’d Known (Pro-ish Tips I’ve Learned… Eventually)
- Letting it cool for ten minutes is not just a suggestion—it actually sets up. I once tried serving straight from the oven and it became chicken pot pie soup. Kids still ate it, but y’know.
- Do yourself a favor and make the filling the day before—it honestly tastes better (I’d argue with anyone). Warms up great, and you can do the biscuit top right before baking.
- If your biscuit mix is old, chuck it. Trust me; I learned that the hard way—odd flavors ensued!
Chicken Pot Pie Casserole Questions I Get All The Time
- Can I freeze this?
- Yes, but the topping gets a bit mushy after thawing. If you do freeze, I’d re-bake it uncovered to regain a bit of crunch. Though, my freezer is basically full of bits of mystery soup, so I rarely bother.
- Could I make it with no biscuit topping?
- Sure, just pop pie dough or even mashed taters on top (shepherd’s pie cousin, anyone?).
- What other veggies can I add?
- Practically anything you fancy—celery, green beans, corn (I mean, why not?). Just don’t get too wild unless you want a new family legend.
- How do I make it ahead?
- Do the whole filling up to a day ahead, but don’t add the biscuit dough until you’re ready to bake. Stops that weird gumminess that sometimes happens if you mix ahead.
One Last Thing (Okay, Two)
If you want even more ideas for hearty, weeknight casseroles, I usually check out Simply Recipes—great for inspiration and, if I’m honest, drool-worthy photos. And if you’re a biscuit fanatic, King Arthur’s basic biscuit recipe is my gold standard once in a blue moon when I’m feeling patient.
Anyway, this casserole has saved my bacon (or chicken, I guess?) more times than I can count. I hope you love it as much as we do. Let me know if you add any wild twists—sharing kitchen experiments is half the fun anyway!
Ingredients
- 3 cups cooked chicken breast, diced
- 2 cups frozen mixed vegetables (peas, carrots, corn, green beans)
- 1 can (10.5 oz) cream of chicken soup
- 1 cup milk
- 1 cup shredded cheddar cheese
- 1/2 teaspoon dried thyme
- 1/2 teaspoon black pepper
- 1 can (16 oz) refrigerated biscuit dough
Instructions
-
1Preheat the oven to 375°F (190°C). Grease a 9×13-inch baking dish.
-
2In a large mixing bowl, combine diced chicken, frozen mixed vegetables, cream of chicken soup, milk, shredded cheddar cheese, dried thyme, and black pepper. Mix well to combine.
-
3Pour the chicken mixture into the prepared baking dish and spread evenly.
-
4Separate the biscuit dough into pieces and place them on top of the chicken mixture, slightly overlapping if needed.
-
5Bake in the preheated oven for 30-35 minutes, or until the biscuits are golden brown and the filling is bubbly.
-
6Let the casserole rest for 5 minutes before serving.
CLICK FOR NUTRITION INFO
↑
Approximate Information for One Serving
Serving Size:
1 serving
Calories:
425 caloriescal
Protein:
26gg
Fat:
19gg
Saturated Fat:
0g
Trans Fat:
0g
Cholesterol:
0mg
Sodium:
0mg
Potassium:
0mg
Total Carbs:
38gg
Fiber:
0g
Sugar:
0g
Net Carbs:
0g
Vitamin A:
0
Vitamin C:
0mg
Calcium:
0mg
Iron:
0mg
Nutrition Disclaimers
Number of total servings shown is approximate. Actual number of servings will depend on your preferred portion sizes.
Nutritional values shown are general guidelines and reflect information for 1 serving using the ingredients listed, not including any optional ingredients. Actual macros may vary slightly depending on specific brands and types of ingredients used.
To determine the weight of one serving, prepare the recipe as instructed. Weigh the finished recipe, then divide the weight of the finished recipe (not including the weight of the container the food is in) by the desired number of servings. Result will be the weight of one serving.
Did you make this recipe?
Please consider Pinning it!!