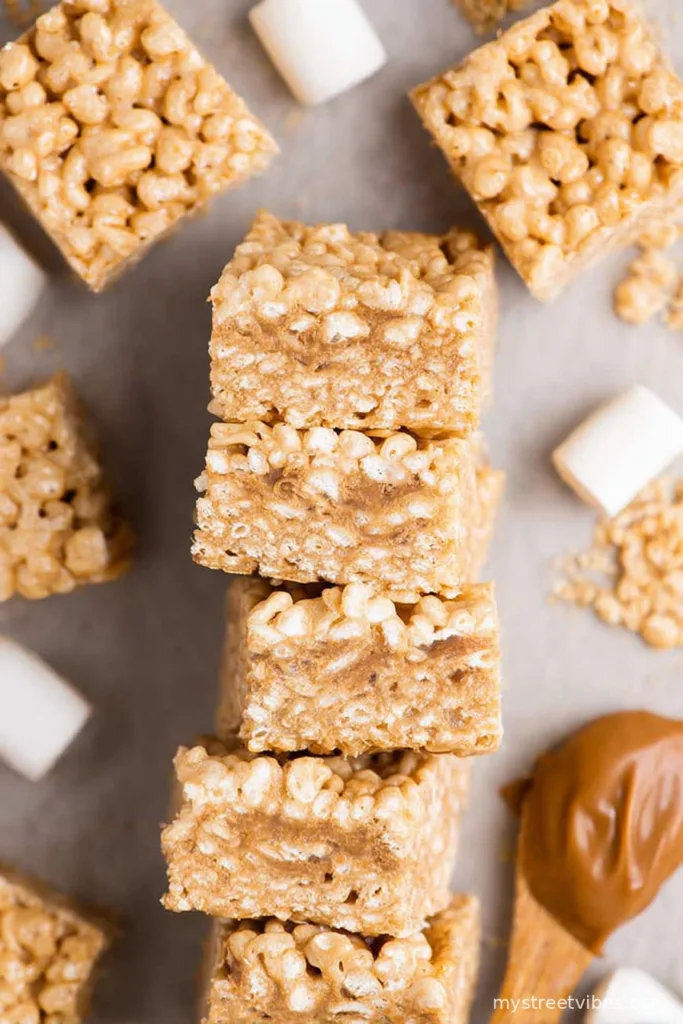
Let Me Tell You About Biscoff Rice Krispie Treats…
I have this theory: every family gets one recipe they guard like a dragon with treasure. For mine, it’s these Biscoff Rice Krispie Treats—well, at least they’re the only thing my nephew requests, so I’m calling that a win. I still remember the first time I made these, scatterbrained as ever, and managed to drop half the marshmallows behind the toaster (don’t ask). Big surprise: they still turned out delicious, and honestly? That’s what hooked me. Oh, and if you ever go wild and drizzle a little extra melted Biscoff over the top—madness, but good madness.

Why You’ll Love This—Or At Least, Why My Family Does
I make these whenever there’s a family movie night (or when I’ve had a day that needs sweetening, ha). My family goes nuts for them because they’re crunchy and gooey with this big toasty Biscoff hug to tie it all together. Sometimes the marshmallow gets so sticky that I think I’ll have to chisel it off the pan, but that’s half the fun (and the reason I started using parchment paper). They’re speedy to make, especially if you have actual patience and don’t try cramming the treats into the fridge to cool faster; lesson learned!
Ingredients (And a Few Cheeky Swaps)
- 3 tbsp unsalted butter (salted works in a pinch, but adjust if you do)
- 1 bag (10 oz, or about 5 cups) mini marshmallows—I’ve subbed in regular ones, just chop ’em a bit
- 1/2 cup Biscoff cookie butter, plus more if you’re feeling generous
- 6 cups Rice Krispies cereal (store brand is fine, honestly—my gran would disagree but here we are)
- 1/2 tsp vanilla extract (pure or imitation, both taste fab to me)
- Pinch of salt
- Optional: 1/2 cup crushed Biscoff cookies for garnish (or for snacking, zero judgment from me)
Let’s Get Cooking (Sort Of…Mostly Melting)
- Line an 8×8 inch pan with parchment paper. If you don’t have any, buttering the pan within an inch of its life works okay—just a bit stickier to get out (been there).
- In a large saucepan, melt the butter over medium-low heat. Just when it starts melting, add your marshmallows. Stir constantly—don’t walk away, marshmallows are drama queens and will burn the second you leave.
- Once the marshmallows are mostly melted, dollop in the Biscoff cookie butter. Stir until it’s all smooth, though sometimes mine looks a bit streaky (still tastes great!).
- Take the pan off the heat. Add in the vanilla and a pinch of salt. This is where I usually sneak a taste with a (not very) clean spatula.
- Pour in the Rice Krispies as evenly as possible. Stir gently and fold them through so every bit gets some of the melty goodness. If the mixture’s a bit clumpy, don’t stress—gently break things up with your spatula, but don’t crush all the cereal.
- Plop (technical term) the mixture into your prepared pan and press it down lightly. I use the back of a spoon or sometimes wax paper so it doesn’t stick to my hands (though warm gooey bits on fingers are a perk).
- If you’re feeling fancy, sprinkle crushed Biscoff cookies over the top and give it a little press so they stick.
- Let cool at room temperature for about 30-40 mins, or until set. Or pop into the fridge for 15 mins if you’re in a huge hurry, but you lose a little of that magical chewy texture—so you decide.
- Slice into squares, triangles, or honestly just hack off a corner and call it yours. Enjoy!
Notes (What I Learned the Hard Way…)
- If you press the mixture too hard in the pan, they’ll end up like bricks. I once stood on mine as a joke. Not recommended (for the treats or your pan).
- Parchment paper is your best mate for easy removal, but I’ve done this with just butter and sheer hope. It works… mostly.
- One time I tried to double the marshmallows—figure more is better, right? Actually, it got way too gooey and almost liquid. Stick to the recipe, odd as that is advice form a born tinkerer.
- It’s not essential, but using fresh cereal keeps things crisper. If your Rice Krispies are a bit stale, they’ll still taste fine—just less snap, crackle, pop.
Variations—Because I Can’t Leave Well Enough Alone
- Swirl in a handful of mini chocolate chips at the end (wait until slightly cooled or they’ll melt into oblivion—unless that’s what you’re after).
- I tried peanut butter instead of Biscoff once. Eh, not bad but kinda lost the whole point. If you do it, maybe add a little honey for extra oomph.
- Throw in some chopped pecans or walnuts for crunch—my husband likes it; my kids, not so much.
- Drizzle melted white or dark chocolate over the top. It’s so extra, but so good.
- On second thought, I tried replacing marshmallows with marshmallow fluff. Big mistake! It went more pudding than treat. Stick to regular marshmallows for best results.

Equipment—Or, How to Improvise
- 1 large saucepan (big enough for cereal stirring)
- 8×8 or even 9×9 inch pan (smaller pan = thicker treats, which I’m here for)
- Wooden spoon or spatula (plastic works, but mind the melting if it’s old and dodgy)
- Parchment paper, or just lots of butter if none is handy (done both, survived both)
If you don’t have a proper pan, I’ve actually used a pie tin before—just ends up in odd shapes but tastes the same. No worries.
How to Store (But Will You Even Need To?)
Put your treats in an airtight container. They’ll keep for about 3 days at room temp, though honestly, in my house it never lasts more than a day! If you live somewhere warm, maybe put them in the fridge but bring them back to room temp before eating or they get a bit too toothsome.
Serving Up (Or, What We Do)
These are an all-occasions treat. I slice them into big chunks for dessert, but for parties I’ll cut into little bites (kids have smaller hands, fewer sticky walls). Sometimes my brother dunks them in coffee—total weirdo, but I tried it and it’s decent! Or heat one for 10 seconds in the microwave for extra gooeyness. Up to you.
Pro Tips (Learned By Oops Moments)
- Resist the urge to speed-melt the butter and marshmallows on high heat. I did once and ended up with a pan that looked like burnt marshmallow art. Low and slow wins the day.
- Let the mixture cool just a tad before pressing in chocolate chips or cookie crumbles, otherwise it all melts together. Don’t ask how many times I’ve forgotten.
- If you’re going to use your hands to press the mixture in, a light coating of butter on your palms keeps things (mostly) mess-free.
FAQ (Actual Questions People Have Thrown at Me)
- “Can I use chunky peanut butter instead of Biscoff?”
Sure thing, but you’ll lose some of that caramel-spice magic. Try smooth PB for best texture, though honestly, experiment all you like. - “Do I have to use mini marshmallows?”
Nope! Big ones work, just takes a touch longer to melt (and chop them a little, otherwise you get big goo blobs). - “Why is my mixture soooo sticky?”
Could be over-melting, or just impatient pouring. It gets less so as it sits, though my cousin says sticky fingers are part of the fun. - “Can I freeze these?”
Sort of, but they get a bit weird after thawing, so I wouldn’t. They’re honestly best fresh. - “My treats turned out really hard – help!”
Probably pressed too firmly, or overcooked a bit. Next time, light pressure and keep the heat low. I did the same thing more times than I can count. - “Are these gluten free?”
You’d have to check your cereal and Biscoff labels—sometimes they sneak in wheat. There’s gluten free cookie butter out there if you really want to give it a go. - One last thing—if you drop marshmallows behind an appliance, just leave them. It’s not worth the trouble. Ask me how I know.
So that’s the lot. If you make these, just know they’re officially “uncle approved” in my house—whatever that’s worth!
Ingredients
- 3 tbsp unsalted butter (salted works in a pinch, but adjust if you do)
- 1 bag (10 oz, or about 5 cups) mini marshmallows—I’ve subbed in regular ones, just chop ’em a bit
- 1/2 cup Biscoff cookie butter, plus more if you’re feeling generous
- 6 cups Rice Krispies cereal (store brand is fine, honestly—my gran would disagree but here we are)
- 1/2 tsp vanilla extract (pure or imitation, both taste fab to me)
- Pinch of salt
- Optional: 1/2 cup crushed Biscoff cookies for garnish (or for snacking, zero judgment from me)
Instructions
-
1Line an 8×8 inch pan with parchment paper. If you don’t have any, buttering the pan within an inch of its life works okay—just a bit stickier to get out (been there).
-
2In a large saucepan, melt the butter over medium-low heat. Just when it starts melting, add your marshmallows. Stir constantly—don’t walk away, marshmallows are drama queens and will burn the second you leave.
-
3Once the marshmallows are mostly melted, dollop in the Biscoff cookie butter. Stir until it’s all smooth, though sometimes mine looks a bit streaky (still tastes great!).
-
4Take the pan off the heat. Add in the vanilla and a pinch of salt. This is where I usually sneak a taste with a (not very) clean spatula.
-
5Pour in the Rice Krispies as evenly as possible. Stir gently and fold them through so every bit gets some of the melty goodness. If the mixture’s a bit clumpy, don’t stress—gently break things up with your spatula, but don’t crush all the cereal.
-
6Plop (technical term) the mixture into your prepared pan and press it down lightly. I use the back of a spoon or sometimes wax paper so it doesn’t stick to my hands (though warm gooey bits on fingers are a perk).
-
7If you’re feeling fancy, sprinkle crushed Biscoff cookies over the top and give it a little press so they stick.
-
8Let cool at room temperature for about 30-40 mins, or until set. Or pop into the fridge for 15 mins if you’re in a huge hurry, but you lose a little of that magical chewy texture—so you decide.
-
9Slice into squares, triangles, or honestly just hack off a corner and call it yours. Enjoy!
CLICK FOR NUTRITION INFO
↑
Approximate Information for One Serving
Serving Size:
1 serving
Calories:
170 caloriescal
Protein:
2 gg
Fat:
5 gg
Saturated Fat:
0g
Trans Fat:
0g
Cholesterol:
0mg
Sodium:
0mg
Potassium:
0mg
Total Carbs:
32 gg
Fiber:
0g
Sugar:
0g
Net Carbs:
0g
Vitamin A:
0
Vitamin C:
0mg
Calcium:
0mg
Iron:
0mg
Nutrition Disclaimers
Number of total servings shown is approximate. Actual number of servings will depend on your preferred portion sizes.
Nutritional values shown are general guidelines and reflect information for 1 serving using the ingredients listed, not including any optional ingredients. Actual macros may vary slightly depending on specific brands and types of ingredients used.
To determine the weight of one serving, prepare the recipe as instructed. Weigh the finished recipe, then divide the weight of the finished recipe (not including the weight of the container the food is in) by the desired number of servings. Result will be the weight of one serving.
Did you make this recipe?
Please consider Pinning it!