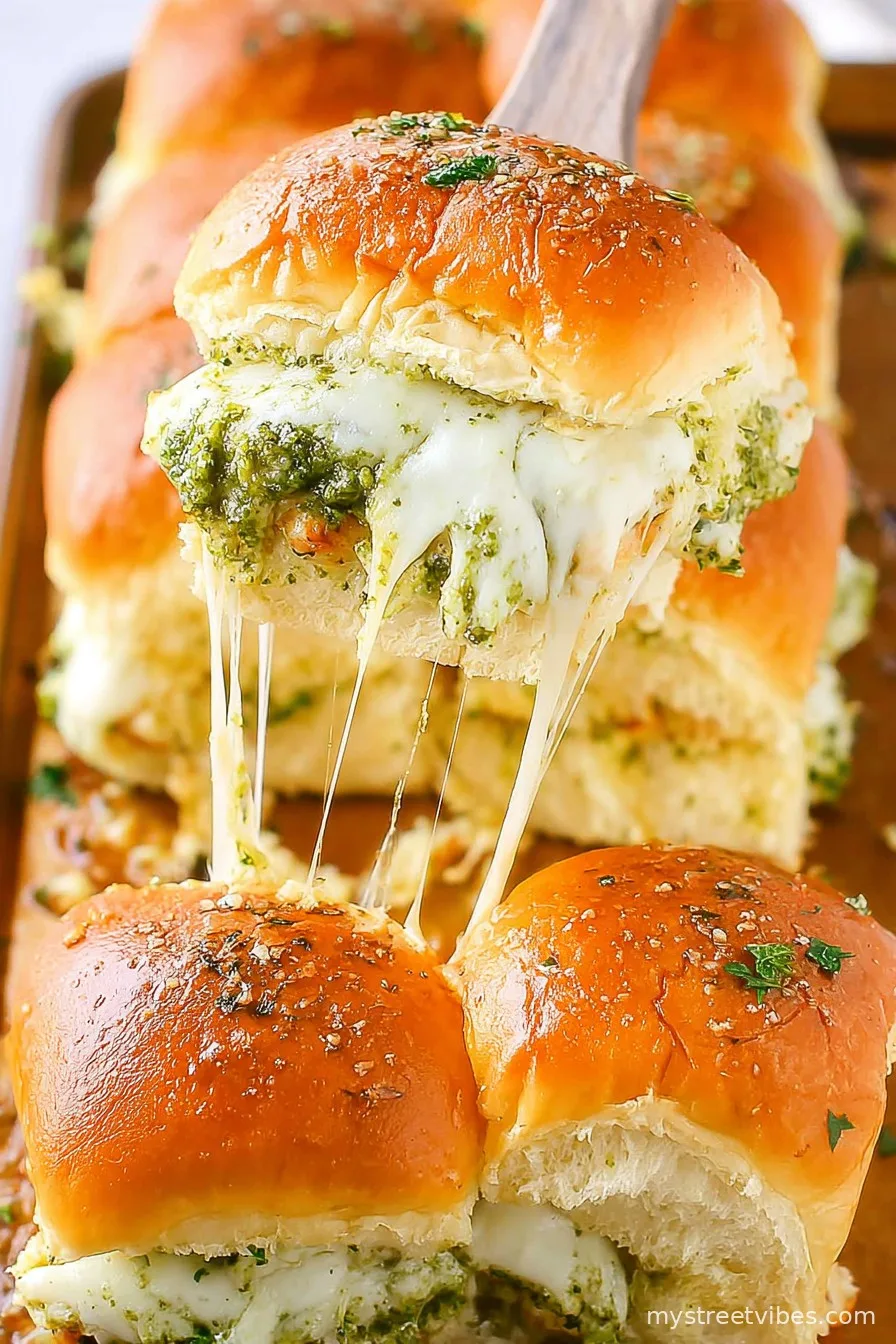
Let Me Tell You About These Sliders…
I first made these Cheesy Garlic Pesto Chicken Sliders on a rainy Friday when I was absolutely craving something warm and cozy but also too exhausted to fuss with a million dishes (isn’t that always the way?). My kid was clamoring for pizza, my partner wanted “some kind of chicken thing” (incredibly specific), and honestly, I just wanted melty cheese and carbs—so I mashed it all together. These sliders were born. Now they’re pretty much a permanent guest at any gathering, game night, or casual dinner where I want people to think I’ve got my life together (spoiler: I often do not).
Why These Chicken Sliders Always Vanish at My Place
I make this when I’ve got leftover rotisserie chicken lying around, or sometimes just to use up a jar of half-eaten pesto from the depths of the fridge. And for some reason? My family loses all self-control around these. It’s the combo of that garlicky butter seeping down into soft slider buns and all that gooey cheese—I mean, what’s not to like? (Well, except when you overbake and the bottom gets crustier than planned. Been there. But hey, we still ate them!)
Here’s What You’ll Need (and a Few Swaps I Use)
- 12 soft slider buns (any kind—not fancy, I’ve used potato rolls and even those store-brand Hawaiian ones)
- 2 cups shredded cooked chicken (rotisserie, leftover roast, or poached…whatever’s looking lonely)
- 1/3 cup basil pesto (honestly, any brand, or even sun-dried tomato pesto when I’m out of basil)
- 1 1/2 cups shredded mozzarella cheese (provolone sometimes sneaks in if we’re low on mozz; cheddar is fun for a much sharper vibe)
- 1/2 cup grated parmesan (or whatever hard cheese is left in the fridge—yes, I’ve done it with pecorino)
- 4 tbsp unsalted butter, melted (I’ve totally used salted butter and just skipped sprinkling salt later)
- 2 cloves garlic, minced (or a heavy shake of garlic powder for the lazy days—my secret shame)
- 1/2 tsp Italian seasoning (not fancy, just the basic shaker form the supermarket)
- Fresh basil for topping (optional, but looks classy on a platter—I skip it most of the time, honestly)
- Salt and black pepper, to taste
Alright, Let’s Make These Sliders (Real Talk Edition)
- Preheat the oven to 350°F (about 180°C give or take—my oven runs hot, so watch for burning edges if yours does too!)
- Slice the slider buns in half horizontally (kind of like making a big sandwich), keeping the bottoms and tops connected as best you can. Place the bottoms in a baking dish—anything that fits them snugly.
- In a bowl, mix the shredded chicken with the pesto, plus a good pinch of salt and black pepper. This is where I usually sneak a taste and maybe add a smidge of extra pesto. No one’s judging.
- Spread that chicken-pesto mixture evenly over the bottom buns. Pile it up—no need to be dainty. Then sprinkle the mozzarella and parmesan all over. If you spill, that’s just chef’s treat (nibble away…)
- Pop the top buns on. Try to match them up: but honestly, sometimes I forget and they’re all mismatched. It’s fine, it still tastes good.
- Mix the melted butter with garlic and Italian seasoning. Brush this over the tops generously. If you don’t have a brush, I totally just drizzle and spread with a spoon or my (clean) fingers.
- Cover loosely with foil so the tops don’t get too toasty too fast. Bake for 15 minutes, then uncover and bake another 7-10 minutes until cheese is bubbly and the tops are golden. Sometimes I go a bit over and the top is extra crisp—that’s honestly my favorite part. Don’t stress.
- Scatter with fresh basil, if you’re feeling fancy. Let them sit for 5 minutes or so before slicing between each slider with a sharp (or even halfway sharp) knife.

Messy Notes from My Kitchen
- Honestly, these reheat surprisingly well, but the bread can get a bit soggy. Still tasty, just different texture! I think they taste better the next day, but my family disagrees and eats the whole tray in one go.
- If you forget to cover with foil at first, the tops get extra crunchy. I kinda like that, but if you want them softer, cover ’em!
- If you ever go wild and add too much pesto, don’t panic—just add more cheese. Easy fix (everything’s better with more cheese, right?).
Variations I’ve Tried (And a Fail or Two)
- I once swapped in BBQ sauce for the pesto. It…was not great. Don’t recommend that one, unless you enjoy slightly confusing flavors.
- Turkey instead of chicken? Totally fine! Even leftover roast pork, on a whim (surprisingly good!).
- Sometimes I add a layer of roasted red peppers for a bit of zing. Also works, but don’t pile them too high or the whole thing gets slippery.

What If I Don’t Have a Fancy Brush or Big Baking Dish?
No brush? Use a spoon for the butter, or honestly, even your hands (just wash up first). For the baking dish, I once used a big sheet pan and just crowded the sliders together—the sides didn’t brown as much, but it worked out in the end.
How to Store (If You Have Leftovers, Which I Never Do)
These sliders keep okay in the fridge in an airtight container for 2 days. Just cover and microwave or oven-reheat, though the bread gets a bit chewy. But let’s be honest, they don’t last that long around here. Once I thought I’d have some for lunch the next day, but when I came back—poof!—gone.
Serving Thoughts (aka, How I Like to Eat ‘Em)
I serve these up with some kettle chips or a messy little salad, but honestly, they don’t need much. My sister-in-law likes dipping hers in extra warm pesto or even a tiny bowl of tomato soup (classy move, I gotta say). Sometimes we eat them straight outta the pan, all standing around the kitchen island—no plates, just napkins.
The Hard-Learned Pro Tips
- Don’t try to rush and skip covering with foil—they dry out and the top gets way too crunchy. Happens to me more than I’d like to admit.
- Don’t go crazy with extra pesto. It leaks out and you end up with soggy buns plus a really green baking dish (ask me how I know).
- Let them rest the full five minutes before cutting, even if you’re impatient—otherwise the whole thing falls apart in a puddle of cheese and shame. Trust me.
Bunch of Questions I Get About These Sliders
- Can I make these ahead? Oh for sure. Assemble, cover, keep in the fridge for a few hours, then bake just before serving. Actually, flavors get even better if they sit a bit.
- What’s the best way to shred chicken? Well, I usually use two forks ’cause that’s fastest; sometimes I use my (clean) hands if I can’t find the forks. No rules here, just do what works.
- Could I use store-bought rotisserie chicken? Absolutely. No judgment, it tastes great and nobody ever notices the shortcut.
- Is there a good veggie substitute for the chicken? You could try cooked jackfruit or even thick-sliced mushrooms (roasted first). I tried tofu once, but the texture honestly didn’t do it for me.
- Do they freeze well? Not really, the bread goes weird. Maybe someone else will have better luck, but it was a no-go in my kitchen.
Alright, that’s the lowdown on my favorite cheesy garlic pesto Chicken Sliders. If you try them and discover a better (or weirder) variation, let me know—I’m always game for a kitchen adventure (except, maybe, BBQ sauce again). Cheers!
Ingredients
- 12 soft slider buns (any kind—not fancy, I’ve used potato rolls and even those store-brand Hawaiian ones)
- 2 cups shredded cooked chicken (rotisserie, leftover roast, or poached…whatever’s looking lonely)
- 1/3 cup basil pesto (honestly, any brand, or even sun-dried tomato pesto when I’m out of basil)
- 1 1/2 cups shredded mozzarella cheese (provolone sometimes sneaks in if we’re low on mozz; cheddar is fun for a much sharper vibe)
- 1/2 cup grated parmesan (or whatever hard cheese is left in the fridge—yes, I’ve done it with pecorino)
- 4 tbsp unsalted butter, melted (I’ve totally used salted butter and just skipped sprinkling salt later)
- 2 cloves garlic, minced (or a heavy shake of garlic powder for the lazy days—my secret shame)
- 1/2 tsp Italian seasoning (not fancy, just the basic shaker form the supermarket)
- Fresh basil for topping (optional, but looks classy on a platter—I skip it most of the time, honestly)
- Salt and black pepper, to taste
Instructions
-
1Preheat the oven to 350°F (about 180°C give or take—my oven runs hot, so watch for burning edges if yours does too!)
-
2Slice the slider buns in half horizontally (kind of like making a big sandwich), keeping the bottoms and tops connected as best you can. Place the bottoms in a baking dish—anything that fits them snugly.
-
3In a bowl, mix the shredded chicken with the pesto, plus a good pinch of salt and black pepper. This is where I usually sneak a taste and maybe add a smidge of extra pesto. No one’s judging.
-
4Spread that chicken-pesto mixture evenly over the bottom buns. Pile it up—no need to be dainty. Then sprinkle the mozzarella and parmesan all over. If you spill, that’s just chef’s treat (nibble away…)
-
5Pop the top buns on. Try to match them up: but honestly, sometimes I forget and they’re all mismatched. It’s fine, it still tastes good.
-
6Mix the melted butter with garlic and Italian seasoning. Brush this over the tops generously. If you don’t have a brush, I totally just drizzle and spread with a spoon or my (clean) fingers.
-
7Cover loosely with foil so the tops don’t get too toasty too fast. Bake for 15 minutes, then uncover and bake another 7-10 minutes until cheese is bubbly and the tops are golden. Sometimes I go a bit over and the top is extra crisp—that’s honestly my favorite part. Don’t stress.
-
8Scatter with fresh basil, if you’re feeling fancy. Let them sit for 5 minutes or so before slicing between each slider with a sharp (or even halfway sharp) knife.
CLICK FOR NUTRITION INFO
↑
Approximate Information for One Serving
Serving Size:
1 serving
Calories:
310 caloriescal
Protein:
16gg
Fat:
16gg
Saturated Fat:
0g
Trans Fat:
0g
Cholesterol:
0mg
Sodium:
0mg
Potassium:
0mg
Total Carbs:
26gg
Fiber:
0g
Sugar:
0g
Net Carbs:
0g
Vitamin A:
0
Vitamin C:
0mg
Calcium:
0mg
Iron:
0mg
Nutrition Disclaimers
Number of total servings shown is approximate. Actual number of servings will depend on your preferred portion sizes.
Nutritional values shown are general guidelines and reflect information for 1 serving using the ingredients listed, not including any optional ingredients. Actual macros may vary slightly depending on specific brands and types of ingredients used.
To determine the weight of one serving, prepare the recipe as instructed. Weigh the finished recipe, then divide the weight of the finished recipe (not including the weight of the container the food is in) by the desired number of servings. Result will be the weight of one serving.
Did you make this recipe?
Please consider Pinning it!