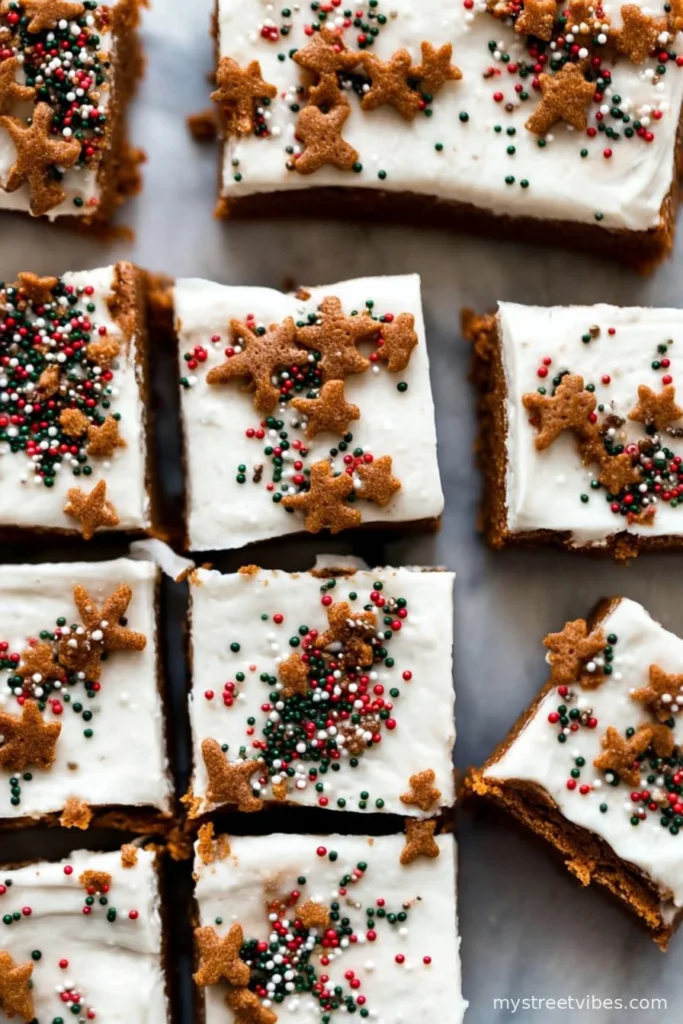
A Little Story Before We Bake: Why Gingerbread Cookie Bars?
So here’s the backstory. The first time I tried making gingerbread cookies, I wound up with oddly crisp ginger rocks—sort of like tasty hockey pucks. The house smelled amazing, but my teeth didn’t forgive me for a week. Enter Gingerbread Cookie Bars. I stumbled on these when I was trying (and failing) to roll out dough in a too-warm kitchen—got lazy, pressed it all in a pan, and bam! Bars for days. Honestly, they’re kind of like the soft middle bits everyone fights over with regular cookies. Plus: less work, fewer dishes, more time for sneaking bites while pretending to tidy up the kitchen. (Don’t tell my kids.)
Why You’ll Love This: Honestly, It’s a Life-Saver
I make these when I’m craving gingerbread but can’t be bothered with cookie cutters. My family goes bonkers for them, especially because you can cut them extra thick if you’re feeling greedy (I always do; who wants scrawny bars?). They’re also excellent for last-minute bake sales or holiday swaps—no fancy decorating required. Oh! And if you’ve ever dropped a gingerbread man head-first on the floor, you’ll appreciate that bars are way sturdier. Trust me, I speak from sad, crumbly experience.
What You’ll Need (With My Weird Little Preferences)
- 2 cups all-purpose flour (I’ve used half whole wheat in a pinch, turns out just slightly nuttier—up to you)
- 2 tsp ground ginger (I’ve been known to add a little extra because, well, it’s gingerbread)
- 1.5 tsp ground cinnamon
- 1/4 tsp ground cloves (My grandma swore by McCormick but store brand is honestly fine—I won’t tell)
- 1/4 tsp nutmeg (fresh if you have it, but nobody will complain if you use pre-ground)
- 1/4 tsp salt
- 1 tsp baking soda
- 3/4 cup (175g) unsalted butter, softened (salted works too, just skip the salt up there!)
- 1/2 cup brown sugar, packed (light or dark, I use whichever bags open easier)
- 1/4 cup white sugar
- 1 large egg
- 1/3 cup molasses (Grandma would only use Brer Rabbit, but any molasses will work – just don’t accidentally grab blackstrap, it’s a whole different beast)
- 2 tsp vanilla extract (I even used almond once by mistake—very interesting, but not classic)
- Optional: a handful of mini white chocolate chips or a light dusting of powdered sugar for the top
How To Actually Do This (Promise, It’s Easy)
- Preheat your oven to 350°F/180°C. Grease a 9×13 inch baking pan. I seriously just smear butter over it with a paper towel. Sometimes I even skip the parchment paper—really living on the edge.
- Mix the dry stuff first: In a big bowl, whisk together the flour, all the spices, salt, and baking soda. Sometimes my mind drifts here and I forget the nutmeg until way too late; it’s forgiving, just add it whenever you remember.
- Cream the butter and sugars. In a separate bowl (or stand mixer if you’re fancier than me), cream together the softened butter, brown sugar, and white sugar until it’s nice and fluffy. That takes about 2-3 minutes. This is where I usually sneak a taste. For scientific reasons.
- Add the egg, molasses, and vanilla, mixing until smooth. Don’t panic if it looks split or weird at this stage. It comes together—I promise.
- Dump in the dry ingredients and mix until just combined. Seriously, don’t overmix. (I read somewhere that ruins cookies. No idea if true, but it stuck with me.)
- Scoop that lovely dough into your pan and use a spatula or just your hands (washboard hands, but I believe in you) to spread it evenly. Mine’s always a little lopsided; nobody has noticed.
- If you’re a rule breaker, throw those white chocolate chips (or literally any chocolate chips) on top now. Gently press ‘em in.
- Bake for about 20-23 minutes. Edges will look set and slightly brown, center will be a touch soft. Don’t overbake! Bars firm up as they cool. And no, your kitchen timer isn’t lying (though mine does anyway—dodgy old thing).
- Cool the pan on a wire rack if you have one. If not, a folded up tea towel is grand. Slice when mostly cool or if you’re impatient (guilty), be ready for gooey, molten centers—still tastes amazing.
Lived-and-Learned Notes (Because I Messed Up, So You Don’t Have To)
- If the dough’s sticky, flour your hands or spatula a little—otherwise, you’ll be peeling batter off your fingers for days (it’s happened to me, more than once).
- Pan size: I tried a square pan once, made super thick bars. They were more like gingerbread cake squares. Not bad, but different mood, you know?
- The flavor somehow gets deeper the next day—if you can wait that long, it’s worth it. But… usually we can’t.
Variations I’ve Actually Tried (With Mixed Results)
- Lemon glaze: Once I whisked a cup of powdered sugar with some lemon juice and drizzled it on when the bars were cool. Everyone raved (and I secretly felt like a Bake Off contestant).
- Swapping the molasses: Tried honey instead for a friend with a molasses allergy. The bars were pleasant but really not the same—weirdly mild and not the signature gingerbread taste. Stick with molasses if you can.
- Nuts: Once I chucked in some chopped pecans. Not bad, but then the kids started picking them out and the dog wanted in. It was chaos. (Still, if you like nuts, go for it!)
What You Need Tool-Wise (and What You Can Get Away With)
- 9×13-inch baking pan: Technically essential…but honestly, I once stretched this dough on a rimmed cookie sheet and just eyeballed the thickness. Worked out fine. Rustic charm, you know?
- Mixing bowls: If you’re low on extras, I mix everything in one big bowl, tossing in the dry bits after doing the wet. Sure, not textbook, but dishes are evil.
- Spatula or sturdy spoon: You can use your hands if you’re brave or can’t find your spatula (like me, nine times out of ten).

How Do You Keep ‘Em? (Though Honestly, They Just Disappear)
Technically, keep these bars in an airtight container at room temp for up to 4 days. In my house, they rarely last 24 hours—seriously. One time I doubled the batch and STILL had an empty tin by morning. If you do have leftovers and want them extra fresh, toss a slice of bread in the tin (granny trick) so they stay super soft.
How Do You Serve These? Here’s What I Do
I love to dust the tops with powdered sugar before slicing. During December, my kids decorate theirs with something sparkly and sugary—always a mess, always worth it. For adults, try pairing with a scoop of vanilla ice cream or a cup of strong tea. Once, I served them with warm cider and it was basically autumn-in-a-bite (check out this apple cider recipe that’s a house favorite for more fall vibes).
Learned the Hard Way: Little Pro Tips
- Don’t rush the cooling. I once tried cutting them straight from the oven—major molten mess. Let them set, at least a bit. Actually, I find the flavor develops if I wait till fully cooled.
- If your butter isn’t room temp, a microwave zap works, but only until soft—not melted. I once turned it to soup and the dough was, well, odd-feeling.
- Bars taste even spicier the next day. Don’t know why, but suddenly the flavors sing. (Kind of like how soup is always better the next day? Mystery of the kitchen.)
Questions I’ve Actually Been Asked (and Yes, I Read Them All!)
Q: Can I freeze these Gingerbread Cookie Bars?
A: Oh, definitely; just wrap tightly in clingfilm and then stick in a freezer bag. They’re good for maybe two months, but I’ll be honest…they taste best fresh. Let them come to room temp before tucking in—or warm gently if you’re impatient.
Q: My bars turned out dry. What gives?
A: Hmm, might’ve been a tad overbaked. Happens to the best of us! Next time, check a couple of minutes early—you want the center to look barely set. Also, check your oven isn’t running hot. (Mine once incinerated a batch—rip, gingerbread.)
Q: Can I make these gluten-free?
A: I’ve swapped in a gluten-free blend (like Bob’s Red Mill, honest I don’t get paid to say that) and they turned out grand, but a bit crumblier. Add an extra egg yolk if you like them chewier.
Q: Do I have to use a mixer?
A: Not at all! I just use a sturdy wooden spoon. More arm workout, but worth it. If you need a visual step-by-step, Sally’s Baking Addiction has great photos (though my method has fewer steps—and more snacks).
One day I’ll write my magnum opus on why these bars save every last-minute school bake sale, but for now, I hope you love them as much as my slightly-chaotic family does. If you end up with a wonky-shaped batch, just tell ’em it’s rustic and it’ll pass for gourmet. That’s my motto! Happy nibbling!

Ingredients
- 2 1/4 cups all-purpose flour
- 2 teaspoons ground ginger
- 1 1/2 teaspoons ground cinnamon
- 1/2 teaspoon ground cloves
- 1/4 teaspoon ground nutmeg
- 1/2 teaspoon salt
- 1/2 teaspoon baking soda
- 3/4 cup unsalted butter, melted
- 3/4 cup packed brown sugar
- 1/4 cup granulated sugar
- 1 large egg
- 1/3 cup molasses
- 1 teaspoon vanilla extract
Instructions
-
1Preheat the oven to 350°F (175°C). Line a 9×9-inch baking pan with parchment paper or lightly grease it.
-
2In a medium bowl, whisk together the flour, ground ginger, cinnamon, cloves, nutmeg, salt, and baking soda.
-
3In a large bowl, mix the melted butter, brown sugar, and granulated sugar until well blended. Add the egg, molasses, and vanilla extract, and mix until smooth.
-
4Gradually add the dry ingredients to the wet ingredients, stirring until just combined.
-
5Spread the batter evenly in the prepared pan. Bake for 20-22 minutes, or until a toothpick inserted in the center comes out clean.
-
6Allow to cool completely in the pan before cutting into bars. Optionally, drizzle with a simple glaze or dust with powdered sugar.
CLICK FOR NUTRITION INFO
↑
Approximate Information for One Serving
Serving Size:
1 serving
Calories:
160 caloriescal
Protein:
2gg
Fat:
6gg
Saturated Fat:
0g
Trans Fat:
0g
Cholesterol:
0mg
Sodium:
0mg
Potassium:
0mg
Total Carbs:
25gg
Fiber:
0g
Sugar:
0g
Net Carbs:
0g
Vitamin A:
0
Vitamin C:
0mg
Calcium:
0mg
Iron:
0mg
Nutrition Disclaimers
Number of total servings shown is approximate. Actual number of servings will depend on your preferred portion sizes.
Nutritional values shown are general guidelines and reflect information for 1 serving using the ingredients listed, not including any optional ingredients. Actual macros may vary slightly depending on specific brands and types of ingredients used.
To determine the weight of one serving, prepare the recipe as instructed. Weigh the finished recipe, then divide the weight of the finished recipe (not including the weight of the container the food is in) by the desired number of servings. Result will be the weight of one serving.
Did you make this recipe?
Please consider Pinning it!!