Let Me Tell You About These Vegan Gluten-free Energy Bars…
Alright, so, if you’ve ever found yourself rooting through the pantry at 3:12pm (I know, oddly specific, but stay with me) trying not to eat the kids’ last packet of cookies—these energy bars are basically my own homemade answer to that drama. The first time I made them, I was actually procrastinating folding laundry and thought, “How hard could it really be?” Spoiler: not that hard! I’ve made a ton of versions since, sometimes out of necessity, sometimes just to have something actually edible after a hike. Oh, I did drop half the tray once, but the dog was delighted, so, silver lining?

Why You’ll Love This (Honestly)
I make these every Sunday (well, that’s the plan, sometimes it’s Monday). My family goes wild for these because they’re chewy and sweet but don’t have all the weird stuff you can’t pronounce. Plus, I love that it only takes like…15 minutes of actual work, unless I get distracted again. There was this one time I used way too many dates, and it kinda turned into taffy, but they still vanished…so that tells you something.
What Goes Into These (And Handy Swaps)
- 1 cup rolled oats (gluten-free if needed; sometimes I use half puffed rice when the oat jar looks tragic)
- 3/4 cup raw almonds (or really, whatever nut you grab first—pecans are lush, too)
- 1/2 cup pumpkin seeds (My gran swears sunflower seeds are better, but I can’t taste a difference)
- 1/3 cup natural peanut butter (almond or sunflower butter totally do the trick; I’ve used tahini once when desperate, but it’s a bit out there)
- 10 soft Medjool dates, pitted (don’t worry if they’re not Medjool; the regular kind work—just soak them in warm water for 10 mins first)
- 2 tablespoons pure maple syrup (agave is fine; I honestly just glug ’til it looks right sometimes)
- 1/4 teaspoon sea salt (I always do a “scant” quarter, because salty bars make me cranky)
- 1/3 cup dairy-free chocolate chips (totally optional. Coconut flakes or dried cherries are also ridiculously good)
How I Usually Make Them
- Line an 8×8 inch pan with parchment paper. Or don’t—just oil it, you rebel. Less washing up, anyway.
- In a food processor, pulse the oats, almonds, and pumpkin seeds a bunch until they’re mostly chopped but still a bit chunky (sometimes I leave a few big bits in for crunch).
- Add dates, peanut butter, maple syrup, and salt. Process until it clumps into a sticky, slightly stubborn dough—don’t panic if there’s still crumbly bits, you can squish it together with your hands later, and I promise it comes together. This is where I always sneak a taste because…quality control, obviously.
- Take the blade out (trust me, I’ve nearly lost a finger here before). Stir in your chocolate chips or add-ins of choice with a spoon—or your hand, I won’t judge.
- Scrape the whole glorious mess into your lined pan. Press it down, using the back of a spoon or even a glass to get it really packed in—this is where I hum whatever earworm my child has brought home from school that week.
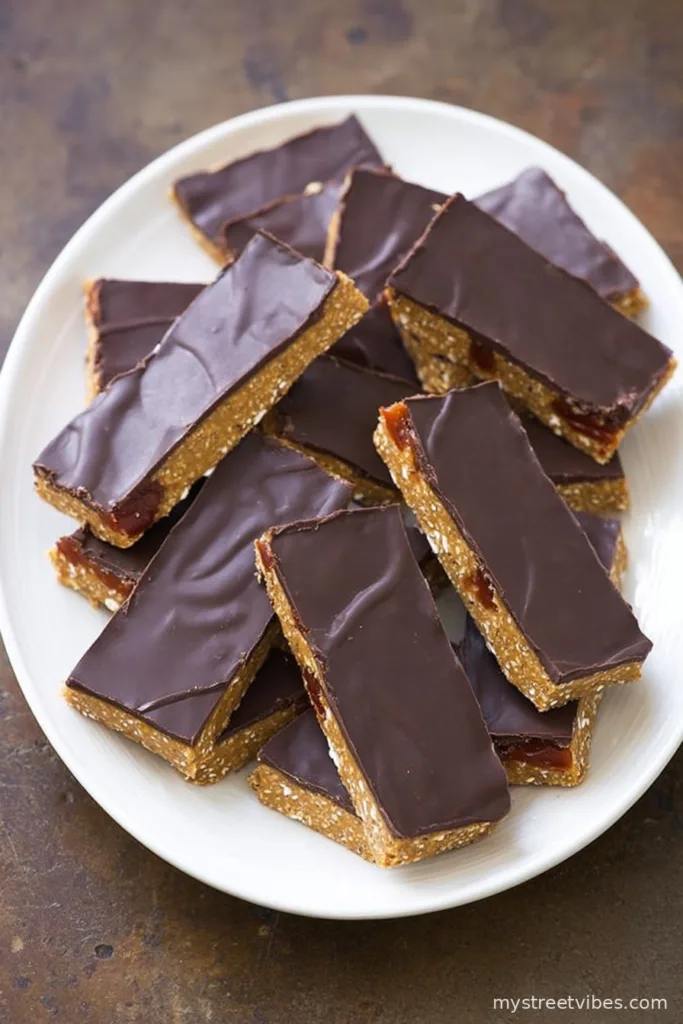
- Pop it into the freezer for about 45 minutes—if you’re impatient (which, same), 30 mins usually works fine. Chop into bars or squares, and definitely eat the crumbly edges right away.

My Honest Notes (Take It or Leave It)
- Sometimes it’s really sticky, and I’ve totally just wet my hands to press it down. Game changer.
- If dates are a bit dry, soaking them helps tons—or just toss in an extra squeeze of syrup.
- Double batch? Yeah, you’ll need a bigger pan (learned this the hard way).
If You Want to Mix It Up…
I’ve tried adding a bit of espresso powder—good for adults, wild for kids. Dried figs instead of dates? Meh, didn’t love it, texture got a bit weird. Oh and once I tossed in freeze-dried raspberries, and now I can’t forget how addictive that was. Basically, feel free to raid your pantry.

The (Semi-Useful) Tools Bit
Food processor is honestly the easiest here, but I’ve mashed it all in a giant bowl with a potato masher once—elbow grease, baby! As for the pan, if you don’t have an 8×8, just use a loaf tin or even a plate. Bars will just be thicker or thinner. Completely up to you; that’s part of the fun.
Keeping Them Fresh (Not That They Ever Last Long)
If you put them in an airtight container in the fridge, they’ll be happy for up to a week. (Though, between my late-night snacking and disappearing bars, they rarely make it past Tuesday!) You can freeze ’em too, just separate layers with a bit of parchment so you don’t need a chisel to get one out.
How I Serve These (Snacking Is An Art)
Honestly, they’re great straight from the fridge, but I’ve been known to crumble a bar over coconut yogurt when feeling a bit fancy—instant breakfast win. My youngest dunks them in warm almond milk, which is either genius or madness, jury’s still out. Sometimes they end up tossed in the car for post-soccer emergencies, no joke.
Pro Tips—Learned (Often) The Hard Way
- Don’t try to cut them before they’re fully chilled; I once rushed it and basically made energy granola. Which, sure, tasty, but not the goal.
- Over-processing kills the texture and makes them gummy, so just pulse—don’t blitz for ages.
- Do keep an eye on your chocolate chips if your kitchen is hot. Melted chip puddles are a thing. Not a tragedy, but just saying.
Frequently Asked (or Yelled Across the Kitchen) Questions
- Can I leave out the nuts? You actually can! Try more seeds, or toss in extra oats—but I’d add a splash more syrup or nut/seed butter, or they’ll be too crumbly.
- What if my dates are the really dry kind? Soak ’em in hot water for 10 minutes, then drain; it makes a world of difference.
- Is peanut butter essential? Nope. I’ve used almond butter, and, okay, once had to use cashew butter (leftover from making frosting?!). It was so good. Tahini works if you want a more grown-up, sesame-y vibe, but warn unsuspecting snackers.
- Why aren’t they sticking together? Try processing it a bit more, or just add another tablespoon of syrup. Once, I just mushed the lot by hand—it felt rustic, let’s say.
- Can I double the recipe? Sure thing. Just grab a bigger pan—note to self, don’t go rogue and use a cookie sheet. Everything slides around, it’s a faff.
- Are these breakfast-appropriate? Oh absolutely. I think they taste even better the next day with coffee. Or tea. Or secretly, alone in the pantry when nobody’s looking. (Not that I’d know.)
Ingredients
- 1 cup rolled oats (gluten-free if needed; sometimes I use half puffed rice when the oat jar looks tragic)
- 3/4 cup raw almonds (or really, whatever nut you grab first—pecans are lush, too)
- 1/2 cup pumpkin seeds (My gran swears sunflower seeds are better, but I can’t taste a difference)
- 1/3 cup natural peanut butter (almond or sunflower butter totally do the trick; I’ve used tahini once when desperate, but it’s a bit out there)
- 10 soft Medjool dates, pitted (don’t worry if they’re not Medjool; the regular kind work—just soak them in warm water for 10 mins first)
- 2 tablespoons pure maple syrup (agave is fine; I honestly just glug ’til it looks right sometimes)
- 1/4 teaspoon sea salt (I always do a “scant” quarter, because salty bars make me cranky)
- 1/3 cup dairy-free chocolate chips (totally optional. Coconut flakes or dried cherries are also ridiculously good)
Instructions
-
1Line an 8×8 inch pan with parchment paper. Or don’t—just oil it, you rebel. Less washing up, anyway.
-
2In a food processor, pulse the oats, almonds, and pumpkin seeds a bunch until they’re mostly chopped but still a bit chunky (sometimes I leave a few big bits in for crunch).
-
3Add dates, peanut butter, maple syrup, and salt. Process until it clumps into a sticky, slightly stubborn dough—don’t panic if there’s still crumbly bits, you can squish it together with your hands later, and I promise it comes together. This is where I always sneak a taste because…quality control, obviously.
-
4Take the blade out (trust me, I’ve nearly lost a finger here before). Stir in your chocolate chips or add-ins of choice with a spoon—or your hand, I won’t judge.
-
5Scrape the whole glorious mess into your lined pan. Press it down, using the back of a spoon or even a glass to get it really packed in—this is where I hum whatever earworm my child has brought home from school that week.
-
6Pop it into the freezer for about 45 minutes—if you’re impatient (which, same), 30 mins usually works fine. Chop into bars or squares, and definitely eat the crumbly edges right away.
CLICK FOR NUTRITION INFO
↑
Approximate Information for One Serving
Serving Size:
1 serving
Calories:
180 caloriescal
Protein:
4gg
Fat:
9gg
Saturated Fat:
0g
Trans Fat:
0g
Cholesterol:
0mg
Sodium:
0mg
Potassium:
0mg
Total Carbs:
22gg
Fiber:
0g
Sugar:
0g
Net Carbs:
0g
Vitamin A:
0
Vitamin C:
0mg
Calcium:
0mg
Iron:
0mg
Nutrition Disclaimers
Number of total servings shown is approximate. Actual number of servings will depend on your preferred portion sizes.
Nutritional values shown are general guidelines and reflect information for 1 serving using the ingredients listed, not including any optional ingredients. Actual macros may vary slightly depending on specific brands and types of ingredients used.
To determine the weight of one serving, prepare the recipe as instructed. Weigh the finished recipe, then divide the weight of the finished recipe (not including the weight of the container the food is in) by the desired number of servings. Result will be the weight of one serving.
Did you make this recipe?
Please consider Pinning it!