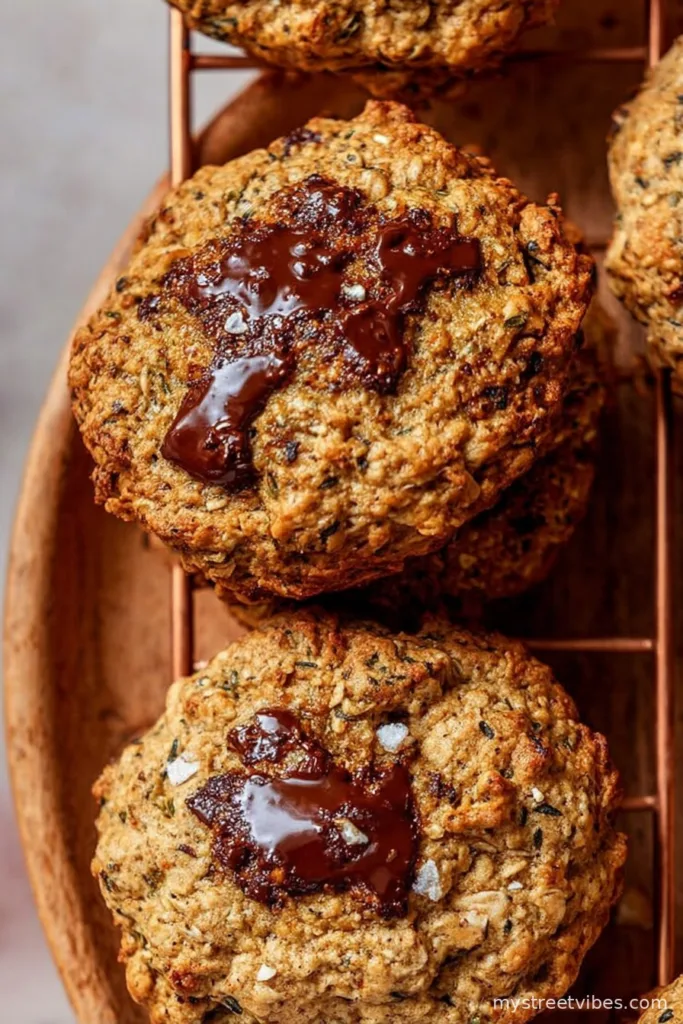
If you’d told me ten years ago my most-requested cookie would start with flaxseed meal and hempseeds, I’d have handed you my grandma’s chocolate chip recipe and laughed. But here we are—my Superfood Oatmeal Cookies disappear faster than pizza on game night. I think it’s the hint of coconut, the chocolate chunks, or possibly that everyone assumes they’re healthy so you can have two (I sometimes sneak a third and call it “taste testing,” but who’s counting?). These are the cookies my kids fight over, my neighbor once bartered for lawn-mowing, and honestly, I make a double batch just to be safe.
I remember the first time I tried to blend so many nutrient-dense goodies into cookies—I ended up with something that looked like bird food and tasted sadly similar. But after a few not-so-great batches (don’t ask about the chia disaster), this version became my gold standard—and genuinely, it’s the one I bake when I want to treat myself and trick the rest of the world into eating well. So, ready for ridiculously chewy, satisfyingly nutty, totally chocolatey cookies loaded with super-powered goodness? Here’s how I make them.
Why I’m Obsessed With These
- I make these for gift baskets, school bake sales, and occasionally just to hide in the back of my freezer (if you’re reading this, family, NO you didn’t see anything).
- My partner, who claims they “don’t do healthy cookies,” polishes off a plate before the first episode finishes. It’s got everything: oats, nuts, dark chocolate. And that little sprinkle of flaky salt at the end? Chef’s kiss*.
- Sometimes I swap peanut butter for almond butter, or use walnuts in place of pecans (on accident), and they still turn out. They’re basically fail-proof—unless you forget to set the timer, which, yes, I have definitely done.
- The best thing? They’re gluten-free (just check your oats), full of fiber, and have those sneaky ‘superfoods’ so I almost feel like I’m eating breakfast. Actually, they’re secretly my favorite breakfast-on-the-go.
Here’s What You’ll Need
- 2 large eggs, room temperature – I’ve cracked cold eggs in a hurry; works, just takes longer to mix. But room temp is best.
- 1/4 cup melted coconut oil (room temperature) – If you’ve got refined or unrefined, either works! Once, I used olive oil—eh, it was very different.
- 1/2 cup runny, natural almond butter – You can absolutely sub in peanut butter (sometimes I have to if the almond butter runs out), but I’d avoid that super-thick, old almond butter at the back of the fridge—it gets hard to mix.
- 3/4 cup coconut sugar – If you’re out, brown sugar is the closest thing, but coconut sugar adds a nice flavor.
- 1/4 cup maple syrup – Once I used honey—results weren’t quite as soft.
- 2 teaspoons pure vanilla extract – No need for the fancy stuff, honestly. But the imitation kind is not quite as nice here.
- 1 cup almond flour – Any blanched almond flour works. I wouldn’t use almond meal—texture’s a bit odd.
- 1/2 cup oat flour – Or just buzz up rolled oats in your blender, which is what I do about half the time.
- 1/2 cup ground flaxseed meal – Gives mega nutrition. Sometimes I forget and have to stir it in at the end (oops), but it still works.
- 1 1/4 cups gluten-free rolled oats – Use whatever oats you like. Avoid instant, they get too mushy.
- 1/4 cup hempseeds – Not always easy to find, but they do make the texture pop. Skippable in a pinch, or I’ve tried chia seeds—just remember, they soak up liquid!
- 2 scoops collagen peptides (optional) – I add these sometimes, especially if it’s going to a new parent friend, but they’re 100% optional. Skip them for vegan vibes.
- 1/2 teaspoon cinnamon
- 1/4 teaspoon kosher salt
- 1/2 teaspoon baking soda
- 1 teaspoon baking powder
- 1/2 cup chopped walnuts – Or pecans; sometimes I toss in pumpkin seeds (except that time I burned them; not great).
- 3 ounces dark chocolate, chopped, divided – Use whatever bar you love, or a handful of chocolate chips — really, it’s your call. I like Ghirardelli 70%, just being honest.
- Flaky salt, for garnish (I like Maldon) – This step isn’t to be skipped! Makes everything pop.
Let’s Get Baking (And Sneak a Taste): Directions
- First things first, set that oven to 350°F, and line two baking sheets with parchment paper. I’ve also used silicone mats—works just dandy. Get those pans ready—trust me, you don’t want to be scrambling mid-mix!
- Whisk together your wet ingredients. Grab a big bowl and add in the eggs, the coconut oil, almond (or peanut) butter, coconut sugar, syrup, and vanilla. Whisk these until you have a smooth-ish, rich mixture. If you have kids around, this is a good step to let them stir—and inevitably spill.
- Mix up the dry stuff in a different bowl. Almond flour, oat flour (or those blended-up oats), flaxseed meal, rolled oats, hempseeds, collagen if you’re using, the cinnamon, salt, baking soda, and baking powder. Whisk them until you don’t see any little clumps. (I admit, I’ve skipped this step and just dumped everything into one bowl. The cookies turned out, but texture was a bit all over the place. Live and learn…)
- Add the dry to the wet slowly, stirring so it all comes together. It’ll be a thick, pretty sticky dough, but that’s what you want! Once you’ve got most of the lumps out, fold in your walnuts and about three-quarters of your chopped chocolate. Save the rest for topping. (This is my official taste-testing moment; if you’re not licking the spoon here, you’re missing out.)
- Scoop the dough into balls. Medium-sized cookie scoop works beautifully here, but two spoons will do. You’re aiming for 24 pieces. Press some of that saved chocolate into each one—more chocolate, more fun. Plop the dough balls onto a baking sheet and slide them in the freezer for 30 minutes. I know, it’s a pain waiting, but skipping makes cookies too flat.
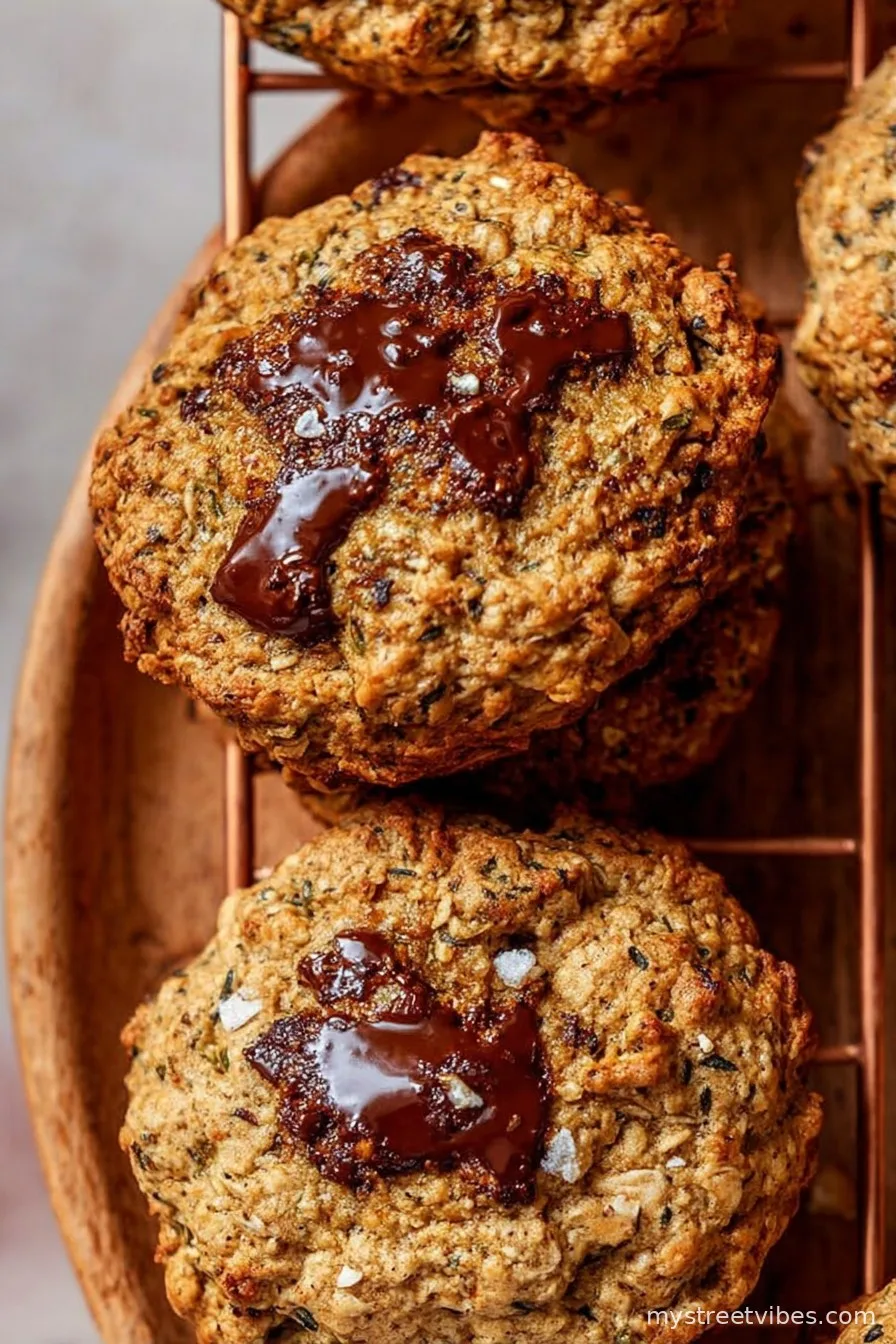
- Ready to bake? Grab about 8 cookies for each tray (gives them plenty of space to spread) and bake on the middle rack for 11 to 14 minutes, depending on if you like chewy middles or crisp edges (I accidentally left them a minute too long once, and hey, my friends still ate them). Take out, sprinkle some flaky salt, marvel at the shine from the melting chocolate. Move immediately to a rack to cool. Repeat for the rest of the dough!
- Cool totally before you store them. Because otherwise, they trap steam and get mushy—ask me how I know. But try them still just a little warm, with the chocolate melty. Heavenly.

What I’ve Learned (the hard way)
- Wait for ‘em to cool. I know, I already said it, but I always regret it if I try to stack them when they’re even slightly warm.
- Freezing the dough is seriously worth it. I get lazy, but if you bake straight away, cookies go flat as a pancake (not in a good way).
- Make double. If you think, “I’ll make a small batch,” you’re fooling yourself. Someone always comes asking for more.
What I’ve Tried (Some Genius, Some Not)
- Peanut butter for almond butter? Solid, just adds a stronger flavor. Not bad at all.
- That time I dumped in shredded coconut? Actually delicious. But too much makes them fall apart (whoops).
- Swapping walnuts for seeds? Works, but be careful with salty pepitas—they throw off the flavor a bit.

What If I Don’t Have… (Equipment Bits)
- No cookie scoop? Two spoons, a little patience, and maybe slightly uneven cookies—but nobody’s complaining.
- No mixing bowls left clean? I’ve mixed in a saucepan. Wouldn’t recommend, but it’ll do in a pinch.
Storing and (Maybe) Freezing
- On the counter: They’ll last 3 days in an airtight container, but honestly, they’re usually gone in half that time at my place.
- In the fridge: Up to 2 weeks, but I think the texture suffers a bit.
- Freezer: Baked cookies or dough both freeze beautifully. Stack with a bit of parchment between. (Frozen dough balls bake up great, just add 2-3 minutes to bake time. No need to thaw!)
How I Serve ‘Em (Traditions and Quirks)
- With a mug of strong coffee (my go-to breakfast if you must know)
- Crumbled into yogurt with fresh berries—let me tell you, that’s a winner
- Or just straight off the rack, still warm, chocolate dripping—what could be better?
My Not-So-Secret Tips
- If you rush the bake (too hot, too short), you’ll have sad, doughy cookies that leave a mark on your conscience and your baking sheet. Just trust me, slow and steady makes the best ones.
- Sprinkle that salt just when you take ‘em out—the chocolate glistens and grabs just the right amount.
- Don’t try to double the batch in one bowl bigger than you can handle. Ask me how I learned.
The Questions People Actually Ask (and My Honest Answers)
- Can I use regular flour instead of almond/oat?
Sure, but you’ll lose that gluten-free magic. Will it work? Probably! But texture might be chewier and less nutty. - Can I skip the collagen?
Absolutely—it’s optional. Just leave it out, doesn’t affect cookies at all. - Is it okay to skip the freezer step?
I mean, you can, but expect pancakes, not cookies. Your call! - Help! My dough’s sticky.
It’s supposed to be super thick and sticky. If it feels way too loose, add a sprinkle of oats, but don’t overthink it.
So there you have it—my not-so-perfect, but absolutely delicious, Superfood Oatmeal Cookies. Don’t overthink ‘em… and make sure to smuggle one or two for yourself when nobody’s looking. That’s just kitchen justice.
Ingredients
- 2 large eggs, room temperature
- 1/4 cup melted coconut oil, room temperature
- 1/2 cup runny, natural almond butter , (or substitute peanut butter)
- 3/4 cup coconut sugar
- 1/4 cup maple syrup
- 2 teaspoons pure vanilla extract
- 1 cup almond flour
- 1/2 cup oat flour
- 1/2 cup ground flaxseed meal
- 1 1/4 cups gluten-free rolled oats
- 1/4 cup hempseeds
- 2 scoops collagen peptides, (optional)
- 1/2 teaspoon cinnamon
- 1/4 teaspoon kosher salt
- 1/2 teaspoon baking soda
- 1 teaspoon baking powder
- 1/2 cup chopped walnuts
- 3 ounces dark chocolate, chopped, divided
- Flaky salt, for garnish (I like Maldon)
Instructions
-
1First things first, set that oven to 350°F, and line two baking sheets with parchment paper. I’ve also used silicone mats—works just dandy. Get those pans ready—trust me, you don’t want to be scrambling mid-mix!
-
2Whisk together your wet ingredients. Grab a big bowl and add in the eggs, the coconut oil, almond (or peanut) butter, coconut sugar, syrup, and vanilla. Whisk these until you have a smooth-ish, rich mixture. If you have kids around, this is a good step to let them stir—and inevitably spill.
-
3Mix up the dry stuff in a different bowl. Almond flour, oat flour (or those blended-up oats), flaxseed meal, rolled oats, hempseeds, collagen if you’re using, the cinnamon, salt, baking soda, and baking powder. Whisk them until you don’t see any little clumps. (I admit, I’ve skipped this step and just dumped everything into one bowl. The cookies turned out, but texture was a bit all over the place. Live and learn…)
-
4Add the dry to the wet slowly, stirring so it all comes together. It’ll be a thick, pretty sticky dough, but that’s what you want! Once you’ve got most of the lumps out, fold in your walnuts and about three-quarters of your chopped chocolate. Save the rest for topping. (This is my official taste-testing moment; if you’re not licking the spoon here, you’re missing out.)
-
5Scoop the dough into balls. Medium-sized cookie scoop works beautifully here, but two spoons will do. You’re aiming for 24 pieces. Press some of that saved chocolate into each one—more chocolate, more fun. Plop the dough balls onto a baking sheet and slide them in the freezer for 30 minutes. I know, it’s a pain waiting, but skipping makes cookies too flat.
-
6Ready to bake? Grab about 8 cookies for each tray (gives them plenty of space to spread) and bake on the middle rack for 11 to 14 minutes, depending on if you like chewy middles or crisp edges (I accidentally left them a minute too long once, and hey, my friends still ate them). Take out, sprinkle some flaky salt, marvel at the shine from the melting chocolate. Move immediately to a rack to cool. Repeat for the rest of the dough!
-
7Cool totally before you store them. Because otherwise, they trap steam and get mushy—ask me how I know. But try them still just a little warm, with the chocolate melty. Heavenly.
CLICK FOR NUTRITION INFO
↑
Approximate Information for One Serving
Serving Size:
1 serving
Calories:
170 caloriescal
Protein:
5gg
Fat:
10gg
Saturated Fat:
0g
Trans Fat:
0g
Cholesterol:
0mg
Sodium:
0mg
Potassium:
0mg
Total Carbs:
17gg
Fiber:
0g
Sugar:
0g
Net Carbs:
0g
Vitamin A:
0
Vitamin C:
0mg
Calcium:
0mg
Iron:
0mg
Nutrition Disclaimers
Number of total servings shown is approximate. Actual number of servings will depend on your preferred portion sizes.
Nutritional values shown are general guidelines and reflect information for 1 serving using the ingredients listed, not including any optional ingredients. Actual macros may vary slightly depending on specific brands and types of ingredients used.
To determine the weight of one serving, prepare the recipe as instructed. Weigh the finished recipe, then divide the weight of the finished recipe (not including the weight of the container the food is in) by the desired number of servings. Result will be the weight of one serving.
Did you make this recipe?
Please consider Pinning it!