When the Slow Cooker Is Your Best Kitchen Sidekick
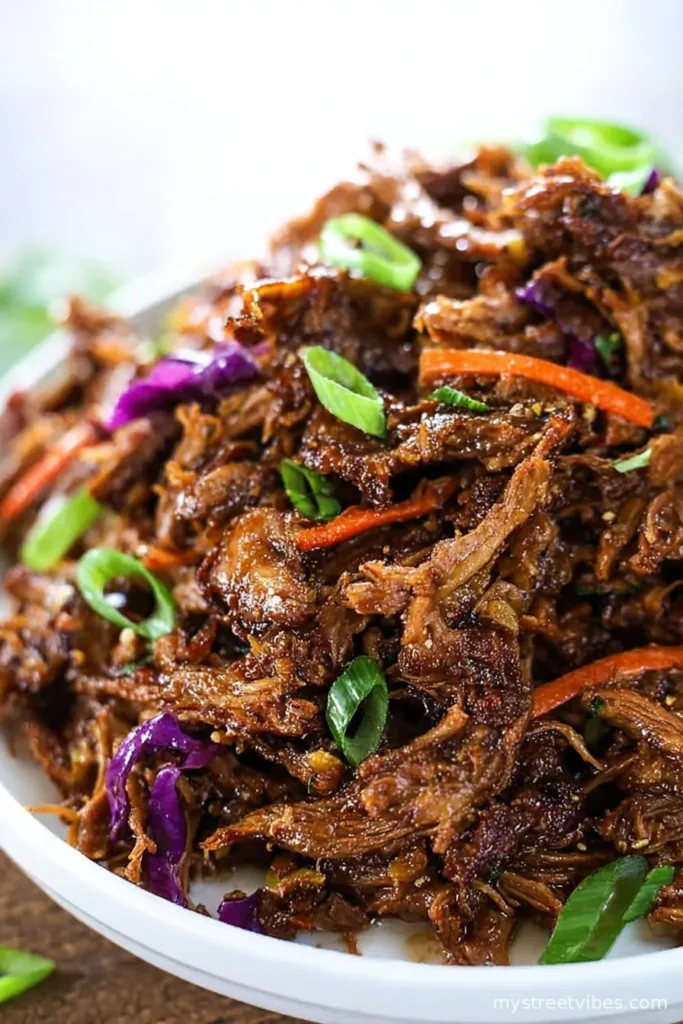
You know those days when you’d rather herd cats than stand over the stove? That’s exactly why I ended up making Slow Cooker Asian shredded pork for the first time—well, that and a pork shoulder lurking in my fridge looking like the Lost City of Atlantis. The first time was on a rainy Sunday (the sort of ‘can’t be bothered’ Sunday); I wanted a meal that simmered away while I watched ridiculous home renovation shows and pretended I was going to clear my inbox. Now, it’s one of those recipes I pull out when I want maximum taste for minimum effort. Plus, it makes the house smell absurdly good—like, hang-around-the-kitchen kind of good.

Why This Dish Is a Repeat Offender in My Meal Plan
I make this when I’ve got friends coming over and I want to look like a kitchen genius who totally has it together (secret: I usually don’t). My family goes wild for this because the pork pretty much melts in your mouth, and the sauce? It’s sweet, savory, and has a bit of zing if you throw in some chili flakes—though, I’ve definitely skipped them when feeding spice-averse uncles. I also love that you just dump everything in and walk away; there’s no browning or faffing about. Actually, learned this the hard way after thinking I needed to brown absolutely everything—won’t do that again. Plus, it’s wicked good leftover (if you have any, which, good luck with that).
Gather These Ingredients (Subbing is Totally Fine)
- 2 kg pork shoulder, boneless (sometimes I use pork butt if that’s what’s on sale; heck, I’ve even done it with pork loin but it’s less juicy)
- 120 ml soy sauce (I swear by the dark one for color, but light soy works in a pinch)
- 80 ml hoisin sauce (my gran always used Lee Kum Kee, but the knockoff from the local shop is fine—don’t stress)
- 60 ml rice vinegar (white wine vinegar works if you’re out—I’ve definitely done that more than once)
- 80 g brown sugar (I’ve swapped in honey before when I ran out, it worked…ish)
- 6 cloves garlic, smashed (or a handful of the pre-chopped jarred stuff when feeling lazy)
- 1 tablespoon fresh ginger, grated (or, I hate to say it, the tube stuff if it’s winter and I’m cold)
- 1 teaspoon red pepper flakes (totally optional, or more if you’re feeling bold—my brother adds sriracha instead, rebel)
- 2 tablespoons sesame oil
- 120 ml chicken stock (oh, and once I used veggie stock by accident and honestly? Not bad at all)
- 2 tablespoons cornstarch (mix this with a splash of water later; sometimes I forget this bit, but it still works)
How To Make This Slow Cooker Winner
- Pop your pork shoulder into the slow cooker. No need to trim every last bit of fat—some is good for flavor. If it looks massive, cut it in half so everything fits.
- In a medium bowl (or honestly, sometimes I just do this straight in the crock), mix together the soy sauce, hoisin, rice vinegar, brown sugar, garlic, ginger, chili flakes, sesame oil, and chicken stock. Pour the sauce sloppily over the pork. (Pro tip: try not to splash your shirt. I do every time.)
- Lid on. Cook on low for 8-10 hours or high for about 5-6 if you’re running behind. Don’t peek too early; moisture is your friend and is shy when interrupted.
- Once it’s done, lift out the pork (tongs work; forks will do; just don’t burn yourself like I did last month) and shred it up with two forks. This is when I always nibble a piece, and then convince myself it’s taste-testing, not snacking.
- To thicken the sauce: mix the cornstarch with a bit of water, then stir it into the liquid left in the slow cooker. Crank it to high and let it bubble for 10-15 mins. (Sometimes I forget this part, honestly, and just pour the thinner sauce over rice. Still delicious.)
- Dump the shredded pork back into the slow cooker and swirl it around in all that saucy goodness. Give it another 10 minutes if you can bear waiting. Or just go for it; I definitely have.
Notes From Someone Who’s Messed Up Enough Times
- If your pork seems dry, you probably cooked it too hot. I used to always rush slow cooker recipes, but patience really does the trick here.
- No slow cooker? I made this once in a Dutch oven in the oven at 140°C (about 285°F) for 4-5 hours. The pork didn’t quite fall apart, but still lush.
- I’ve totally forgotten the ginger before (and it’s still good). The recipe forgives forgetful cooks.
Things I’ve Tried (Not All Were Genius Moves)
So, one time I swapped out half the pork for beef brisket. Spoiler: the sauce still worked, but I thought the pork played nicer with all that sweet-savory going on. Chicken thighs are decent too for a lighter meal, but they get a bit stringy if you cook them for as long as pork requires. I also once added pineapple chunks, channeling my inner fancy chef—tasted nice, but the texture threw me off. Wouldn’t bother again.

Equipment (Don’t Panic If You’re Missing Something)
- Slow cooker (obviously). Or do what I said above—oven works in a pinch.
- Decent tongs (get in there with fork and spoon if that’s what you have—no one will know)
- Cutting board, big knife
- Bowl for mixing/sauce prep (or just use the slow cooker insert if you can’t be fussed)
Storage (But Honestly, It Never Lasts Long Here)
Stuff this straight in the fridge in an airtight container, it’ll keep for 3-4 days—though in my house, that’s wishful thinking. Occasionally, I’ll portion it into smaller tubs for quick lunches. Freezes great, too; just thaw and microwave or pop it in a pan to reheat. If you somehow have leftovers.
If You Want to Serve It Like I Do
In our place, this lands on steamed rice most nights. Toss some quick-pickled veg on the side (or, alright, just chopped cucumbers if I’m being realistic). Sometimes we pile it into fluffy bao buns with slaw, and—little guilty pleasure—leftover pork in a toasted sandwich with a bit of mayo, let me tell you: magic. My mum insists on adding spring onions and sesame seeds every time, and who am I to argue?
Hard-Earned Pro Tips (Learn Form Me)
- I once tried cranking this on high the whole way—came out tough as old boots. Low and slow wins every day.
- Actually, let the pork sit in the sauce for an extra 10 minutes after shredding—soaks up the flavor like a day at the spa.
- Don’t skip the brown sugar or hoisin, or you’ll lose that beautiful balanced sauce. Ask me how I know.
So, Here Are Some Real-Life Questions I’ve Been Asked
- Can I use another meat? Absolutely, though pork shoulder is king here. Chicken thighs work if you adjust the time (try 4-5 hours on low), but brisket was a bit weirdly chewy, to be honest.
- Is it really OK if I don’t have fresh ginger? Oh, for sure. The tube or even powdered ginger (about half a teaspoon) will do. I promise, no one will know unless they’re a ginger snob.
- What if my sauce is runny? Add more cornstarch slurry and let it bubble, or just live with a thinner sauce—it soaks into rice beautifully.
- Does it taste better the next day? I think it does. The flavors meld and get even richer somehow, but honestly, we rarely have any left to test this theory more than once or twice.
Funny story—last time I made this, I left the pork resting on the counter to cool and came back to find the cat staring at it longingly. That’s when you know dinner’s about to be a hit.
Ingredients
- 2 kg pork shoulder, boneless (sometimes I use pork butt if that’s what’s on sale; heck, I’ve even done it with pork loin but it’s less juicy)
- 120 ml soy sauce (I swear by the dark one for color, but light soy works in a pinch)
- 80 ml hoisin sauce (my gran always used Lee Kum Kee, but the knockoff from the local shop is fine—don’t stress)
- 60 ml rice vinegar (white wine vinegar works if you’re out—I’ve definitely done that more than once)
- 80 g brown sugar (I’ve swapped in honey before when I ran out, it worked…ish)
- 6 cloves garlic, smashed (or a handful of the pre-chopped jarred stuff when feeling lazy)
- 1 tablespoon fresh ginger, grated (or, I hate to say it, the tube stuff if it’s winter and I’m cold)
- 1 teaspoon red pepper flakes (totally optional, or more if you’re feeling bold—my brother adds sriracha instead, rebel)
- 2 tablespoons sesame oil
- 120 ml chicken stock (oh, and once I used veggie stock by accident and honestly? Not bad at all)
- 2 tablespoons cornstarch (mix this with a splash of water later; sometimes I forget this bit, but it still works)
Instructions
-
1Pop your pork shoulder into the slow cooker. No need to trim every last bit of fat—some is good for flavor. If it looks massive, cut it in half so everything fits.
-
2In a medium bowl (or honestly, sometimes I just do this straight in the crock), mix together the soy sauce, hoisin, rice vinegar, brown sugar, garlic, ginger, chili flakes, sesame oil, and chicken stock. Pour the sauce sloppily over the pork. (Pro tip: try not to splash your shirt. I do every time.)
-
3Lid on. Cook on low for 8-10 hours or high for about 5-6 if you’re running behind. Don’t peek too early; moisture is your friend and is shy when interrupted.
-
4Once it’s done, lift out the pork (tongs work; forks will do; just don’t burn yourself like I did last month) and shred it up with two forks. This is when I always nibble a piece, and then convince myself it’s taste-testing, not snacking.
-
5To thicken the sauce: mix the cornstarch with a bit of water, then stir it into the liquid left in the slow cooker. Crank it to high and let it bubble for 10-15 mins. (Sometimes I forget this part, honestly, and just pour the thinner sauce over rice. Still delicious.)
-
6Dump the shredded pork back into the slow cooker and swirl it around in all that saucy goodness. Give it another 10 minutes if you can bear waiting. Or just go for it; I definitely have.
CLICK FOR NUTRITION INFO
↑
Approximate Information for One Serving
Serving Size:
1 serving
Calories:
430cal
Protein:
45 gg
Fat:
20 gg
Saturated Fat:
0g
Trans Fat:
0g
Cholesterol:
0mg
Sodium:
0mg
Potassium:
0mg
Total Carbs:
15 gg
Fiber:
0g
Sugar:
0g
Net Carbs:
0g
Vitamin A:
0
Vitamin C:
0mg
Calcium:
0mg
Iron:
0mg
Nutrition Disclaimers
Number of total servings shown is approximate. Actual number of servings will depend on your preferred portion sizes.
Nutritional values shown are general guidelines and reflect information for 1 serving using the ingredients listed, not including any optional ingredients. Actual macros may vary slightly depending on specific brands and types of ingredients used.
To determine the weight of one serving, prepare the recipe as instructed. Weigh the finished recipe, then divide the weight of the finished recipe (not including the weight of the container the food is in) by the desired number of servings. Result will be the weight of one serving.
Did you make this recipe?
Please consider Pinning it!