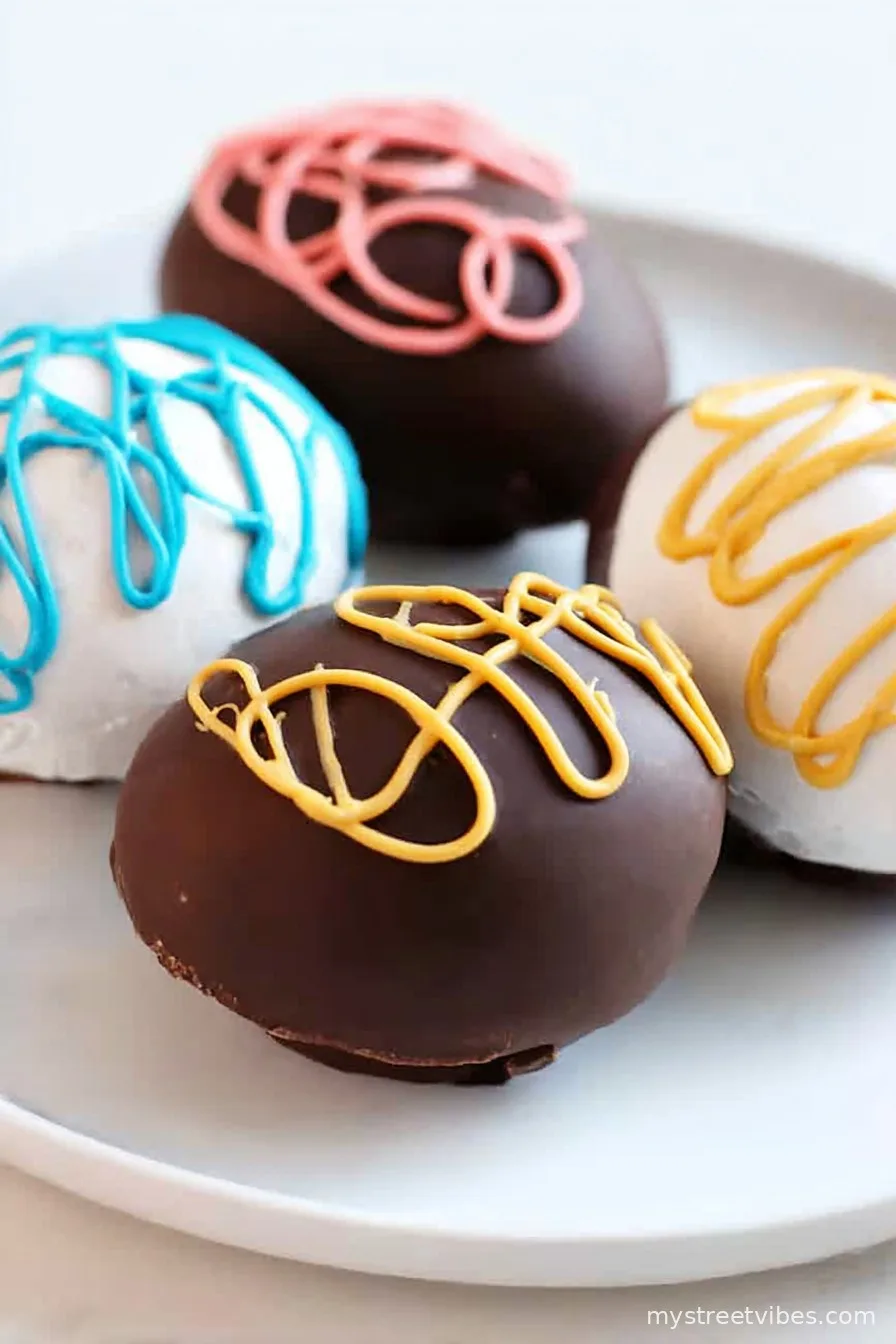
Catching Up Over Homemade Marshmallow Eggs
I still remember the first time I made marshmallow eggs with my niece. Kitchen was a disaster, hands were sticky, table covered in a snowdrift of powdered sugar—and honestly, neither of us could stop giggling. If joy had a taste, it’d be this sweet, pillowy, chocolate-dipped fluff. So, every spring I dust off the trusty stand mixer and commit to spending an afternoon wrestling (sometimes literally) with all things marshmallow. Warning: you might never look at the store-bought ones the same way again.
Why You’ll Love This (At Least, I Do!)
I make these for every family gathering right before Easter, but honestly, we’ve eaten them in July too. My family goes bananas for them—the soft marshmallow, that dark chocolate snap. And, okay, when you get the chocolate to coat just right? The satisfaction is real. Little tip: don’t be afraid of the sticky chaos. It’s part of the fun. Plus, these taste about a million times better homemade, even if mine sometimes come out looking like wobbly space potatoes. (But that’s part of the charm, no?)
What You’ll Need (and My Little Substitutions)
- 32 – 64 ounces (1 or 2 bags) of Confectioners Sugar — I’ll be real, sometimes I just dump a whole bag into my mixing bowl and hope for the best.
- 1/2 cup (118g) cold water — tap water is fine, I promise.
- 3 packages (21.6g) unflavored gelatin — Knox is classic, but store brands seem fine. My gran used to swear by the orange box, but you do you.
- 1 ½ cups (337g) Granulated Sugar — any white sugar, honestly.
- 1 cup (310g) Light Corn Syrup — don’t substitute this, or the texture gets weird. I tried honey once… wouldn’t recommend it.
- 1/2 cup (118g) water — yes, again; you’ll use this in the syrup part so don’t get confused.
- 12 ounces Premium 70% Dark Chocolate — premium is ~nice~ but I’ve melted down leftover chocolate Santas in a pinch. Just chop whatever you use.
- 1 whole egg for creating the molds — raw, but don’t worry, you’re not eating it, just making the shape!
- Colorful candy melts or sprinkles for decoration — sometimes we skip these, but the kids love it when things get *extra* bright.
Let’s Make Marshmallow Eggs (Mess Is Your Friend)
- Line up a couple baking sheets and dump a thick layer of confectioners sugar all over. Take your whole egg (yep, raw in the shell!), press it (gently, unless you want egg everywhere) into the sugar to form lots of little egg-shaped hollows. Like making footprints in the snow. Set aside for now.
- Grab your stand mixer and pour in the first 1/2 cup cold water. Sprinkle the gelatin over top and just let it sit (it’ll look a bit lumpy—totally normal). That’s called blooming, and you can use the pause to scroll your phone or play some tunes. Or, actually, prep your syrup.
- In a medium saucepan, toss in the granulated sugar, corn syrup, and second 1/2 cup water. Stir it until the sugar is dissolved (I’ve forgotten to stir before—doesn’t end well). Now, put away your spoon. Seriously, hands off. Clip on a candy thermometer and let the syrup bubble until it hits 240°F. No stirring!
- Once you hit that sweet spot, carefully take it off the heat and slowly (like, really slowly—hot sugar is no joke) pour it into the waiting gelatin in your mixer bowl.
- Turn your mixer to low at first (unless you want strings of molten marshmallow in your hair), then let it rip to high. Let it whisk for about 10 minutes, until it’s glossy, thick, and fluffy as a cloud. This is my favorite part—the transformation is kind of wild.
- Take the bowl off the mixer, load the marshmallow into a pastry bag (or a gallon zip-top bag with the corner snipped if you can’t find your pastry tip…not that that’s ever happened…). This gets sticky. I always end up with marshmallow in places I didn’t know possible.
- Pipe that gorgeous marshmallow into all those egg-shaped dips you made earlier. Doesn’t have to be perfect—mine never are. Kinda rustic, let’s say.
- Now, let your marshmallow eggs sit and firm up for about 1-2 hours. Good time to catch up on life, clean the sticky bits off your elbows, whatever.
- Chop up your chocolate and microwave for about a minute. Stir, then keep zapping in 15-second bursts until it’s silky. Be patient. If you scorch it, you’ll know (the smell is…unforgiving).
- Take each marshmallow egg, dust off any sugar snowdrifts, and dunk it in that glossy melted chocolate. Toss it around so it gets fully coated, then place onto a parchment-lined tray. Repeat until all eggs are now chocolatey (and you, too).
- Let the chocolate set up a bit. If you’re doing sprinkles, sprinkle now, while it’s still sticky. Otherwise they just slide right off and you get weird half-bald eggs.
- Melt some candy melts (whatever colors you like), transfer to a baggie, and pipe on stripes or zigzags—let your inner 5-year-old go wild here.
- Once set, leave your eggs at room temp for up to a day or pop them in the fridge for a week. That said, I’ve never had a batch last that long in my house. Someone always nicks them before breakfast the next morning (looking at you, Dad).
Real-Life Discoveries (AKA “Notes from Battle”)
- If you over-bloom the gelatin, it gets weird and clumpy. Turns out, patience is a virtue.
- The marshmallow mixture loves to stick to absolutely everything. Rubbing a teensy bit of oil on your hands helps—or, you could just embrace the chaos.
Variations I’ve Tried (And a Fail or Two)
- Extra flavors! I’ve stirred in a drop of vanilla or almond extract after whipping. Lemon zest once… which wasn’t a crowd favorite, actually.
- Peanut butter drizzle is incredible, except for my cousin who’s allergic—oops.
- Different chocolates…white chocolate looks fancy but tastes so sweet. Milk chocolate is a bit much for me, but the kids approve.

Equipment—I Improvise All the Time
- Stand mixer: A must, unless you’re training for a forearm wrestling championship.
- Candy thermometer: I kinda think it’s necessary, but in a pinch you can use the cold water sugar “ball” test. Sort of fun, actually.
- Don’t sweat it if you’re out of pastry bags—zip-top bags work great for piping.
Storage: How Long Will They Really Last?
Technically you can keep these at room temperature for 24 hours, or in the fridge for up to a week.
But in all honesty, ours disappear within a day, tops. If you do stash them in the fridge, toss them in an airtight container—or they’ll absorb all sorts of weird fridge flavors. Trust me, marshmallow-egg-with-broccoli-notes isn’t great.
My Favorite Ways to Serve
We put out a jumbo plateful in the middle of the table and let everyone fight over the best-decorated one. They’re lovely as part of an Easter brunch spread, or just eaten straight out of hand while arguing over whose eggs are ugliest (that’s a tradition, right?). Oddly enough, I think they taste even better after a day—if they last that long.
Pro Tips I Learned the Hard Way
- Trying to speed things up by popping the chocolate-covered eggs in the freezer? Don’t—they get weird and sweaty.
- Really let the sugar syrup reach the right temp; if you jump the gun, your marshmallow will be gloopy. Learned that the sticky way.
You’ve Got Questions, I’ve Got Answers
- Can I make these ahead? Honestly, yes, but the decorations are best added the day of. They get a bit soft after a few days in the fridge.
- What’s the hack if I don’t have a candy thermometer? You can drop a bit of syrup into cold water—if it forms a chewy softball, you’re there. Fiddly, but it works in a pinch.
- Can I swap out the dark chocolate? Sure, but I prefer the snap of 70%. Use whatever you love; just don’t blame me if it’s too sweet!
- Do I have to pipe the marshmallow? Not really—smear it in with a spoon if you want rustic (aka lumpy) eggs.
- Is this worth the mess? I say yes every time. The stickiness mostly washes out, eventually…
Now, if you’ll excuse me, I’ve got chocolate to lick off my fingers. Happy marshmallowing!
Ingredients
- 32 -64 ounces (1 or 2) bags of Confectioners Sugar
- ½ cup (118g) cold water
- 3 packages (21.6g) unflavored gelatin
- 1 ½ cups (337g) Baker’s Corner Granulated Sugar
- 1 cup (310g) Baker’s Corner Light Corn Syrup
- ½ cup (118g) water
- 12 ounces Premium 70% Dark Chocolate
- 1 whole egg for creating the molds
- Colorful candy melts or sprinkles for decoration
Instructions
-
1Line up a couple baking sheets and dump a thick layer of confectioners sugar all over. Take your whole egg (yep, raw in the shell!), press it (gently, unless you want egg everywhere) into the sugar to form lots of little egg-shaped hollows. Like making footprints in the snow. Set aside for now.
-
2Grab your stand mixer and pour in the first 1/2 cup cold water. Sprinkle the gelatin over top and just let it sit (it’ll look a bit lumpy—totally normal). That’s called blooming, and you can use the pause to scroll your phone or play some tunes. Or, actually, prep your syrup.
-
3In a medium saucepan, toss in the granulated sugar, corn syrup, and second 1/2 cup water. Stir it until the sugar is dissolved (I’ve forgotten to stir before—doesn’t end well). Now, put away your spoon. Seriously, hands off. Clip on a candy thermometer and let the syrup bubble until it hits 240°F. No stirring!
-
4Once you hit that sweet spot, carefully take it off the heat and slowly (like, really slowly—hot sugar is no joke) pour it into the waiting gelatin in your mixer bowl.
-
5Turn your mixer to low at first (unless you want strings of molten marshmallow in your hair), then let it rip to high. Let it whisk for about 10 minutes, until it’s glossy, thick, and fluffy as a cloud. This is my favorite part—the transformation is kind of wild.
-
6Take the bowl off the mixer, load the marshmallow into a pastry bag (or a gallon zip-top bag with the corner snipped if you can’t find your pastry tip…not that that’s ever happened…). This gets sticky. I always end up with marshmallow in places I didn’t know possible.
-
7Pipe that gorgeous marshmallow into all those egg-shaped dips you made earlier. Doesn’t have to be perfect—mine never are. Kinda rustic, let’s say.
-
8Now, let your marshmallow eggs sit and firm up for about 1-2 hours. Good time to catch up on life, clean the sticky bits off your elbows, whatever.
-
9Chop up your chocolate and microwave for about a minute. Stir, then keep zapping in 15-second bursts until it’s silky. Be patient. If you scorch it, you’ll know (the smell is…unforgiving).
-
10Take each marshmallow egg, dust off any sugar snowdrifts, and dunk it in that glossy melted chocolate. Toss it around so it gets fully coated, then place onto a parchment-lined tray. Repeat until all eggs are now chocolatey (and you, too).
-
11Let the chocolate set up a bit. If you’re doing sprinkles, sprinkle now, while it’s still sticky. Otherwise they just slide right off and you get weird half-bald eggs.
-
12Melt some candy melts (whatever colors you like), transfer to a baggie, and pipe on stripes or zigzags—let your inner 5-year-old go wild here.
-
13Once set, leave your eggs at room temp for up to a day or pop them in the fridge for a week. That said, I’ve never had a batch last that long in my house. Someone always nicks them before breakfast the next morning (looking at you, Dad).
CLICK FOR NUTRITION INFO
↑
Approximate Information for One Serving
Serving Size:
1 serving
Calories:
180 caloriescal
Protein:
2gg
Fat:
6gg
Saturated Fat:
0g
Trans Fat:
0g
Cholesterol:
0mg
Sodium:
0mg
Potassium:
0mg
Total Carbs:
32gg
Fiber:
0g
Sugar:
0g
Net Carbs:
0g
Vitamin A:
0
Vitamin C:
0mg
Calcium:
0mg
Iron:
0mg
Nutrition Disclaimers
Number of total servings shown is approximate. Actual number of servings will depend on your preferred portion sizes.
Nutritional values shown are general guidelines and reflect information for 1 serving using the ingredients listed, not including any optional ingredients. Actual macros may vary slightly depending on specific brands and types of ingredients used.
To determine the weight of one serving, prepare the recipe as instructed. Weigh the finished recipe, then divide the weight of the finished recipe (not including the weight of the container the food is in) by the desired number of servings. Result will be the weight of one serving.
Did you make this recipe?
Please consider Pinning it!