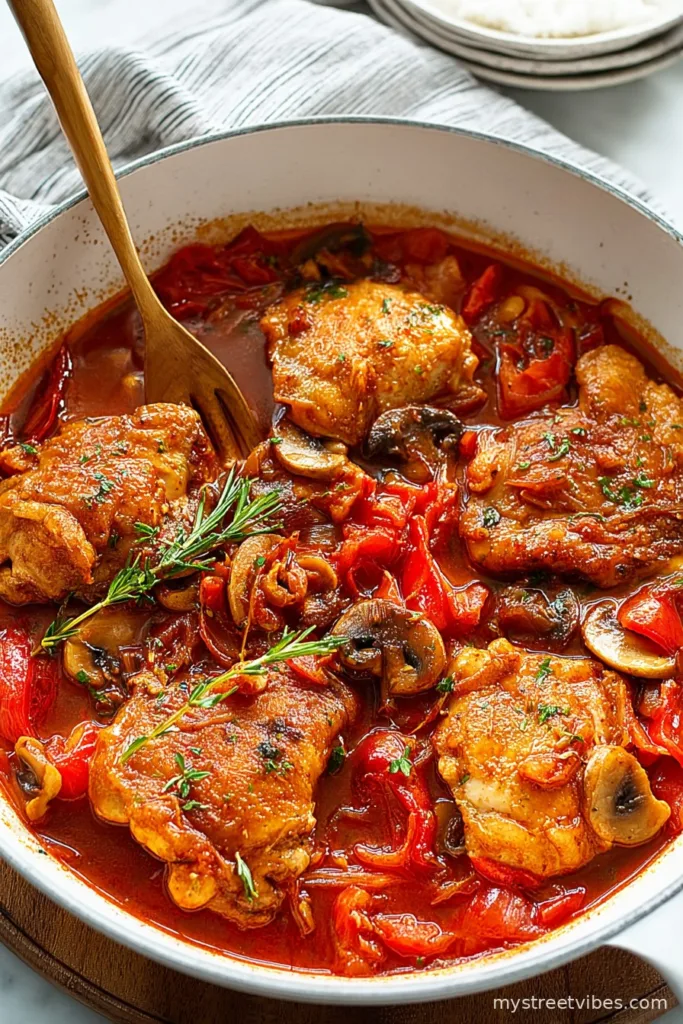
How Fork-Tender Chicken Cacciatore Became My Comfort Food
Look, I’ll be honest—Chicken Cacciatore wasn’t something I grew up with. I discovered it by accident while trying to impress a date (who, for the record, was more impressed with my wine-pouring skills than my culinary prowess—but that’s a story for another day). But after the first time I made it, with its saucy, aromatic mess of tomatoes, onions, and peppers tangled up with chicken that basically falls off the bone, it just stuck. Now I haul out my battered Dutch oven (it looks like it’s been through a few world wars) at least once a month for this little ritual, especially when I can’t decide between easy and comforting. Sometimes I even make it on a Tuesday, just because it feels like a Cacciatore sort of day. And you should see the looks I get from the dog when she smells it.

Why You’ll Love This (or Honestly, Why I Do)
I make this when I just want dinner to practically make itself while I sip something on the couch. My family goes bonkers for it because the chicken just melts—like, you can pull it apart with a fork and feel a little bit smug. It also tastes even better the next day (assuming it lasts that long). I used to curse under my breath peeling tomatoes, but canned do just fine; no one has ever noticed the difference. Plus, it’s kinda forgiving. Mess up the timing? Sauce still tastes good. Forget the capers? It’ll survive. I once swapped thighs for drumsticks by accident—not a soul complained. Well, except my sister, but she complains regardless.
What You’ll Need (with a Few Cheeky Swaps)
- 6 bone-in, skin-on chicken thighs (or swap for drumsticks; I do sometimes if thighs are on sale)
- 1 big onion, sliced kinda thin (yellow or white; my grandmother swore by yellow but I’m not that picky)
- 1 red bell pepper, cut into chunky strips (green works too, or even roasted peppers from a jar if you’re in a rush)
- 3 cloves garlic, smashed and minced (I once used the stuff form the jar—honestly, it’s fine)
- 400g (about 14oz) canned crushed tomatoes (in summer, I sometimes use fresh, but, really, who has the time?)
- 2 tablespoons tomato paste (optional, for a richer sauce—sometimes I skip this step if I can’t find the tube lurking in the fridge)
- 100ml dry white wine (or chicken broth if I feel like skipping booze for the night)
- 2 teaspoons dried oregano (fresh is great, but my dried jar’s been going for years and still works)
- 1 teaspoon dried basil (again, fresh is fancy but not required)
- 1 handful black olives, pitted (Kalamata are lush, but use whatever you like—or leave out if olives aren’t your thing)
- 2 tablespoons capers, rinsed (optional; sometimes I skip to save a trip to the shop)
- Salt and black pepper, to taste (I go heavy on the pepper)
- Olive oil, a couple of good glugs
- Chopped fresh parsley, for serving (I forget this half the time, so don’t stress)
How I Make Fork-Tender Chicken Cacciatore
- Start by browning the chicken. Heat a generous glug of olive oil in your biggest Dutch oven or a deep sauté pan—medium-highish heat. Season the chicken thighs with salt and pepper, then lay them skin-side down. Let them sizzle for 5-8 minutes till good and golden (this bit always makes the kitchen smell amazing!). Flip and brown the other side too. Take them out and set aside. A plate works but I use a baking sheet when I’ve run out of clean plates.
- Sauté the veg. In the same pan, toss in onion and bell pepper. Cook, stirring a bit, till soft and starting to caramelise (about 6 min). Add in the garlic for the last 30 seconds. Careful—garlic burns faster than you think, and I’ve learned this the hard way.
- Build that sauce. Stir in the tomato paste if you’re using it (sometimes I don’t, it’s fine). Pour in the white wine (or broth), scrape up any tasty browned bits from the bottom—don’t skip this, it makes things extra flavourful. Let it bubble for a minute. Add canned tomatoes, oregano, basil, olives, and capers (if you have them). Taste and add more salt or pepper if you think it needs it.
- Add back the chicken. Snuggle the browned chicken back into the sauce, skin up. Spoon a bit of sauce on top, then cover and turn the heat to low. This is where I usually abandon it for 45-55 minutes and do something else. Chicken’s done when it’s so tender you can prod it with a fork and it basically gives up. If the sauce seems too thick, I sometimes splash a bit of water in.
- Finish it off. Take off the lid for the last 10 minutes to let the sauce thicken, if you like it that way. Actually, I think it’s better a bit loose, but you do you. Taste one last time—this is where I sneak a cheeky smidge of sauce with a spoon (quality control, obviously). Sprinkle with parsley just before serving.
Notes (Learned the Hard Way)
- If you cram the pan tight, things steam instead of brown. Give your chicken some breathing room—it acts like it’s on holiday that way.
- I once left it simmering an extra half hour by accident. Not a disaster—honestly, it just gets more tender, but do check it hasn’t dried out.
- If you’re short on time, you can cut the chicken into chunks before browning—they cook faster, though it’s not as dramatic at serving time.
How I’ve Mixed This Up
- Tried with mushrooms added in after the peppers—really tasty, especially for a bit more earthiness.
- Once went wild and put in a pinch of chili flakes. If you like a bit of heat, totally do it.
- Attempted to swap chicken for pork shoulder once—it wasn’t great. Wouldn’t recommend to be honest.

My Equipment List (or Lack Thereof)
- Dutch oven or any biggish, heavy-bottomed pot—if you only have a deep frying pan with a lid, that’ll do in a pinch.
- Cooks spoon (wooden, plastic, whatever). I lost my wooden spoon once and used a salad tong—awkward but manageable.
Storing Leftovers (Like They’ll Last)
Store in an airtight container in the fridge, up to 3 days (though honestly, in my house it rarely gets past day one). Sometimes I think it tastes even better on day two. You can freeze it too, but make sure you de-bone the chicken first—and label it, otherwise you’ll forget what it is. Trust me.
How I Like to Serve It (It’s a Bit of a Ritual)
We pile it over heaps of buttery mashed potatoes or, more traditionally I suppose, al dente spaghetti. My uncle likes it with crusty bread—he says it’s the only way to mop up the sauce properly. Occasionally, I just eat it over rice when all else fails.
Lessons Learned (My Not-So-Secret Pro Tips)
- Don’t skip the browning step! I once tried to save time and it tasted flat—plus, you miss out on all those caramelized bits stuck to the pan.
- Use bone-in chicken for best flavour. Boneless works in a pinch, but it’s just less rich. On second thought, boneless thighs do make it easier to eat if you’re in a hurry (not gonna lie).
Questions Folks Have Asked Me
- Can I use chicken breasts? Sure, if that’s what you’ve got—but keep an eye on the cooking time; breasts dry out faster. I’d check them at the 30-minute mark.
- Is it really OK to use canned tomatoes? Absolutely. I’ve used fresh once or twice when I was feeling fancy, but canned is honestly less fuss (and most days I’m all about less fuss).
- Do I have to use wine? Nope! Chicken broth works fine. I sometimes use a splash of both, depending what’s handy—the flavour’s pretty forgiving.
- Can I make this ahead? Yes! It reheats like a dream, and, weirdly, I swear it gets tastier. I mean, how many dinners can you say that about?
- What’s best to serve it with? Whatever soaks up sauce—spaghetti, bread, rice…plain polenta if you want to get all rustic about it.
And, unrelated but I always wonder—why do chickens never cross the road near my house? Maybe they just know I’m making cacciatore. Anyway, if you give this a go, let me know how it turned out—unless it flopped, in which case, let’s never speak of it again!
Ingredients
- 6 bone-in, skin-on chicken thighs (or swap for drumsticks; I do sometimes if thighs are on sale)
- 1 big onion, sliced kinda thin (yellow or white; my grandmother swore by yellow but I’m not that picky)
- 1 red bell pepper, cut into chunky strips (green works too, or even roasted peppers from a jar if you’re in a rush)
- 3 cloves garlic, smashed and minced (I once used the stuff form the jar—honestly, it’s fine)
- 400g (about 14oz) canned crushed tomatoes (in summer, I sometimes use fresh, but, really, who has the time?)
- 2 tablespoons tomato paste (optional, for a richer sauce—sometimes I skip this step if I can’t find the tube lurking in the fridge)
- 100ml dry white wine (or chicken broth if I feel like skipping booze for the night)
- 2 teaspoons dried oregano (fresh is great, but my dried jar’s been going for years and still works)
- 1 teaspoon dried basil (again, fresh is fancy but not required)
- 1 handful black olives, pitted (Kalamata are lush, but use whatever you like—or leave out if olives aren’t your thing)
- 2 tablespoons capers, rinsed (optional; sometimes I skip to save a trip to the shop)
- Salt and black pepper, to taste (I go heavy on the pepper)
- Olive oil, a couple of good glugs
- Chopped fresh parsley, for serving (I forget this half the time, so don’t stress)
Instructions
-
1Start by browning the chicken. Heat a generous glug of olive oil in your biggest Dutch oven or a deep sauté pan—medium-highish heat. Season the chicken thighs with salt and pepper, then lay them skin-side down. Let them sizzle for 5-8 minutes till good and golden (this bit always makes the kitchen smell amazing!). Flip and brown the other side too. Take them out and set aside. A plate works but I use a baking sheet when I’ve run out of clean plates.
-
2Sauté the veg. In the same pan, toss in onion and bell pepper. Cook, stirring a bit, till soft and starting to caramelise (about 6 min). Add in the garlic for the last 30 seconds. Careful—garlic burns faster than you think, and I’ve learned this the hard way.
-
3Build that sauce. Stir in the tomato paste if you’re using it (sometimes I don’t, it’s fine). Pour in the white wine (or broth), scrape up any tasty browned bits from the bottom—don’t skip this, it makes things extra flavourful. Let it bubble for a minute. Add canned tomatoes, oregano, basil, olives, and capers (if you have them). Taste and add more salt or pepper if you think it needs it.
-
4Add back the chicken. Snuggle the browned chicken back into the sauce, skin up. Spoon a bit of sauce on top, then cover and turn the heat to low. This is where I usually abandon it for 45-55 minutes and do something else. Chicken’s done when it’s so tender you can prod it with a fork and it basically gives up. If the sauce seems too thick, I sometimes splash a bit of water in.
-
5Finish it off. Take off the lid for the last 10 minutes to let the sauce thicken, if you like it that way. Actually, I think it’s better a bit loose, but you do you. Taste one last time—this is where I sneak a cheeky smidge of sauce with a spoon (quality control, obviously). Sprinkle with parsley just before serving.
CLICK FOR NUTRITION INFO
↑
Approximate Information for One Serving
Serving Size:
1 serving
Calories:
435cal
Protein:
34 gg
Fat:
28 gg
Saturated Fat:
0g
Trans Fat:
0g
Cholesterol:
0mg
Sodium:
0mg
Potassium:
0mg
Total Carbs:
14 gg
Fiber:
0g
Sugar:
0g
Net Carbs:
0g
Vitamin A:
0
Vitamin C:
0mg
Calcium:
0mg
Iron:
0mg
Nutrition Disclaimers
Number of total servings shown is approximate. Actual number of servings will depend on your preferred portion sizes.
Nutritional values shown are general guidelines and reflect information for 1 serving using the ingredients listed, not including any optional ingredients. Actual macros may vary slightly depending on specific brands and types of ingredients used.
To determine the weight of one serving, prepare the recipe as instructed. Weigh the finished recipe, then divide the weight of the finished recipe (not including the weight of the container the food is in) by the desired number of servings. Result will be the weight of one serving.
Did you make this recipe?
Please consider Pinning it!