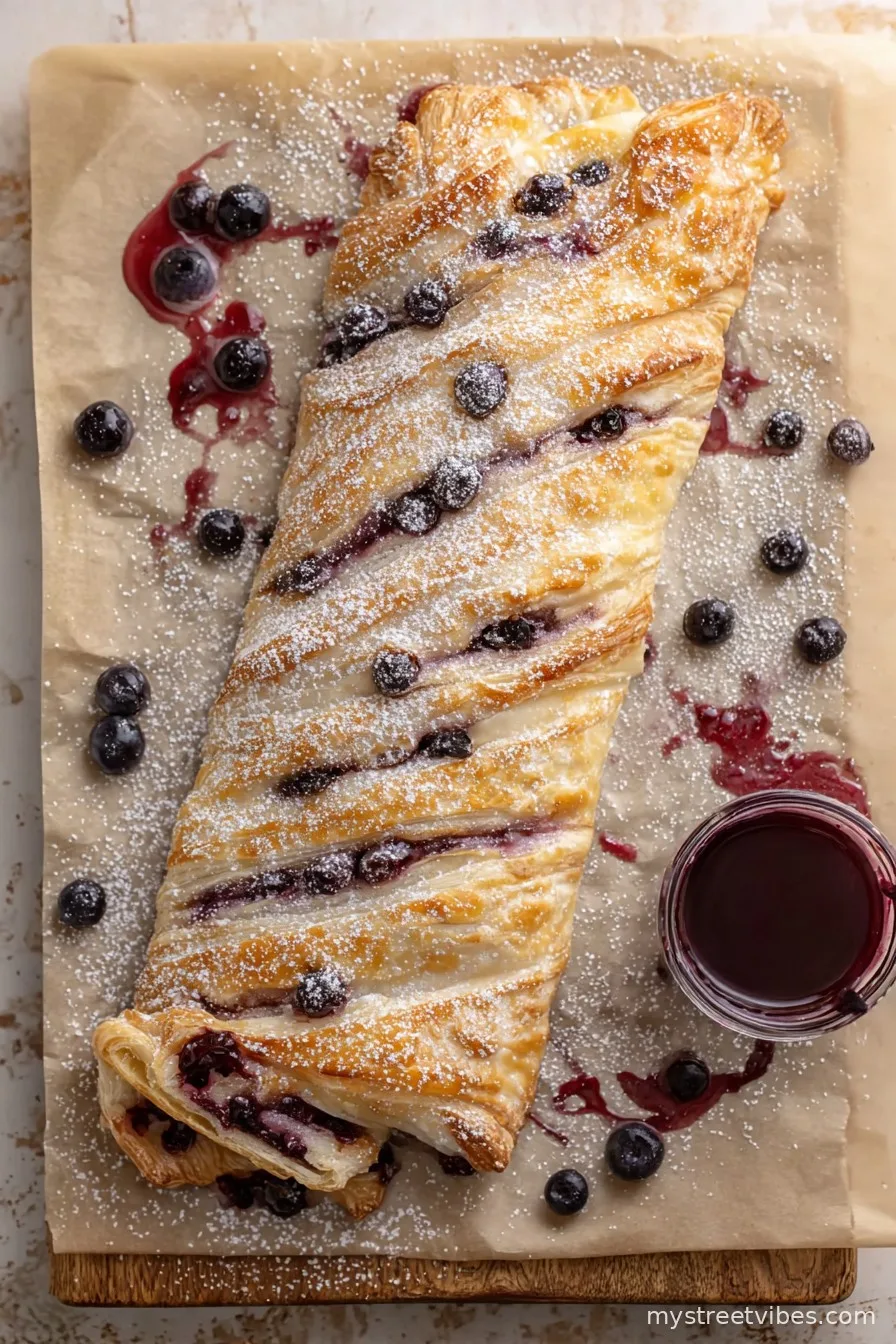
Let Me Tell You About This Danish…
Look, I know what you’re thinking—another danish recipe that calls for rising dough or, heaven forbid, braiding. But hear me out, friend: this Easy Lemon Blueberry Cheese Danish isn’t like the fussy ones. I started making it after getting inspired by one I tried at a proper fancy bakery (the kind where the servers use tongs), but I’ll be honest—I couldn’t be bothered with all that. I wanted something buttery, tangy, and bursting with blueberries, but without turning my kitchen into a flour bomb zone. My little one, Sam, literally licked the plate the first time I made it. So if you’re after a crowd-pleaser that still feels a bit special, you’re in luck!
Why You’ll Love This Danish (and When I Make It)
I pull out this danish whenever I’m asked to bring something “just a bit sweet, nothing crazy” for brunch—my neighbors devour it! There’s honestly nothing craftier than using store-bought puff pastry (no shame, by the way), so you get bakery-worthy flavor with, let’s call it, minimal faff. Also, I must admit, I tried once to make it from full-blown scratch. Never again—the laminated dough stuck to literally everything. So now I smugly reach for the frozen stuff. My partner claims it’s the lemony cheesecake center they love most, but I think it’s the way the blueberries sort of pop and swirl on top. Also, it makes your kitchen smell like you’re winning at life.
What You’ll Need (Plus Some Real-Life Swaps)
- 1 sheet puff pastry (thawed) – honestly, any brand. But my gran used to act like Pepperidge Farm was sacred.
- 4 oz (about 115g) cream cheese, softened – full-fat just tastes best, but low-fat will get the job done if you’re watching that sort of thing
- 3 tablespoons granulated sugar (or toss in 1/4 cup if you’ve got a major sweet tooth)
- 1 tablespoon fresh lemon juice – in a pinch, that squeezy bottle stuff is fine
- Zest of 1 lemon – gives a nice zing
- 1/2 teaspoon vanilla extract (honestly, I just eyeball this most days)
- 1/2 cup fresh blueberries – or frozen, if that’s what’s rolling around in the freezer. No judgment here
- 1 egg, beaten (for brushing) – sometimes I skip this if I’m out, but it does make a lovely golden edge
- 1 tablespoon coarse sugar – totally optional, but it gives a nice crunch
How To Throw This Together (Don’t Worry, It’s Easy)
- Preheat your oven to 400°F (200°C). Lay out the puff pastry on a baking sheet lined with parchment—it’ll stick otherwise. Some days I forget and just peel it off the pan like a stubborn child with a sticker, but try to remember the paper!
- In a bowl, mush (technical term) together the cream cheese, sugar, lemon juice, lemon zest, and vanilla. I use a fork. You can use a mixer, but honestly, doing it by hand is less to wash. Taste a little—this is your right as the cook.
- Spread your lovely lemony cream cheese smack dab in the middle of the pastry, leaving about a 1-inch border. Don’t be too precious; it’ll settle as it bakes.
- Scatter the blueberries over the top. There’s no art to this—just don’t dump them all in one corner like I always try to do when distracted.
- Fold over the edges of the pastry to make a sort of free-form border; pinch the corners if you like square-ish things. Brush the exposed pastry with beaten egg, or just leave it bare if you forgot (I don’t judge—been there).
- Sprinkle with coarse sugar if you’re feeling fancy. It’s honestly optional, but I like the crunch.
- Bake for about 20-25 minutes, until golden and puffed. There’s always a moment when it looks a bit wobbly in the center—don’t panic! It’ll firm up as it cools.
- Let cool for at least 10 minutes so you don’t scorch your mouth—yes, I’ve done this, more than once.

A Few Notes from My, Erm, Experiments
- Don’t overload with blueberries. I once tried to make it “extra fruity” and, well, let’s say it got soggy. Less is more, for real.
- Frozen blueberries sometimes bleed—don’t worry! It gives lovely little purple streaks. Own it.
- Try to use real lemon juice if you can; the bottled juice works, but it’s just not as bright.
Variations I’ve Actually Tried (and One Dud)
- Swapped lemon for orange – more subtle, almost floral. Not bad!
- Raspberry instead of blueberry – pretty and tart, but seeds get stuck in your teeth
- Tried adding a pinch of cinnamon once—don’t bother. It tastes like the flavors are fighting

Handy Equipment List (But Not Critical)
- Baking sheet – most important. I used a pizza pan in a pinch once, honestly worked fine.
- Parchment paper – unless you like chiseling pastry off your pan
- Mixing bowl
- Fork or hand mixer (I use a fork. Less cleaning. That’s my motto for most things.)
How To Store This (But It’ll Vanish Quick!)
Technically you can cover leftovers and keep in the fridge for up to 3 days. Reheat gently in the toaster oven if you want the pastry crisp again. But, and this is the honest truth, it rarely survives past the afternoon around here. Someone always nicks another sliver.
What To Serve This With—Or, What I Serve It With
We love it plain, but if the sun’s shining, I’ll put out a plate with fresh strawberries or extra blueberries on the side. Sometimes a good strong cup of tea or coffee is all it really needs. My daughter once insisted on a drizzle of honey. It was…different, but not bad!
The Pro Tips I Learned The Hard Way
- Don’t rush the cooling. I seriously scorched my tongue once in my impatience—it was not worth the pain
- If the pastry cracks as you unfold it, just press it back together. Once it bakes up golden, no one is the wiser
- Bake on the middle rack. I once baked it low and the bottom got soggy. Lesson learned
FAQ – Actual Questions (Some With Silly Answers)
- Can I use phyllo dough instead? I mean, you can, but it’ll be crispier and more finicky. Puff pastry is more forgiving (trust me)
- Do I have to use an egg wash? Nope. It’s just shinier with, but nothing bad will happen without. Half the time I forget anyway
- Frozen blueberries or fresh? Both work, though frozen may make things a tad more colorful (aka messy). Tastes great either way
- Can you freeze leftovers? You could, but the pastry goes sad. I recommend just sharing it instead
Oh, before I forget—one time I tried to double this thinking it’d be enough for a crowd. It turns out, it just disappears even faster! Go figure. Let me know what wild tweaks you try; maybe yours will beat the lemon (but I doubt it).
Ingredients
- 1 sheet puff pastry (thawed) – honestly, any brand. But my gran used to act like Pepperidge Farm was sacred.
- 4 oz (about 115g) cream cheese, softened – full-fat just tastes best, but low-fat will get the job done if you’re watching that sort of thing
- 3 tablespoons granulated sugar (or toss in 1/4 cup if you’ve got a major sweet tooth)
- 1 tablespoon fresh lemon juice – in a pinch, that squeezy bottle stuff is fine
- Zest of 1 lemon – gives a nice zing
- 1/2 teaspoon vanilla extract (honestly, I just eyeball this most days)
- 1/2 cup fresh blueberries – or frozen, if that’s what’s rolling around in the freezer. No judgment here
- 1 egg, beaten (for brushing) – sometimes I skip this if I’m out, but it does make a lovely golden edge
- 1 tablespoon coarse sugar – totally optional, but it gives a nice crunch
Instructions
-
1Preheat your oven to 400°F (200°C). Lay out the puff pastry on a baking sheet lined with parchment—it’ll stick otherwise. Some days I forget and just peel it off the pan like a stubborn child with a sticker, but try to remember the paper!
-
2In a bowl, mush (technical term) together the cream cheese, sugar, lemon juice, lemon zest, and vanilla. I use a fork. You can use a mixer, but honestly, doing it by hand is less to wash. Taste a little—this is your right as the cook.
-
3Spread your lovely lemony cream cheese smack dab in the middle of the pastry, leaving about a 1-inch border. Don’t be too precious; it’ll settle as it bakes.
-
4Scatter the blueberries over the top. There’s no art to this—just don’t dump them all in one corner like I always try to do when distracted.
-
5Fold over the edges of the pastry to make a sort of free-form border; pinch the corners if you like square-ish things. Brush the exposed pastry with beaten egg, or just leave it bare if you forgot (I don’t judge—been there).
-
6Sprinkle with coarse sugar if you’re feeling fancy. It’s honestly optional, but I like the crunch.
-
7Bake for about 20-25 minutes, until golden and puffed. There’s always a moment when it looks a bit wobbly in the center—don’t panic! It’ll firm up as it cools.
-
8Let cool for at least 10 minutes so you don’t scorch your mouth—yes, I’ve done this, more than once.
CLICK FOR NUTRITION INFO
↑
Approximate Information for One Serving
Serving Size:
1 serving
Calories:
330 caloriescal
Protein:
5gg
Fat:
20gg
Saturated Fat:
0g
Trans Fat:
0g
Cholesterol:
0mg
Sodium:
0mg
Potassium:
0mg
Total Carbs:
32gg
Fiber:
0g
Sugar:
0g
Net Carbs:
0g
Vitamin A:
0
Vitamin C:
0mg
Calcium:
0mg
Iron:
0mg
Nutrition Disclaimers
Number of total servings shown is approximate. Actual number of servings will depend on your preferred portion sizes.
Nutritional values shown are general guidelines and reflect information for 1 serving using the ingredients listed, not including any optional ingredients. Actual macros may vary slightly depending on specific brands and types of ingredients used.
To determine the weight of one serving, prepare the recipe as instructed. Weigh the finished recipe, then divide the weight of the finished recipe (not including the weight of the container the food is in) by the desired number of servings. Result will be the weight of one serving.
Did you make this recipe?
Please consider Pinning it!