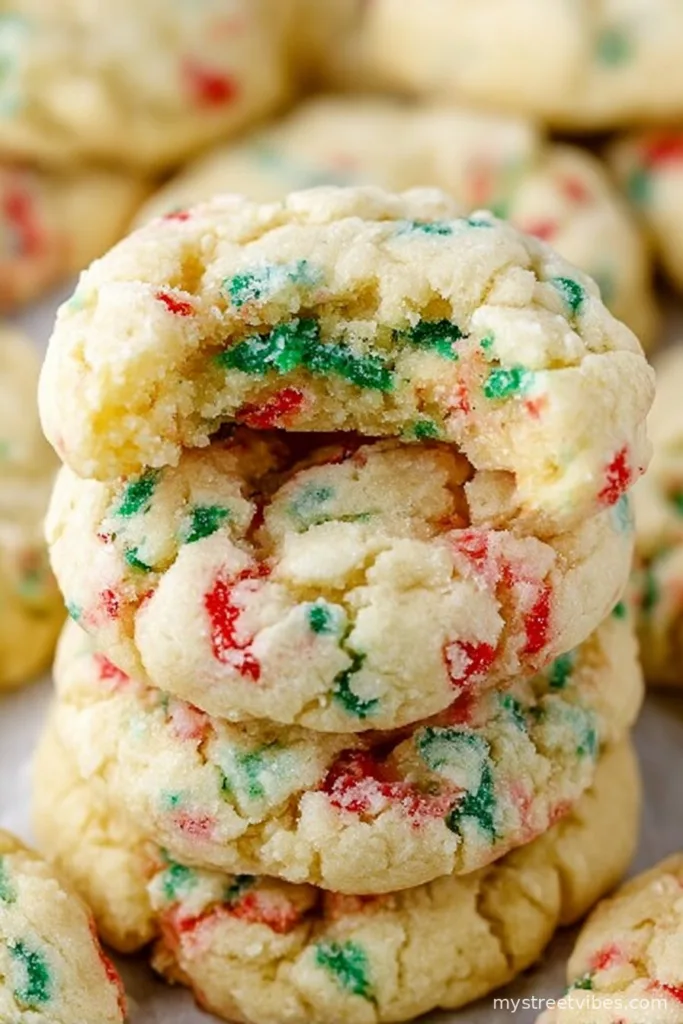
If You’ve Never Had Christmas Gooey Butter Cookies, You’re in for Something Ridiculous
Okay, confession: I discovered these Christmas Gooey Butter Cookies at a neighbor’s cookie exchange one year when I was, rather embarrassingly, out of time and short on patience. Somebody showed up with a big tin of these gooey, powdered sugar-dusted, sprinkle-studded cookies, and people went nuts—total feeding frenzy. After subtly sneaking way more than my share (I regret nothing), I begged for the recipe. The best part? You barely need to measure and you 100% won’t dirty your mixer more than once. If you’re after a fast holiday win but want your kitchen to smell like pure Christmas cheer, these are IT. (Plus, the colorful sprinkles make them look way more impressive than the effort demands. Don’t tell my mom.)

Why You’ll Want to Make These Over and Over
I honestly make these whenever I get a wild last-minute urge to bake for the school staff, or if the family starts hinting that the cookie jar’s looking a bit too empty. Even picky eaters (the ones who only eat cookies shaped like reindeer, for some reason) absolutely smash these. My sister’s always texting me for the recipe, though I’m pretty sure she just eats the dough and skips the baking. If you love soft, buttery cookies that border on cake-like with a sort of crackled, powdery outside… you’ll lose the plot over these. And yes, they’re even better with coffee the next morning. Actually, now that I think of it, I might like them cold from the fridge, but that could just be me.
The Ingredients You’ll Need (And My Slightly Unorthodox Opinions)
- Cream cheese – The brick style makes all the difference. I once grabbed the whipped stuff in a rush; the cookies practically oozed everywhere—don’t be like me.
- Unsalted butter – All that melty richness. If you forget to take it out to soften, microwaving for 10 seconds is fine. No judgment.
- Egg – Just one, big or medium. I use whatever is in the carton (probably should be large but I never check).
- Vanilla extract – Go for as much real stuff as you can find. My gran used to pour double, and honestly, not mad at it.
- Yellow cake mix – The soulful shortcut (I only admit this on holiday bakes). Swap in vanilla or white cake mix if that’s lurking in your cupboard; nobody ever complained.
- Powdered sugar – For rolling. Don’t skimp, and don’t bother sifting unless you feel like showing off.
- Christmas sprinkles – I go full red and green, but rainbow in July is fine too. Tinsel-shaped sprinkles are doomed to melt weirdly—learned the hard way.
Let’s Make Some Cookies, Shall We?
- Get everything ready and preheat that oven. Crank it up to 350°F (she’s hot!) and line two baking trays with parchment. I’ve used foil in a pinch, but the parchment really makes cleanup simple.
- Make your gooey base. Grab a roomy bowl and grab your mixer (hand or stand—whatever makes you happy). Plop in your softened cream cheese and butter, toss in the egg, then pour in the vanilla. Whip them together until it all looks very smooth. I’ve done this with just a sturdy wooden spoon but your arm will get a workout—worth it if you’re feeling nostalgic.
- Add the cake mix magic. Now dump in your yellow cake mix and mix until it gets super thick and sticky. Full warning: dough is going to look kind of strange and sticky at first. Don’t sweat it; it’s all part of the charm.
- Add those festive sprinkles. Fold in your Christmas sprinkles with a gentle touch so they don’t get smeary (unless you want totally tie-dyed cookies, in which case, go wild). I always lose a few sprinkles on the floor—it’s tradition at this point.
- Chill now, roll later. Pop the dough bowl into the fridge for at least 30 minutes. If you skip this, you’ll end up with cookies spreading faster than holiday rumors. In a rush? Ten to fifteen minutes in the freezer sorta works. (But then your fingers will freeze too.)
- Shape and sugar up. Grab a spoon or small cookie scoop (tablespoonish size), and roll the dough into balls about 1.5 inches across. Shower them in powdered sugar—seriously, roll them until they look like tiny snowballs.
- Bake! Spread those sugar-rolled dough balls onto your lined baking trays, with a good two inches space between each. Into the oven they go for 10–12 minutes. The edges should be set but the centers might look too soft—this is right. Resist the urge to bake longer.
- Let them cool a sec. Take the cookies out (impossibly tempting smell, I know) and let them sit on the tray for 3-4 minutes. They’ll finish firming up. Move to a wire rack—or honestly, just a big plate if you’re like me—and cool completely. Or eat one warm because life is short.

Notes I Wish I’d Known Sooner
- Don’t swap out brick cream cheese for anything else—it just gets gloopy. Ask me how I know.
- Forget to let the butter and cream cheese soften? Zap them for 10 seconds at a time in the microwave, but keep watch so you don’t make a puddle.
- If your cookies don’t have that crackly look, you might not have rolled them in enough powdered sugar. Roll once, then roll again for drama.
- The dough is sticky. You can dust your hands with powdered sugar (or just embrace the mess—it’s half the fun).
Some Variations I’ve Tested (With Mixed Results)
- Swapping yellow cake mix for vanilla or white—still amazing. Chocolate cake mix was honestly too rich; won’t make that mistake at Christmas time again.
- A few drops of almond or peppermint extract make it feel extra-fancy. Maybe don’t use both at once unless you love chaos.
- Mini chocolate chips or smashed candy canes folded in are great—though once the candy canes melted into galaxy swirls (cool, if accidental).
- Dividing the dough and tinting half red, half green? Looks adorable in pictures, a total mess in real life for my kitchen.
- Rolled in colored sanding sugar instead of powdered sugar once—good crunch, but almost too sweet. Or hey, skip sprinkles if you just want classic gooey butter cookies.

Equipment Chat: What If You Don’t Have Everything?
- I use my hand mixer but have made do with a wooden spoon and stubbornness. Who needs a gym anyway?
- Cookie scoop makes life easier and cookies neater. Lacking one? Tablespoon, small ice cream scoop, or even an old-school soup spoon and your hands.
- Parchment paper makes cleanup wonderful. If you’re out, lightly grease your tray.
Storing Your Gooey Butter Cookies
Store in an airtight tin or Tupperware, tossing a piece of bread in to keep them magically soft. They’ll last 3-4 days, supposedly, but with my hungry crew they’re gone in 24 hours (honestly, I usually have to hide a few at the back for myself).
Favorite Ways to Serve
Warm from the oven, ideally, with cold milk or hot cocoa. My uncle swears these are best at midnight during a rerun of “Home Alone”—who am I to argue? Also, cookies for breakfast isn’t punishable by law, so I say go for it.
Things I Learned the Hard (and Messy) Way
- Don’t even think about skipping the chill time or you’ll regret it with puddles more than cookies (speaking from experience).
- Bake just until the edges set—overbaked cookies go from gooey to weirdly dry, and nobody wants that for Christmas.
Real Questions I Actually Get (And My Real Answers)
- Can I freeze the dough? Absolutely! Freeze in balls, roll in sugar when you’re ready to bake. Thaw slightly or bake straight from frozen (just add a minute or two).
- Can I halve the recipe? Yup, but what’s the point? (I always wish I hadn’t.)
- Do I really need a mixer? Nope. Elbow grease will do, but don’t blame me if you need a nap after!
- Why are my cookies brown at the bottom? Maybe your oven’s got a hot spot (mine does this). Move your tray one rack higher next time.
One last thing: if you end up with powdered sugar all over your shirt, your counter, and probably your cat—it means you did it right.
Ingredients
- Cream cheese – Makes the cookies soft and adds a gooey texture.
- Unsalted butter – Adds richness and a melt-in-your-mouth texture.
- Egg – Binds the ingredients and adds structure.
- Vanilla extract – Enhances the cookie’s flavor.
- Yellow cake mix – The quick and easy base of the cookies.
- Powdered sugar – Creates a sweet, crackly coating.
- Christmas sprinkles – Add a festive holiday touch.
Instructions
-
1Get everything ready and preheat that oven. Crank it up to 350°F (she’s hot!) and line two baking trays with parchment. I’ve used foil in a pinch, but the parchment really makes cleanup simple.
-
2Make your gooey base. Grab a roomy bowl and grab your mixer (hand or stand—whatever makes you happy). Plop in your softened cream cheese and butter, toss in the egg, then pour in the vanilla. Whip them together until it all looks very smooth. I’ve done this with just a sturdy wooden spoon but your arm will get a workout—worth it if you’re feeling nostalgic.
-
3Add the cake mix magic. Now dump in your yellow cake mix and mix until it gets super thick and sticky. Full warning: dough is going to look kind of strange and sticky at first. Don’t sweat it; it’s all part of the charm.
-
4Add those festive sprinkles. Fold in your Christmas sprinkles with a gentle touch so they don’t get smeary (unless you want totally tie-dyed cookies, in which case, go wild). I always lose a few sprinkles on the floor—it’s tradition at this point.
-
5Chill now, roll later. Pop the dough bowl into the fridge for at least 30 minutes. If you skip this, you’ll end up with cookies spreading faster than holiday rumors. In a rush? Ten to fifteen minutes in the freezer sorta works. (But then your fingers will freeze too.)
-
6Shape and sugar up. Grab a spoon or small cookie scoop (tablespoonish size), and roll the dough into balls about 1.5 inches across. Shower them in powdered sugar—seriously, roll them until they look like tiny snowballs.
-
7Bake! Spread those sugar-rolled dough balls onto your lined baking trays, with a good two inches space between each. Into the oven they go for 10–12 minutes. The edges should be set but the centers might look too soft—this is right. Resist the urge to bake longer.
-
8Let them cool a sec. Take the cookies out (impossibly tempting smell, I know) and let them sit on the tray for 3-4 minutes. They’ll finish firming up. Move to a wire rack—or honestly, just a big plate if you’re like me—and cool completely. Or eat one warm because life is short.
CLICK FOR NUTRITION INFO
↑
Approximate Information for One Serving
Serving Size:
1 serving
Calories:
140 caloriescal
Protein:
2 gg
Fat:
7 gg
Saturated Fat:
0g
Trans Fat:
0g
Cholesterol:
0mg
Sodium:
0mg
Potassium:
0mg
Total Carbs:
19 gg
Fiber:
0g
Sugar:
0g
Net Carbs:
0g
Vitamin A:
0
Vitamin C:
0mg
Calcium:
0mg
Iron:
0mg
Nutrition Disclaimers
Number of total servings shown is approximate. Actual number of servings will depend on your preferred portion sizes.
Nutritional values shown are general guidelines and reflect information for 1 serving using the ingredients listed, not including any optional ingredients. Actual macros may vary slightly depending on specific brands and types of ingredients used.
To determine the weight of one serving, prepare the recipe as instructed. Weigh the finished recipe, then divide the weight of the finished recipe (not including the weight of the container the food is in) by the desired number of servings. Result will be the weight of one serving.
Did you make this recipe?
Please consider Pinning it!