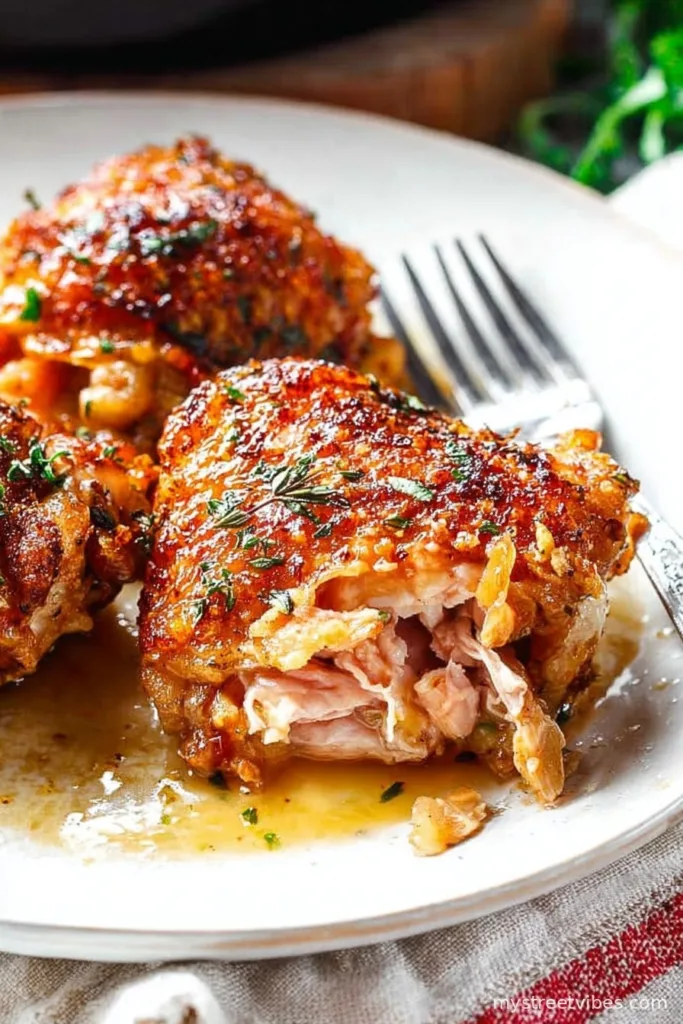
Sitting Down to Cast Iron Chicken Thighs
You know those dishes that just worm their way into your weekly dinner line-up and refuse to leave? Cast iron Chicken Thighs are that for me. I first started making them on a Monday when I was hungry (and okay, maybe a little grumpy) and all I had was a pack of Chicken Thighs hiding in the fridge. But wow, one bite and my mood did a full 180. If I’m honest, this is the sort of recipe that makes me feel like I’ve got my life together—even if every other pan in the kitchen is dirty. Plus, there’s this glorious moment when the whole house smells like crispy, herby chicken and everyone starts drifting into the kitchen. I mean, even the cat looks hopeful! Anyway, let’s get to it before I start rambling about the time I tried to cook these during a power outage…

Why I Keep Making This (And Why You Might, Too)
I make this when work’s run late, and I’m not in the mood for anything fussy or fiddly. My family goes crazy for this because the skin gets all super crisp (even when I accidentally leave it in a few minutes too long), and honestly, leftovers hardly ever exist. Chicken thighs are forgiving—I once overcooked them for like, ten minutes, and they were still juicy. If you love an easy clean up (who doesn’t?), this is your jam. Also, I can swap out the seasonings depending on who’s coming for dinner—my youngest requests garlic powder every single time (no subtlety in their palate yet, I guess).
What You’ll Need: The “Flexible Pantry” Ingredients
- 1.5 to 2 pounds bone-in, skin-on chicken thighs (sometimes I use boneless if I’m in a rush—my grandma would probably be appalled, but it works fine!)
- 1 tablespoon olive oil (or vegetable oil, or honestly any neutral oil you’ve got laying around)
- 1 teaspoon kosher salt (or table salt, but go easy if it’s the fine kind)
- 1/2 teaspoon black pepper (sometimes I throw in a pinch more—you know me and pepper)
- 1 teaspoon smoked paprika (sweet is great too, or skip it if you’re out, just adds a bit of color and flavor)
- 1/2 teaspoon garlic powder (accidentally doubled this once—wasn’t even mad)
- 1/2 teaspoon dried thyme (or oregano, or Italian seasoning, or just, like, whatever herb you’ve got—don’t overthink it)
- Optional: a squeeze of fresh lemon at the end (if I remember, which is…rare)
How I Make Cast Iron Chicken Thighs (And Don’t Stress)
- Preheat your oven to 425°F (220°C). I know some folks say 400 or even 450, but I find 425 is like Goldilocks—just right. If you forget and it’s only at 400, don’t panic.
- Pat the chicken thighs dry with paper towels—don’t skip this, unless you like soggy skin (which I definitely do not). This is where I usually get distracted and have to re-dry a thigh.
- Season both sides of the chicken with salt, pepper, paprika, garlic powder, and thyme. Use your hands—yes, it gets a little messy, but it’s worth it.
- Heat the olive oil in your cast iron skillet over medium-high heat until it’s shimmering but not smoking. If you don’t have cast iron, a heavy oven-safe skillet will do, but cast iron is just chef’s kiss for that extra sizzle.
- Place the chicken thighs skin-side down in the hot oil. (You should hear a satisfying hiss. If not, let the pan heat longer next time.) And don’t crowd the pan—give those thighs some room so they crisp up. Cook for 6-8 minutes, until the skin is really golden brown. And seriously, don’t move them around too much. I used to, and got patchy skin. Not cute.
- Flip the chicken over with tongs (gently—nobody wants their chicken to be bald!), then move the skillet right into the oven. If you’re using an oven mitt that’s seen better days, beware: cast iron handles get scorching hot.
- Roast for about 18-22 minutes, or until the chicken is cooked through and a thermometer says 170°F (I sometimes just peek and cut into the thickest bit, old-school style). Sometimes it takes a little longer—don’t stress if yours does, ovens are finicky.
- Pull the skillet out, let the chicken rest for 5-ish minutes. This is when I clean up all the seasoning I spilled earlier. Optional: squeeze a little fresh lemon over the top just before serving—it brightens everything up, especially if things got a tad overly crispy.

Lotta Little Notes I Wish I’d Known Earlier
- Sometimes the skin sticks if I don’t wait for the oil to get hot enough. Patience is your friend here. Actually, I find it works better if the chicken sits at room temp for 15 mins before cooking.
- If you use chicken straight from the fridge—yeah, it’ll take a couple extra minutes to cook.
- Don’t toss any pan juices! They’re liquid gold on rice or even bread.
- If you crowd the skillet (guilty), the chicken steams instead of crisps. Space matters, who knew?
Trying Something Different: Variations that Actually (Mostly) Work
- I once tossed in a splash of hot honey at the end—my spouse loved it, the kids were confused. You win some, you lose some.
- Moroccan-ish: swap paprika and thyme for cumin, coriander, and a little cinnamon for a clever twist (really good!).
- Lemon pepper is fantastic, as long as you don’t go overboard; I did, and well, the chicken tasted like cleaning spray. Lesson learned.
- If you want an herby-crunch, sprinkle in some fresh parsley or chives at the end (not traditional, but jazzy).

Do You Really Need a Cast Iron Skillet? Kinda, But Not Totally
Look, cast iron does make the best golden skin, but if you don’t own one—use another heavy oven-safe skillet. I made this once in a cheap aluminum pan and, sure, there was less crispiness; but it still tasted smashing. Don’t let a pan stop you from dinner, ever.
How to Store ‘Em (But Good Luck Making Enough for Leftovers)
Store leftovers in an airtight container in the fridge for 2-3 days. If you actually have leftovers, that is. They’re still good cold or reheated in the toaster oven (I swear, tastes even better the next day… maybe that’s just me?). Just avoid the microwave unless you like rubbery skin.
Serving It Up: Our Table Traditions
Most nights, I slice the chicken over a quick salad or shove it up next to a pile of buttered rice. On Sundays? Mashed potatoes, always. My uncle swears by dipping it in hot sauce, but frankly, he’d dip cereal in hot sauce.
Pro Tips (Learned the Hard Way)
- I once rushed the pan-searing step—ended up with soft skin. Now I keep my hands busy by prepping a salad so I don’t mess with the chicken while it crisps.
- Actually, don’t try to flip the chicken too soon (or you’ll tear the skin, and I promise, you’ll mourn the loss).
- Oh, and don’t skip resting before you serve. Once I did—juice everywhere, chicken a bit dry. Now I just sip my drink for five minutes and pretend it was part of my plan.
Questions Folks Have Actually Asked Me
- Do I really need bone-in, skin-on thighs?
- I mean, they give the most flavor, but boneless or skinless work if you’ve got them. You might want to cut a few minutes off the cook time though—nobody likes dry chicken. And frankly, sometimes that’s all I’ve got and I’m not running to the shop.
- Can I use chicken breasts?
- You can, just be careful about them drying out. Maybe check a couple minutes earlier. Not my favorite, but works in a pinch when thighs are missing in action.
- Will this smoke my whole house up?
- If the pan’s too hot or there’s a ton of oil, yes. I open a window a crack just in case. Or maybe that’s just my stove being stubborn…
- How do you clean cast iron after?
- I just use hot water and a spatula—no soap. If you forget and it rusts a bit, just scrub and oil it again. Not the end of the world.
- Is it okay to cook veggies in the pan after?
- Absolutely (I toss in some asparagus or broccoli right after the chicken comes out), just be careful, the juices are super hot!
And one last thing: don’t be afraid to experiment with the seasoning. Worst case scenario? You order a pizza and laugh about it. That’s what happened here last month—turned out spicy Cajun seasoning is not a crowd-pleaser in my house, but, hey, we live, we learn.
Ingredients
- 1.5 to 2 pounds bone-in, skin-on chicken thighs (sometimes I use boneless if I’m in a rush—my grandma would probably be appalled, but it works fine!)
- 1 tablespoon olive oil (or vegetable oil, or honestly any neutral oil you’ve got laying around)
- 1 teaspoon kosher salt (or table salt, but go easy if it’s the fine kind)
- 1/2 teaspoon black pepper (sometimes I throw in a pinch more—you know me and pepper)
- 1 teaspoon smoked paprika (sweet is great too, or skip it if you’re out, just adds a bit of color and flavor)
- 1/2 teaspoon garlic powder (accidentally doubled this once—wasn’t even mad)
- 1/2 teaspoon dried thyme (or oregano, or Italian seasoning, or just, like, whatever herb you’ve got—don’t overthink it)
- Optional: a squeeze of fresh lemon at the end (if I remember, which is…rare)
Instructions
-
1Preheat your oven to 425°F (220°C). I know some folks say 400 or even 450, but I find 425 is like Goldilocks—just right. If you forget and it’s only at 400, don’t panic.
-
2Pat the chicken thighs dry with paper towels—don’t skip this, unless you like soggy skin (which I definitely do not). This is where I usually get distracted and have to re-dry a thigh.
-
3Season both sides of the chicken with salt, pepper, paprika, garlic powder, and thyme. Use your hands—yes, it gets a little messy, but it’s worth it.
-
4Heat the olive oil in your cast iron skillet over medium-high heat until it’s shimmering but not smoking. If you don’t have cast iron, a heavy oven-safe skillet will do, but cast iron is just chef’s kiss for that extra sizzle.
-
5Place the chicken thighs skin-side down in the hot oil. (You should hear a satisfying hiss. If not, let the pan heat longer next time.) And don’t crowd the pan—give those thighs some room so they crisp up. Cook for 6-8 minutes, until the skin is really golden brown. And seriously, don’t move them around too much. I used to, and got patchy skin. Not cute.
-
6Flip the chicken over with tongs (gently—nobody wants their chicken to be bald!), then move the skillet right into the oven. If you’re using an oven mitt that’s seen better days, beware: cast iron handles get scorching hot.
-
7Roast for about 18-22 minutes, or until the chicken is cooked through and a thermometer says 170°F (I sometimes just peek and cut into the thickest bit, old-school style). Sometimes it takes a little longer—don’t stress if yours does, ovens are finicky.
-
8Pull the skillet out, let the chicken rest for 5-ish minutes. This is when I clean up all the seasoning I spilled earlier. Optional: squeeze a little fresh lemon over the top just before serving—it brightens everything up, especially if things got a tad overly crispy.
CLICK FOR NUTRITION INFO
↑
Approximate Information for One Serving
Serving Size:
1 serving
Calories:
310 caloriescal
Protein:
28gg
Fat:
20gg
Saturated Fat:
0g
Trans Fat:
0g
Cholesterol:
0mg
Sodium:
0mg
Potassium:
0mg
Total Carbs:
2gg
Fiber:
0g
Sugar:
0g
Net Carbs:
0g
Vitamin A:
0
Vitamin C:
0mg
Calcium:
0mg
Iron:
0mg
Nutrition Disclaimers
Number of total servings shown is approximate. Actual number of servings will depend on your preferred portion sizes.
Nutritional values shown are general guidelines and reflect information for 1 serving using the ingredients listed, not including any optional ingredients. Actual macros may vary slightly depending on specific brands and types of ingredients used.
To determine the weight of one serving, prepare the recipe as instructed. Weigh the finished recipe, then divide the weight of the finished recipe (not including the weight of the container the food is in) by the desired number of servings. Result will be the weight of one serving.
Did you make this recipe?
Please consider Pinning it!