The Butter Swim Biscuit Story (aka Why My Kitchen Always Smells Like Heaven)
So here’s the deal: Butter Swim Biscuits have rescued me more times than I care to admit. Waking up to that wild craving for something actually warm and homemade, but, sigh, all I have is a stick of butter and a little flour? This recipe is my old reliable—kind of like that favorite flannel shirt with the mysterious flour stains. I’ve made these on rainy afternoons, for last-minute breakfasts, and once at 2am after a movie marathon (yes, biscuits at midnight are a thing in this house). The smell alone will make your neighbor “accidentally” wander over, just warning you.

Why You’ll Love This Recipe (Or At Least Make It Weekly)
I pull this one out when I want biscuits but can’t be bothered with anything fussy—no rolling, no cutters, no biscuit drama. My family turns up mysteriously when these are in the oven (I swear they have biscuit radar). Since it’s all mixed in one bowl and bakes in a pool of butter, the edges go golden and crispy while the middle stays soft. I used to struggle with dry, dusty biscuits, but this method? Pure, buttery, dunked-in-soup magic. Plus, if you’re like me and always forget to plan ahead, these don’t even need to be cut into perfect shapes. Pretty much foolproof… unless you forget to set a timer—been there, too.
Ingredients—And Where I Break My Own Rules
- ½ cup (1 stick, 113 g) unsalted butter, melted
(I have, in a pinch, used salted butter; just go easy on that extra salt if you do.) - 2 ½ cups (300 g) all-purpose flour
(Self-rising works if you knock back on the baking powder and salt, but honestly, plain flour is my go-to.) - 1 tablespoon granulated sugar
(Sometimes I use a smidge of honey for a deeper flavor, but sugar’s the classic.) - 4 teaspoons baking powder
(Don’t skimp, or you might end up with biscuits as dense as a hockey puck. Ask me how I know.) - 1 teaspoon salt
(If you’re using salted butter, like I said, drop this to about half a teaspoon.) - 1 ¾ cups (420 ml) buttermilk
(No buttermilk? Use regular milk with a squeeze of lemon or a splash of vinegar. It’s not quite the same, but it works in a pinch.)
How To Make Butter Swim Biscuits (With a Few of My Quirks)
- Start off by cranking your oven up to 450°F (230°C). Center rack is key—I once tried the lower rack and let’s just say, burnt bottoms are harder to slice off than you think.
- Pour that glorious melted butter straight into an 8×8-inch pan (something heavy like a metal or glass dish works a treat). Don’t skip this step! The butter swimming is the magic here.
- Grab a big bowl. Whisk your flour, sugar, baking powder, and salt together. (If you’re like me, you’ll forget the sugar and have to tip it in last minute. It’s fine, promise.) Just make sure the baking powder gets in there; otherwise, no lift.
- In goes the buttermilk. Stir things gently—don’t overmix. It’s not bread dough, it’s okay if it’s a hot mess right now. Sticky and shaggy is what you want.
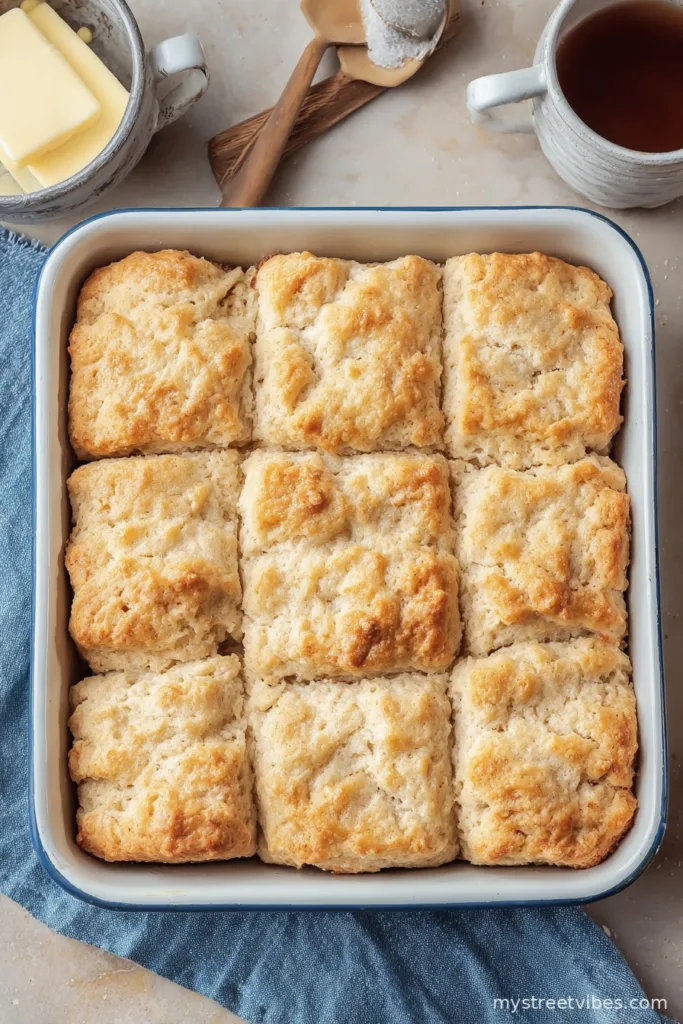
- Scrape that dough (ugly as it is—it’s supposed to be!) onto the swimming pool of melted butter in your pan. Spread it out softly to the corners with a spatula or even damp fingers. At this point, I use a knife or bench scraper to lightly mark nine squares—doesn’t have to be perfect! This is just so you can break them apart later. Don’t worry about cutting all the way down (unless you like scooping butter off your knife).
- Bake for 20–25 minutes, or until the top is blushing golden and your house smells like a vintage bakery. Pull the pan out. Serve ‘em up right away while the bottoms are sizzling in their buttery bath. Try to resist eating half straight from the pan—I rarely succeed.
Notes From My (Sometimes Messy) Kitchen
- If you swap in milk plus vinegar for buttermilk, I add an extra pinch of salt and maybe a sliver more baking powder—makes up for the missing tang.
- Pan not nonstick? Give it a brush of butter or oil first, just in case. I learned that the hard way.
- Let the biscuits cool for a couple minutes; that molten butter can surprise ya.

Have Fun With Variations (And My Failures)
- Toss in a handful of shredded cheddar and a spoonful of chives for super-savory vibes.
- I’ve tried swapping in whole wheat flour once—it was…let’s call it “sturdy.” Wouldn’t do that again unless you wanna build a biscuit fort.
- Sometimes I sprinkle a little cinnamon sugar on top. Not classic, but my niece loves it for breakfast.
Essential (Or Not So Essential) Equipment
- I use an 8×8-inch pan, but in a pinch a round cake pan sort of works too. Just squish the dough in—no one’s judging.
- Bench scraper? Nice, but honestly, a butter knife does the trick for marking the dough. I’ve even used a chopstick when I couldn’t find anything else.
- Big mixing bowl. Plastic, metal… it all works.
Storing Leftovers—If That Ever Happens
If, by some cosmic fluke, you don’t devour these all at once: These biscuits actually taste amazing the next morning. Store them in an airtight box for up to two days (though let’s face it, mine vanish before bedtime). They do get a bit firmer, but a few seconds in the microwave helps.
How I Serve ‘Em: Traditions (and the Odd Snack)
My favorite: Fresh from the pan, split open with a slab of salted butter and a drizzle of honey. Great for dunking in soup, or sopping up a saucy breakfast. Sometimes late at night, I sneak one cold straight from the container with a square of cheese—pretty sure that’s not a real tradition, but hey, works for me.

Pro Tips—Or, Mistakes I’ve Actually Made
- Resist the urge to overmix. Once I tried to beat the dough smooth—came out tough as boots. Just mix until combined, then stop!
- Don’t substitute margarine for butter. Just, no. Learned that the hard way at a friend’s house and we all agreed: never again.
- If things get too brown on top but look pale underneath, tent with foil for the last five minutes.
FAQ: Honest Answers From My Kitchen
- Can I double this recipe?
- Sure thing—just use a 9×13 pan. Might want to bake a smidge longer, and maybe rotate halfway through.
- What if I don’t have buttermilk?
- No worries—milk with a splash of lemon or vinegar works okay. Actually, I find yogurt watered down does great too.
- Can I freeze Butter Swim Biscuits?
- Yes, but eat them fresh if you can. Thaw gently and warm up so they’re not sad and soggy. I tend to think the texture’s best day-of.
- Why no egg?
- Classic Butter Swim Biscuits are eggless—that’s the secret to their tender, fluffy crumb. Don’t let anyone tell you they need an egg. Trust me.
- Help! No 8×8 pan?
- Round cake pans, a cast-iron skillet, or even a baking dish all work. Just watch the baking time and don’t panic if it looks a little rustic.
And there you have it—Butter Swim Biscuits, from my (sometimes messy) kitchen to yours. Let me know how yours turn out—bonus points if you manage to stash a few for breakfast tomorrow! Or, you know, midnight.
Ingredients
- ½ cup (1 stick, 113 g) unsalted butter, melted
- 2 ½ cups (300 g) all-purpose flour
- 1 tablespoon granulated sugar
- 4 teaspoons baking powder
- 1 teaspoon salt
- 1 ¾ cups (420 ml) buttermilk
Instructions
-
1Start off by cranking your oven up to 450°F (230°C). Center rack is key—I once tried the lower rack and let’s just say, burnt bottoms are harder to slice off than you think.
-
2Pour that glorious melted butter straight into an 8×8-inch pan (something heavy like a metal or glass dish works a treat). Don’t skip this step! The butter swimming is the magic here.
-
3Grab a big bowl. Whisk your flour, sugar, baking powder, and salt together. (If you’re like me, you’ll forget the sugar and have to tip it in last minute. It’s fine, promise.) Just make sure the baking powder gets in there; otherwise, no lift.
-
4In goes the buttermilk. Stir things gently—don’t overmix. It’s not bread dough, it’s okay if it’s a hot mess right now. Sticky and shaggy is what you want.
-
5Scrape that dough (ugly as it is—it’s supposed to be!) onto the swimming pool of melted butter in your pan. Spread it out softly to the corners with a spatula or even damp fingers. At this point, I use a knife or bench scraper to lightly mark nine squares—doesn’t have to be perfect! This is just so you can break them apart later. Don’t worry about cutting all the way down (unless you like scooping butter off your knife).
-
6Bake for 20–25 minutes, or until the top is blushing golden and your house smells like a vintage bakery. Pull the pan out. Serve ‘em up right away while the bottoms are sizzling in their buttery bath. Try to resist eating half straight from the pan—I rarely succeed.
CLICK FOR NUTRITION INFO
↑
Approximate Information for One Serving
Serving Size:
1 serving
Calories:
290 caloriescal
Protein:
6gg
Fat:
14gg
Saturated Fat:
0g
Trans Fat:
0g
Cholesterol:
0mg
Sodium:
0mg
Potassium:
0mg
Total Carbs:
36gg
Fiber:
0g
Sugar:
0g
Net Carbs:
0g
Vitamin A:
0
Vitamin C:
0mg
Calcium:
0mg
Iron:
0mg
Nutrition Disclaimers
Number of total servings shown is approximate. Actual number of servings will depend on your preferred portion sizes.
Nutritional values shown are general guidelines and reflect information for 1 serving using the ingredients listed, not including any optional ingredients. Actual macros may vary slightly depending on specific brands and types of ingredients used.
To determine the weight of one serving, prepare the recipe as instructed. Weigh the finished recipe, then divide the weight of the finished recipe (not including the weight of the container the food is in) by the desired number of servings. Result will be the weight of one serving.
Did you make this recipe?
Please consider Pinning it!