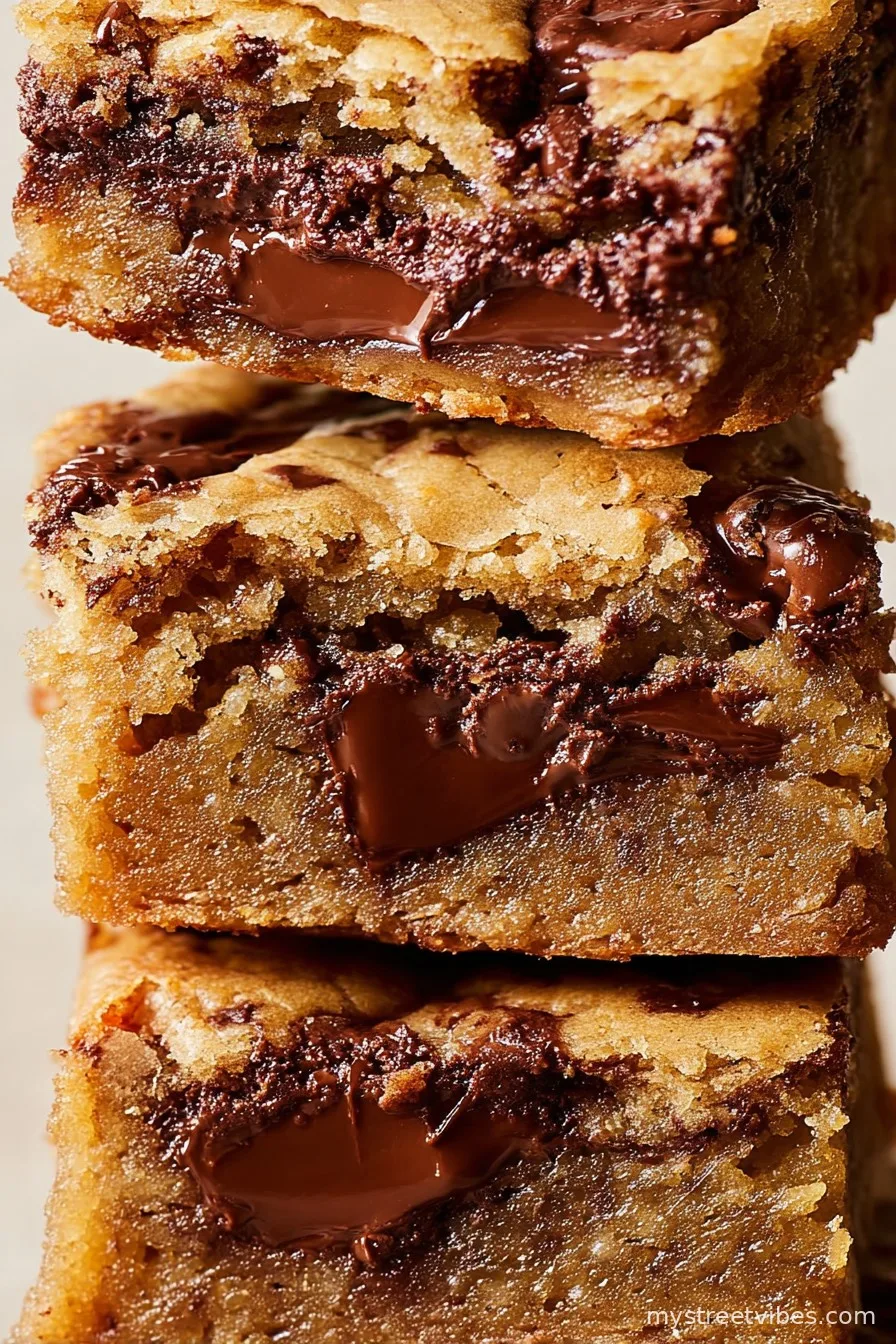
Let’s Talk Blondies (And Why These Are My Go-To)
Alright, confession time: the first time I made these Brown Butter Triple Chocolate Blondies was for a late-night bake-off with a friend who insists brownies are superior. Guess who won? (Hint: it wasn’t the brownies) Anyway, I’ve tweaked this recipe ever since, so now whenever folks come over, someone always hopes I’ve got a batch cooling off somewhere. It’s got this irresistibly nutty brown butter thing going on, plus three kinds of chocolate—which honestly sounds a bit overboard, but trust me, it’s the sweet spot.
Why You’ll Wind Up Craving These
I usually whip these up when I’ve got a craving for something rich but not fussy—or when I “accidentally” bought too many chocolate chips at the shop. My family polishes them off faster than you can say “save me one!” These are also the only blondies I’ve made that stay gooey in the middle without being raw (which was my struggle for ages, honestly). If you’ve ever burned your butter or left chunks in the sugar, believe me, I’ve been there—still delicious, though!
What You’ll Need (Substitutions Included… I Do It All The Time)
- 165g (about 3/4 cup) unsalted butter (I’ve actually used salted Kor
- 200g (1 cup packed) light brown sugar (sometimes half muscovado if I’m feeling extra fancy)
- 50g (1/4 cup) granulated sugar (doesn’t have to be golden, but it’s lovely)
- 2 large eggs (room temp is best, but who always remembers?)
- 2 tsp vanilla extract (or a splash more, I never measure perfectly)
- 225g (1 1/2 cups) plain/all-purpose flour (I’ve used spelt—a bit nuttier)
- 1 tsp baking powder
- 1/2 tsp sea salt (my granny swears by Maldon, but any flaky stuff will do)
- 60g (1/3 cup) white chocolate chips (chopped bar works if that’s all you’ve got)
- 60g (1/3 cup) milk chocolate chips (or even a crushed Dairy Milk, why not?)
- 60g (1/3 cup) dark chocolate chunks (I like at least 70% for a nice swing of flavour)
The “Actually, This Is How I Do It” Directions
- Start by browning the butter: chuck your butter in a small saucepan and melt it over medium heat. Swirl it about every so often—when it smells a bit nutty and you see golden flecks at the bottom, you’re done. Don’t get distracted here; it can go from brown to burnt in a blink! Pour the butter (brown bits and all) into a mixing bowl to cool a little—sometimes I scoop mine into the fridge if I’m in a rush.
- Once it’s just warm, add both kinds of sugar and give it a proper whisk (really, elbow grease here makes all the difference). I sometimes use a hand mixer if it’s been a day.
- Whisk in the eggs, one at a time, then the vanilla. If it looks split or lumpy, that’s normal—keep going!
- Toss in your flour, baking powder, and salt all at once. I stir by hand at this point (fewer dishes, honestly), just until the flour mostly disappears.
- Fold in all the chocolate. Sometimes I hold a few bits back to sprinkle on top—totally optional, but looks nice. This is about when I usually sneak a taste; who’s judging?
- Sling the batter into a lined 8×8-inch tin (mine’s a little warped and it still works fine—don’t stress if yours is a weird shape). Smooth it out a bit, but no need to fuss.
- Bake at 170C (340F) for 23–28 minutes (start checking at 23—the centre should wobble just the tiniest bit if you shake the tin). If you like them a smidge underbaked, pull them sooner. Let cool (if you can wait); they set up a bit more as they rest.
Stuff I Learned the Hard Way (Notes)
- If you use super dark sugar and dark chocolate, the blondies come out extra rich—almost like a fudge bar. Tasty, but not what I’d call a traditional blondie.
- I forgot the baking powder once; still ate them, but they were more like flat, dense chocolate slabs. Maybe don’t skip it unless on purpose.
- Using fridge-cold eggs will make the butter go lumpy—I do it anyway half the time and it’s fine, but just so you know.
I’ve Tried a Few Twists (Some Worked)
- Chopped pecans folded in—amazing, highly recommended if you’re team nut.
- Swirling in a couple of caramel dollops looked pretty but honestly it got a bit too gooey for me.
- I once tried adding mashed banana—lets just say…oddly chewy, don’t recommend!

What You’ll Need (Equipment… Sort Of)
- Small saucepan (though I’ve microwaved the butter before, works in a pinch)
- Mixing bowl
- Whisk or hand mixer (fork worked for me once, but it was a workout!)
- 8×8-inch square baking tin (if you’re stuck, use a loaf pan for thicker bars—more of a “blondie slab” situation)
- Someway to line your tin—parchment, foil, buttered paper bag (yep, did that once)
How I Store These (Ha—If They Last…)
Supposedly, you can keep these blondies in an airtight container at room temp for up to four days. Mine have never made it past day two. If you do have willpower, they freeze surprisingly well—just wrap slices individually and thaw as needed (I sometimes microwave straight form frozen because patience is not my strong suit).
Serving These Up (My Fave Way)
I like them best still a little warm, cut into rugged hunks with a scoop of vanilla ice cream sliding off the top. My brother asks for them topped with whipped cream and a sprinkle of flaky salt—over the top, but he swears by it.
Things I’ve Learned (Hey, Don’t Rush These)
- One time I tried to rush the brown butter. Yikes—ended up with burnt bits, so now I’m a bit more patient here. Let it get golden but not black—your nose will tell you (it smells oddly like toffee when it’s just right).
- Diving in too soon is tempting—the middle will look too gooey but sets up after about 20 minutes of cooling. Or so I tell myself as I burn my mouth every time…
Questions I Actually Get (Or Texts from Friends)
- Should the butter be completely cool before mixing? Eh—just not hot enough to cook your eggs. Room temp-ish is perfect.
- Can I make these gluten free? Yes, swap in your favorite GF blend, though they might be a little crumblier (actually that’s sometimes nice!).
- Is all that chocolate really necessary? No, but then you just have a regular blondie. Which is fine! But this one’s for chocolate fiends.
- My blondies sunk after baking—what gives? That usually means they were underdone or cooled too quickly (happens to me every third time, honestly). Still tastes great.
- Do I need to use all three chocolates? Nope! Mix and match; clean out the baking drawer. Sometimes I use all dark if that’s what I’ve got.
- Freezes well? Yes, but only if you can resist them. Try not to eat half straight from the freezer (not that I’d know…)
Alright, go on—give them a whirl, and let me know if you have a wild twist that actually works out. We can start a blondie experiment club.
Ingredients
- 165g (about 3/4 cup) unsalted butter (I’ve actually used salted Kor
- 200g (1 cup packed) light brown sugar (sometimes half muscovado if I’m feeling extra fancy)
- 50g (1/4 cup) granulated sugar (doesn’t have to be golden, but it’s lovely)
- 2 large eggs (room temp is best, but who always remembers?)
- 2 tsp vanilla extract (or a splash more, I never measure perfectly)
- 225g (1 1/2 cups) plain/all-purpose flour (I’ve used spelt—a bit nuttier)
- 1 tsp baking powder
- 1/2 tsp sea salt (my granny swears by Maldon, but any flaky stuff will do)
- 60g (1/3 cup) white chocolate chips (chopped bar works if that’s all you’ve got)
- 60g (1/3 cup) milk chocolate chips (or even a crushed Dairy Milk, why not?)
- 60g (1/3 cup) dark chocolate chunks (I like at least 70% for a nice swing of flavour)
Instructions
-
1Start by browning the butter: chuck your butter in a small saucepan and melt it over medium heat. Swirl it about every so often—when it smells a bit nutty and you see golden flecks at the bottom, you’re done. Don’t get distracted here; it can go from brown to burnt in a blink! Pour the butter (brown bits and all) into a mixing bowl to cool a little—sometimes I scoop mine into the fridge if I’m in a rush.
-
2Once it’s just warm, add both kinds of sugar and give it a proper whisk (really, elbow grease here makes all the difference). I sometimes use a hand mixer if it’s been a day.
-
3Whisk in the eggs, one at a time, then the vanilla. If it looks split or lumpy, that’s normal—keep going!
-
4Toss in your flour, baking powder, and salt all at once. I stir by hand at this point (fewer dishes, honestly), just until the flour mostly disappears.
-
5Fold in all the chocolate. Sometimes I hold a few bits back to sprinkle on top—totally optional, but looks nice. This is about when I usually sneak a taste; who’s judging?
-
6Sling the batter into a lined 8×8-inch tin (mine’s a little warped and it still works fine—don’t stress if yours is a weird shape). Smooth it out a bit, but no need to fuss.
-
7Bake at 170C (340F) for 23–28 minutes (start checking at 23—the centre should wobble just the tiniest bit if you shake the tin). If you like them a smidge underbaked, pull them sooner. Let cool (if you can wait); they set up a bit more as they rest.
CLICK FOR NUTRITION INFO
↑
Approximate Information for One Serving
Serving Size:
1 serving
Calories:
245cal
Protein:
3 gg
Fat:
13 gg
Saturated Fat:
0g
Trans Fat:
0g
Cholesterol:
0mg
Sodium:
0mg
Potassium:
0mg
Total Carbs:
30 gg
Fiber:
0g
Sugar:
0g
Net Carbs:
0g
Vitamin A:
0
Vitamin C:
0mg
Calcium:
0mg
Iron:
0mg
Nutrition Disclaimers
Number of total servings shown is approximate. Actual number of servings will depend on your preferred portion sizes.
Nutritional values shown are general guidelines and reflect information for 1 serving using the ingredients listed, not including any optional ingredients. Actual macros may vary slightly depending on specific brands and types of ingredients used.
To determine the weight of one serving, prepare the recipe as instructed. Weigh the finished recipe, then divide the weight of the finished recipe (not including the weight of the container the food is in) by the desired number of servings. Result will be the weight of one serving.
Did you make this recipe?
Please consider Pinning it!