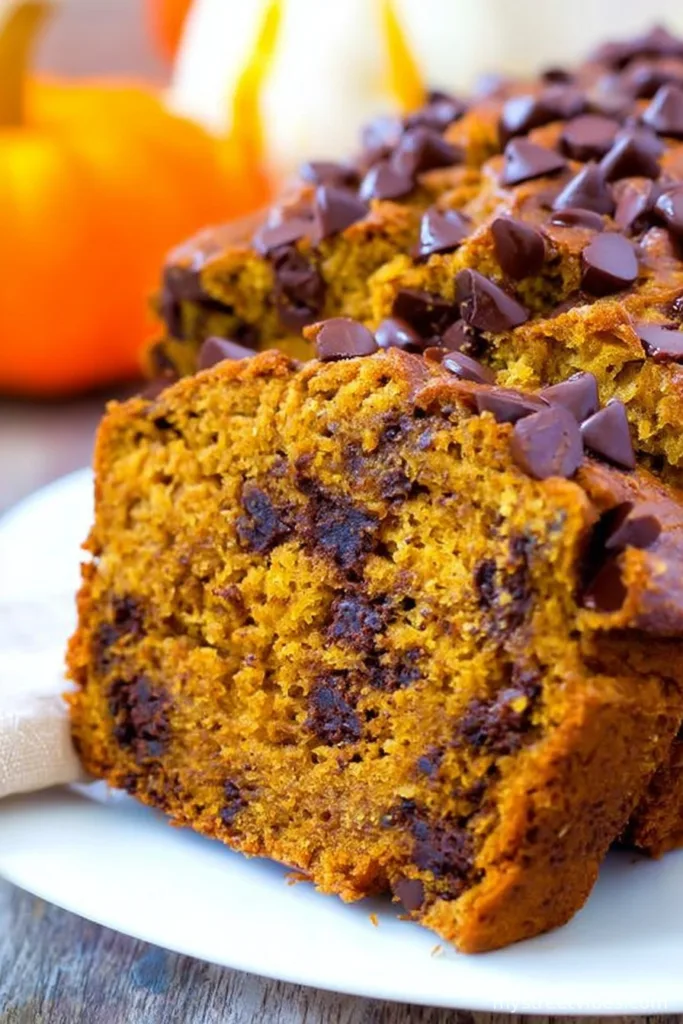
If I Could Only Bake One Thing This Fall…
Okay, honest moment — I’m not what you’d call the world’s most precise baker (ask my husband about the Great Pancake Incident of 2018; actually, please don’t). But this best chocolate chip pumpkin bread? It’s the one thing even my most judgy aunt asks for. I made it last autumn during a run of wet, frankly miserable Tuesdays, and now my kids start dropping extremely unsubtle hints (“Do we have any more of that pumpkin bread?”) every October. So here we are — with my favorite, slightly chaotic, and very homey recipe. I dare you to find someone who doesn’t demolish a thick slice.
Why You’ll Probably Love This (I Know I Do)
I make this when it’s raining and we’ve got some weird half-can of pumpkin leftover (you know the one), or when friends are coming over and I want them to immediately like me more. My family goes nuts for it because the chocolate gets all gooey amongst the pumpkin, and it somehow tastes even better the next day. (If it actually lasts that long, which is rare. One time I tried hiding a loaf, but someone sniffed it out like a bloodhound.) Also, there’s just something about the pumpkin spice smell that makes everything feel cozier, even if you’ve got laundry piled up everywhere like I usually do.
What You’ll Need (But Feel Free To Improvise!)
- 1 3/4 cups (about 225g) all-purpose flour (I’ve subbed in half whole-wheat before, and nobody noticed. Gram would probably stage a protest, though.)
- 1 tsp baking soda
- 1/2 tsp salt
- 1 tsp cinnamon (or pumpkin pie spice, which is what I use if that’s what’s hanging out in the spice drawer)
- 1/2 tsp nutmeg (sometimes I skip it if I can’t find it)
- 2 large eggs
- 3/4 cup granulated sugar (or try coconut sugar for a deeper flavor — it works better than you’d think)
- 1/2 cup packed brown sugar (light or dark, I honestly can’t taste a huge difference)
- 1/2 cup neutral oil (vegetable, canola, or even melted coconut if you’re feeling fancy; olive oil made it taste…interesting)
- 1/4 cup milk (anything goes, even almond milk if dairy’s an issue)
- 1 cup canned pumpkin puree (not pumpkin pie filling — learned that one the hard way!)
- 1 tsp vanilla extract (imitation or real — my taste buds are not snobs)
- 1 cup chocolate chips (semi-sweet or dark, and sometimes mini ones… honestly, grab whatever you’ve got)
Let’s Make Pumpkin Bread (Don’t Overthink It)
- Preheat your oven to 350°F (175°C). Grease or line a bread pan — mine is 9×5 inches, but I’ve used slightly smaller or larger with no problem. (If you forget to grease it, you’ll remember next time. Trust me, we’ve all been there.)
- Mix together your flour, baking soda, salt, cinnamon, and nutmeg in a big bowl. No need to sift — just swish it around a bit with a spoon.
- In another bowl (I know, it’s annoying, but it actually helps), whisk the eggs with both sugars until well-mixed. Add the oil and the milk, then give it a good whisking. Toss in the pumpkin puree and vanilla, too.
- Pour the wet pumpkin mixture into the dry ingredients. Stir just until combined — lumps are totally fine. Over-mixing? Ask me about dense bread disasters sometime.
- This is where I usually sneak a taste of the batter. (Raw eggs, yes, but I like living on the edge.) Fold in most of your chocolate chips, saving a handful for sprinkling on top.
- Pour the batter into your prepared pan. Sprinkle the rest of the chocolate chips over the top, because why not. (It’ll look super impressive, trust me.)
- Bake for 50–60 minutes. I check it at 45 just in case my oven’s in a mood. If a toothpick comes out clean-ish (a little goo from the chocolate is normal), you’re golden.
- Let it cool in the pan for about 15 minutes, then run a knife around the edges and pop it onto a rack. Or, you know, just dig in while it’s warm. Who’s judging?
Notes I’ve Collected (Sometimes The Hard Way)
- Bread sometimes sinks in the middle if you use too much pumpkin. Happens to the best of us.
- Actually, I find it works better if the eggs are room temperature — though I always forget this and microwave them for like 10 seconds. Just don’t cook ’em!
- If you run out of chocolate chips and use a chopped up chocolate bar, it’s a sticky mess, but still delicious. It’ll just be a little wild-looking.
If You Want To Mix It Up, Try These (Or Don’t!)
- Toss in walnuts or pecans for a crunchy thing (I like it for texture, but my youngest picks them out — your call).
- I once tried swirling in cream cheese — neat idea in theory, but the texture went a bit funny. Maybe you’ll have better luck?
- Sprinkle on pumpkin seeds before baking for a toasty topping (I’m all in for extra crunch).
Tools You’ll Need (Or Cheat With What You Have)
You technically need a loaf pan. But honestly, I’ve made this in a muffin tin (just bake for about 22-25 minutes). Don’t have a whisk? A fork and a little elbow grease, and you’re all set. Mixing bowls — mine don’t even match, no shame in that.

How To Store (If It Actually Lasts)
This bread keeps well wrapped in foil or stashed in an airtight container on the counter for 2 to 3 days (though honestly, in my house it never lasts more than a day!). It freezes solid, too: wrap slices up tight and you’ll have emergency snacks whenever. I keep meaning to freeze the whole loaf but, uh, hasn’t happened yet.
Serving It Up — My Way, But Do What Feels Right
Hot slice spread with salted butter, next to a mug of strong coffee? Can’t beat it. My kids eat it plain while still in their pajamas. For brunch with friends, pile slices on a pretty platter and act like you planned everything ahead. If you want to get real extra, drizzle a little honey. Or some whipped cream if you’re feeling wild — Sally has a fancy streusel topping I tried once. Tasty, but chaos in the kitchen.
Lessons I Learned The Not-So-Easy Way
- I once tried to rush the cooling process and ended up with a pile of hot crumbs instead of slices — let it cool, at least a little.
- Overbaking because “it looks too moist”? Regretted it. Trust the toothpick over your eyes.
Your Questions (Because My Family Had These, Too!)
- Can I make this gluten free?
- Yep! I swap in a 1:1 gluten-free flour blend like King Arthur’s. Honestly, comes out really close to the real deal.
- What if I only have fresh pumpkin?
- First, you must have more patience than me. Roast and mash it, but make sure it’s not too watery — otherwise the loaf might get a bit soggy.
- Can I cut back the sugar?
- I’d say yes, but I wouldn’t go less than half or it might taste a little too bread-y for my taste. But hey, experiment!
- What’s the best way to double the recipe?
- Just double every ingredient, but maybe don’t try fitting both loaves in the oven at the same time unless you know your oven’s hot spots. I learned that one the hard way (one was, um, a little crispy).
- Can I use white chocolate chips?
- Sure! I’ve done it when I ran out of regular and a sweet tooth called. It’s a bit much for me, but my cousin loved it.
Oh, almost forgot — if you want even more pumpkin bread science (because it’s a thing!), totally check out this deep-dive at Serious Eats. That’s where I got the idea to try swapping some brown sugar.
So, that’s my best chocolate chip pumpkin bread — imperfections, shortcuts, jaunts to the store for one last egg, and all. You’ll probably tweak it, too, but that’s half the fun.

Ingredients
- 1 3/4 cups all-purpose flour
- 1 cup canned pumpkin puree
- 2 large eggs
- 1 cup granulated sugar
- 1/2 cup unsalted butter, melted
- 1 teaspoon vanilla extract
- 1 teaspoon baking soda
- 1/2 teaspoon salt
- 1 teaspoon ground cinnamon
- 1/2 teaspoon ground nutmeg
- 1 cup semisweet chocolate chips
Instructions
-
1Preheat your oven to 350°F (175°C). Grease and flour a 9×5-inch loaf pan.
-
2In a large bowl, whisk together the flour, baking soda, salt, cinnamon, and nutmeg.
-
3In another bowl, mix the melted butter, sugar, eggs, pumpkin puree, and vanilla until smooth and combined.
-
4Gradually add the wet ingredients to the dry ingredients, stirring just until combined. Fold in the chocolate chips.
-
5Pour the batter into the prepared loaf pan and smooth the top.
-
6Bake for 50–55 minutes, or until a toothpick inserted into the center comes out clean. Cool in the pan for 15 minutes before transferring to a wire rack.
CLICK FOR NUTRITION INFO
↑
Approximate Information for One Serving
Serving Size:
1 serving
Calories:
285 caloriescal
Protein:
4gg
Fat:
12gg
Saturated Fat:
0g
Trans Fat:
0g
Cholesterol:
0mg
Sodium:
0mg
Potassium:
0mg
Total Carbs:
41gg
Fiber:
0g
Sugar:
0g
Net Carbs:
0g
Vitamin A:
0
Vitamin C:
0mg
Calcium:
0mg
Iron:
0mg
Nutrition Disclaimers
Number of total servings shown is approximate. Actual number of servings will depend on your preferred portion sizes.
Nutritional values shown are general guidelines and reflect information for 1 serving using the ingredients listed, not including any optional ingredients. Actual macros may vary slightly depending on specific brands and types of ingredients used.
To determine the weight of one serving, prepare the recipe as instructed. Weigh the finished recipe, then divide the weight of the finished recipe (not including the weight of the container the food is in) by the desired number of servings. Result will be the weight of one serving.
Did you make this recipe?
Please consider Pinning it!!