Alright, Let’s Talk About These Air Fryer Baked Potatoes
I’ve got to admit: I used to think baked potatoes were strictly an oven or campfire thing. But then the air Fryer landed on my counter (thanks, Auntie Kate!), and everything changed. First attempt? Charred the poor spud into something only a squirrel would love—yikes. But these days? I make air Fryer Baked potato with my eyes half-closed, one hand holding a mug. Oh, and there’s something uniquely satisfying about how the skin goes all crackly, almost like the jacket potatoes you get from street vendors—at least, the ones that haven’t been sitting there all day getting soggy.

Why Do I Keep Making These?
I pull this recipe out when I want dinner with almost zero fuss—especially on a Tuesday, you know? My family’s a bunch of crisp-skin fanatics (my youngest occasionally just peels the potato and leaves the insides, cheeky rascal). And sometimes, when I’m feeling lazy, I’ll chuck two in for lunch and, honestly, I can get them hot and ready before I’ve found a clean fork. Sometimes I wish they cooked even faster, but compared to turning on a massive oven, it’s a lifesaver.
What You’ll Need (with Some Wiggle Room)
- 2 russet potatoes, medium (sometimes I grab whichever potatoes are in the pantry—Yukon Golds work too, but the skin’s not as dramatic)
- 1 tablespoon olive oil (but I’ve been known to use avocado oil in a pinch, or honestly, whatever’s closest)
- 1 teaspoon kosher salt (sea salt will do; my gran swore by Maldon flakes, but I don’t usually bother)
- Freshly ground black pepper (optional—my partner says pepper belongs on literally everything)
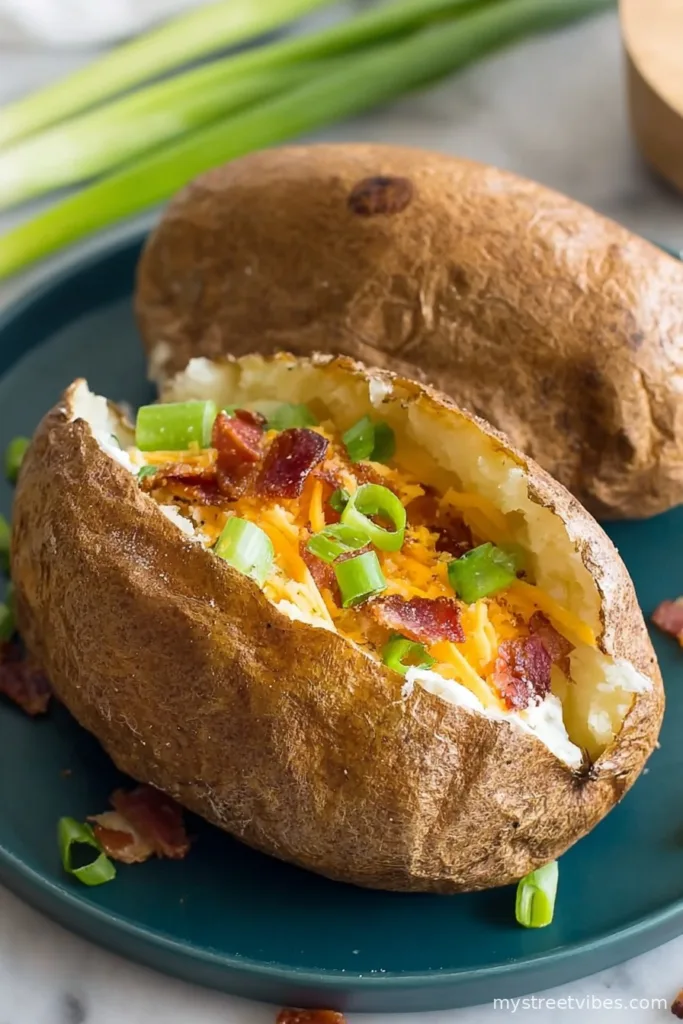
- Plus: Your favourite toppings—I’m all about cheddar and chives but use what you like or nothing at all. Sometimes it’s just butter—simple, proper comforting!
Here’s How I Do It (With My Own Odd Rhythms)
- Scrub your potatoes pretty well. Don’t be lazy here—the skin is the best part. Dry ’em off. If you miss a bit of dirt, it somehow finds your teeth (don’t ask me how).
- Poke the potatoes with a fork (maybe 6–8 times altogether). One time I skipped this and got a tiny spud explosion; cleaning potato bits from an air fryer, not my favourite pastime.
- Rub them with olive oil, then sprinkle with salt and pepper. I do this in my hands over the sink so things don’t get too messy, but I still end up with salty toes somehow.
- Preheat your air fryer if you can be bothered (mine takes about 3 minutes at 390°F/200°C, but sometimes I just toss them in cold—makes maybe a 5 minute difference?)
- Air fry at 390°F/200°C for around 38–42 minutes (turn them over halfway if you remember—sometimes I don’t and it’s all good). They should feel soft when you poke with a knife, and the skins should have a nice crunch. Don’t panic if they’re a little wonky looking; they usually fluff up at the end anyway.
- Let them cool a tad if your fingers can stand the heat, then cut a big cross in the top and squeeze the sides so the insides kind of burst up. Sometimes I put on a bit too much butter and it turns into a molten puddle, and no one’s complained yet.
Some Notes from the School of Hard Spuds
- If the potatoes are still a little firm in the middle, pop them back in for another 5 minutes—no shame, we’ve all undercooked a potato (or three).
- For anyone in a hurry—smaller potatoes = faster. Not rocket science, but I didn’t used to believe it until I tried.
- Potatoes can taste better the next day, especially reheated open-faced with cheese. Don’t @ me.
Experiments and Potato Plot Twists
- Once tried slathering the potato in garlic butter before air frying—delicious but really messy cleanup (my teenager refused to help scrub, but that’s teens for you).
- Loaded ’em with leftover pulled pork: surprisingly tasty. But I wouldn’t recommend baked beans; got a little mushy for my liking.
- If you want a smoky taste, smoked paprika sprinkled as soon as they’re done is a winner.

What You’ll Need (And What to Do if You Don’t Have It)
- Air fryer (obviously! But actually, once tried this in the oven—took way longer. You could use a convection oven at a push, but results are a bit less punchy.)
- Fork (or a small, sharp knife for poking—whatever’s handy; don’t overthink it)
- Small brush or hands for oil, unless you like wasting money on gadgets
How Well Do They Keep? (Honest Answer: Not Long)
If, by some miracle, you’ve got leftovers, just wrap ’em up in foil and stick in the fridge. They’ll keep 2–3 days, but honestly, in my house, leftovers barely last till morning (I once found half a potato in the fridge next to a jar of pickles… it was gone by noon!).
Let’s Talk About Toppings
Alright, here’s where I get excited. Some nights, it’s classic—salt, butter, a wee puddle of sour cream. Sunday evenings? We go full works: crispy bacon, chives, cheddar, maybe a dash of hot sauce. My nan would sometimes do baked beans and cheese because she claimed it was “proper British.” And occasionally, when I want to feel fancy, I’ll sprinkle over some truffle oil and act like I’m on the telly.
Pro Tips Learned the Hard Way
- I once tried shortening the cooking time by cranking the temperature higher—ended up singeing the outsides and the inside was still basically raw. Don’t be me.
- Giving them space in the air fryer basket really does help get the skins crispy. Cramming them in just leads to moody potatoes. Trust me.
Questions Friends Have Actually Asked Me
- Can I do more than two at once? Yeah, as long as they aren’t crammed together; you want air moving round ’em. But if you have a mini air fryer (like the one I borrowed once), just stick with one or they’ll steam instead of crisp.
- Do I really have to use russet potatoes? Nah. But they do give that classic crispy skin/fluffy centre combo. Any potato works in a pinch; just mind the size and adjust the time.
- What’s up with all the poking? Stops ‘em from exploding. Trust me, I learned the hard way. Also, I don’t always count—it’s just poke, poke, poke, done.
- Can I skip oil? You can, but the skin won’t be as crispy. If I’m being really lazy, sometimes I do skip it; the taste is fine, just a different vibe.
- Why do mine sometimes wrinkle? That just happens if they cool too long before cutting—next time, slit ‘em open straight away.
So that’s my take on air fryer baked potato—definitely not fancy, sometimes a little chaotic, but always tasty. Oh, and did I mention I once used leftover potato skins for breakfast hash the next day? Pretty sure that makes me a genius, or at least good at clearing out the fridge.
Ingredients
- 4 medium russet potatoes
- 2 tablespoons olive oil
- 1 teaspoon sea salt
- 1/2 teaspoon black pepper
- 1/2 teaspoon garlic powder
- 1/2 teaspoon paprika
- 2 tablespoons chopped chives (optional for garnish)
- Sour cream or butter, for serving (optional)
Instructions
-
1Scrub the potatoes thoroughly and pat them dry with a towel. Pierce each potato several times with a fork.
-
2Rub each potato with olive oil, then sprinkle on sea salt, black pepper, garlic powder, and paprika to coat evenly.
-
3Place the potatoes in the air fryer basket, ensuring they are not overcrowded for even cooking.
-
4Cook at 400°F (200°C) for 35-40 minutes, turning halfway through, until the potatoes are crispy on the outside and tender on the inside.
-
5Remove from the air fryer, slice open, and top with chopped chives and optional sour cream or butter before serving.
CLICK FOR NUTRITION INFO
↑
Approximate Information for One Serving
Serving Size:
1 serving
Calories:
230cal
Protein:
5 gg
Fat:
6 gg
Saturated Fat:
0g
Trans Fat:
0g
Cholesterol:
0mg
Sodium:
0mg
Potassium:
0mg
Total Carbs:
41 gg
Fiber:
0g
Sugar:
0g
Net Carbs:
0g
Vitamin A:
0
Vitamin C:
0mg
Calcium:
0mg
Iron:
0mg
Nutrition Disclaimers
Number of total servings shown is approximate. Actual number of servings will depend on your preferred portion sizes.
Nutritional values shown are general guidelines and reflect information for 1 serving using the ingredients listed, not including any optional ingredients. Actual macros may vary slightly depending on specific brands and types of ingredients used.
To determine the weight of one serving, prepare the recipe as instructed. Weigh the finished recipe, then divide the weight of the finished recipe (not including the weight of the container the food is in) by the desired number of servings. Result will be the weight of one serving.
Did you make this recipe?
Please consider Pinning it!!