My Take on Peanut Butter and Honey Shortbread Cookies
The first time I baked these Peanut Butter and Honey Shortbread Cookies I’d just moved into my new flat with a kitchen the size of a closet (I’m not exaggerating, my fridge doubled as extra counter space). I remember being determined to bake something comforting—sweet, crumbly, a bit nostalgic, you know? Well, these hit the spot. Even now, every time I make a batch, the smell alone is enough to make me forget about life’s little annoyances (like that time I realized mid-bake that I only had one baking tray).

Why You’ll Love These (According to Me)
I tend to whip these up whenever I’m craving something a bit old-fashioned but don’t want to spend hours fussing about. My family loves them because they’re soft, buttery, and that honey gives a mellow sweetness you just can’t get from sugar alone (oh, and the dough doesn’t need chilling—hallelujah!). And if you’re a peanut butter fiend like half my friends, this recipe is about to be your new best mate. I’ve tried lots of shortbread cookie recipes, but this one’s just got more soul somehow. (For the record, I’ve also botched a batch or two by trying to cut calories. Not worth it! Just embrace the butter.)
What Goes Into Them: The Ingredients
- ¾ cup butter, melted (I just use whatever unsalted butter’s on sale to be honest)
- ½ cup peanut butter—natural creamy is my go-to, but crunchy brings great texture if you’re feeling wild!
- ⅓ cup granulated sugar (sometimes I’ve snuck in golden caster sugar and it was still fab)
- ⅓ cup runny honey—yes, proper honey, not that rock-hard jar at the back of your pantry
- ¼ teaspoon salt (totally necessary, don’t skip; unless you really like things bland… which, why?)
- 2 ½ cups all-purpose flour (yep, plain old flour, nothing fancy—my grandmother would probably approve)
- Light brown sugar for rolling and sprinkling (sometimes I use raw sugar when I’m out—it’s a little crunchier but does the job)
- For Decorating (all optional):
- Melted chocolate (for dunking—delicious but messy)
- Sprinkles (for extra joy, according to my youngest niece)
- Chopped peanuts (sometimes I just crush them with the bottom of a mug)
How to Bring It All Together
- Crank Up the Oven: First things first—get your oven going at 375°F (that’s about 190°C for my fellow metric folks). Grab two or three baking sheets. Some folks swear by silicone mats; I usually reach for plain baking parchment because I keep losing my silicone ones!
- Mix Your Dough: In a medium bowl, combine the melted butter, peanut butter, granulated sugar, honey, and salt. I like to give it a good whisk; it should look silky and cohesive—almost dangerously good at this point (confession: this is usually where I sneak a spoonful). Pour in the flour and fold—don’t worry if it looks like a bit of a mess at first. It always comes together after a few gentle presses with the spoon or even your hands. You want a soft, playdough-like ball at the end.
- Roll, Cut, and Sugar: Dust your countertop with a generous scattering of light brown sugar (this is key—trust me, it gives a caramel crunch). Plop your dough there, flatten with your hands, and then roll to about a third-of-an-inch thickness. Don’t fuss over perfect edges. Slice into fingers or get fancy with your favorite cookie cutters. The wonky edges always get eaten fastest in my house.
- Into the Oven: Arrange the cookies on your trays, spacing them a couple of inches apart so they’ve got room to breathe. Sprinkle their tops with more brown sugar for sparkle and crunch. I like to bake these one tray at a time—usually takes 8 or 9 minutes, right when the edges start to hint at gold. Trust me, don’t wait for them to get brown all over, or you’ll wind up with peanut-flavored bricks.
Let them cool on the tray—they come out alarmingly soft, but they’ll firm up as they cool. Patience, grasshopper. Then transfer them (gently) to a wire rack.
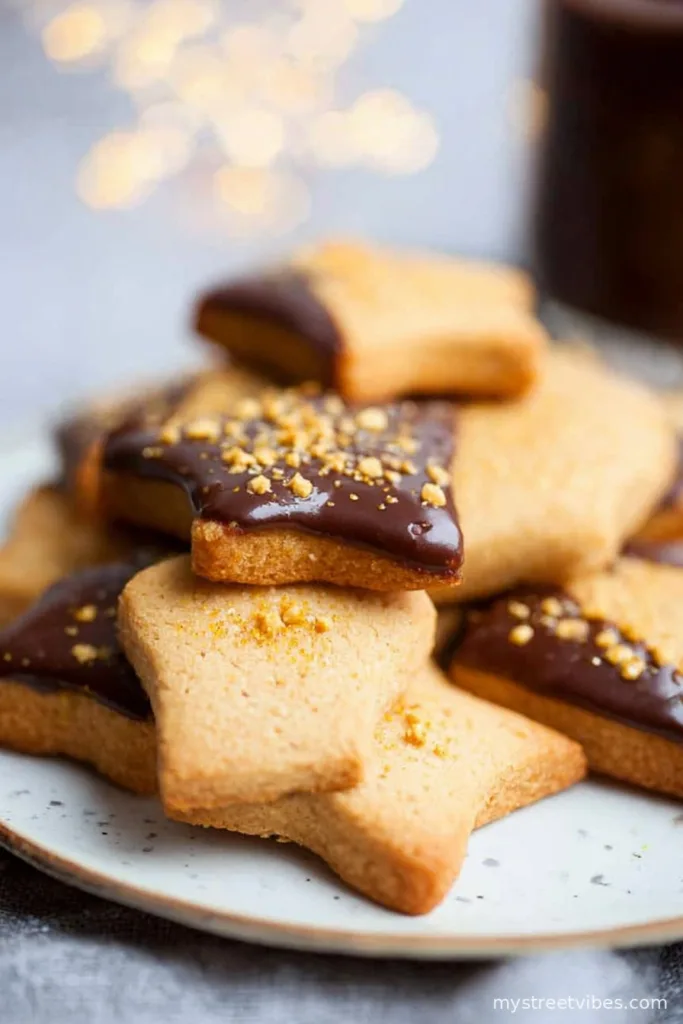
- Dress Them Up (or Don’t): Once they’re cooled off and safe to handle, dip them in melted chocolate if you’re feeling indulgent, then sprinkle with chopped peanuts or sprinkles. I like to lay them back on parchment to set fully. If you skip the decorating, they’re still perfect alongside a strong cuppa.

A Few Notes—Stuff I’ve Learned
- If your dough seems dry, a tiny splash of milk brings it right together. (Once I miscounted the flour and needed more than “a splash”—it was still edible, but not my finest.)
- Line your trays—trust me, cleaning burnt sugar off baking sheets is for the birds.
- The brown sugar on your rolling surface is my sneaky trick for extra flavor! Don’t skip.
If You Want to Tinker—Variations I’ve Tried
- Adding a pinch of cinnamon: lovely warmth, but it can fight with the honey if you overdo it.
- Swapping honey for maple syrup: works well, though the flavor’s a bit milder—my dad prefers it that way.
- I tried baking with almond butter once… let’s just say stick to peanut unless you’re feeling experimental.

What If I Don’t Have…?
- No rolling pin? Try flattening the dough with a clean glass or the bottom of a saucepan. Improvisation is half the fun!
- Missing a wire rack? I used to just slide cookies (still on parchment) over the racks in my oven, door propped open. Little chaotic, but it works.
Storage That’s (Mostly) Theoretical
These will keep in an airtight jar, supposedly for a week. Honestly, I’ve never had a batch last more than 48 hours, but theoretically they’ll stay crisp and buttery for up to 7 days. You could freeze them, unbaked or baked, though I always forget I’ve done it until it’s too late and they’re freezer-burned (oops).
How I Serve ‘Em
Tea and cookies—classic. Sometimes I’ll stack them in a bowl and serve with berries and a dollop of extra peanut butter (my nephew says it’s “genius,” which is the highest kid compliment). If you’re feeling decadent, try sandwiching two with a slather of Nutella. It’s messy, but joyous.
Pro Tips—Learn From My Blunders
- Patience is key after baking. I once moved them too soon and they crumbled—a tasty disaster, but not great for presentation.
- If you’re tempted to double the recipe, make two separate batches. Mixing a double is harder than it looks, and you’ll probably regret it (I always do).
- Don’t skip the final sugar sprinkle. It really is the cherry on top, or I guess, the sugar on the biscuit.
Questions People Actually Ask Me
- Can I use sunflower butter instead? I haven’t tried, but I suppose you could. Texture might change, though.
- These seem super crumbly—is that normal? Yep! That’s the charm of shortbread. But if they’re falling apart, maybe too much flour (happens to the best of us).
- Best way to melt the chocolate? I usually zap it in the microwave 20 seconds at a time, stirring between blasts. Old-school folks might prefer a double boiler, but my microwave works fine.
- Can I halve the recipe? Sure thing! But honestly, you’ll wish you’d made more.
- Is it OK to skip the decorating? Absolutely. Sometimes plain is best—depends on my mood and what chaos is whirling in the kitchen that day.
There you go—probably more than you ever wanted to know about peanut butter and honey shortbread. If you give them a go, tell me if you discover a new twist or a happy accident (or just if you eat half the dough—I won’t judge!).
Ingredients
- ¾ cup butter melted
- ▢½ cup peanut butter I used natural creamy, but crunchy works too!
- ▢⅓ cup granulated sugar
- ▢⅓ cup runny honey
- ▢¼ teaspoon salt
- ▢2 ½ cups all-purpose flour
- ▢light brown sugar for rolling and sprinkling
- Option Decorations
- ▢melted chocolate
- ▢sprinkles
- ▢chopped peanuts
Instructions
-
1Prep: Heat the oven to 375°F and line 2 or 3 baking sheets with silicone mats or baking parchment.
-
2AD
-
3Make cookie dough: Add melted butter, peanut butter, sugar honey and salt to a medium mixing bowl and whisk until smooth. Fold in flour and push together into a soft dough.
-
4Roll and cut out cookies: Sprinkle a surface with light brown sugar and roll dough to ⅓ inch thickness on it. Either cut into fingers or cut into shapes with cookie cutters.
-
5Bake: Place cookies on lined baking sheets 2 inches apart. Sprinkle tops with brown sugar. Bake in batches (one tray at a time!) for 8-9 minutes, or until just turning golden. Cool on the baking sheet (the cookies will still be very soft when they come out of the oven!) before transferring to a wire rack to cool completely.
-
6Optionally decorate: To decorate the cookies, I dip the cooled cookies in melted chocolate and sprinkle them with either chopped peanuts or sprinkles, then I place them on baking parchment until completely dry and firm. Keep them in an air-tight cookie jar for about 1 week.
CLICK FOR NUTRITION INFO
↑
Approximate Information for One Serving
Serving Size:
1 serving
Calories:
130 caloriescal
Protein:
2 gg
Fat:
8 gg
Saturated Fat:
0g
Trans Fat:
0g
Cholesterol:
0mg
Sodium:
0mg
Potassium:
0mg
Total Carbs:
13 gg
Fiber:
0g
Sugar:
0g
Net Carbs:
0g
Vitamin A:
0
Vitamin C:
0mg
Calcium:
0mg
Iron:
0mg
Nutrition Disclaimers
Number of total servings shown is approximate. Actual number of servings will depend on your preferred portion sizes.
Nutritional values shown are general guidelines and reflect information for 1 serving using the ingredients listed, not including any optional ingredients. Actual macros may vary slightly depending on specific brands and types of ingredients used.
To determine the weight of one serving, prepare the recipe as instructed. Weigh the finished recipe, then divide the weight of the finished recipe (not including the weight of the container the food is in) by the desired number of servings. Result will be the weight of one serving.
Did you make this recipe?
Please consider Pinning it!