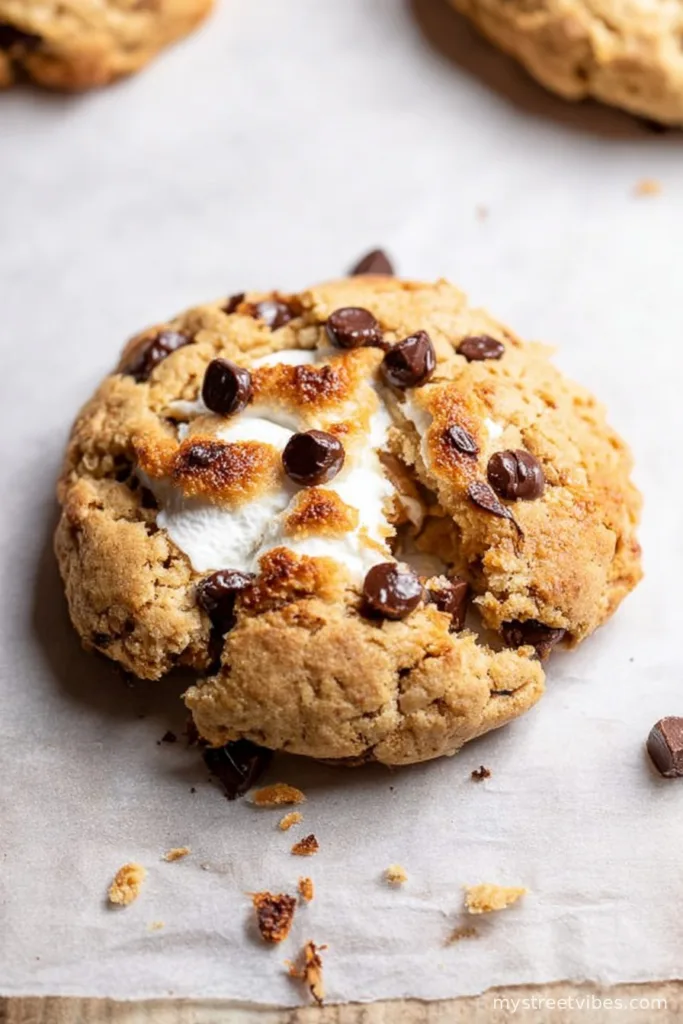
If you’ve ever wanted a campfire treat but, let’s be honest, you can’t be bothered to dig out the fire pit—or if it’s raining cats and dogs outside—these Easy S’mores Cookies are the graham-cracker hug you need. First time I made them, my kids thought I’d invented something world-changing—like the wheel, but way stickier (and loads tastier, if you ask me). One bowl, no chillin’ in the fridge, and they’re out of the oven quicker than your neighbor Phil can borrow a cup of sugar. True story: the first time I tried these, I used my old 70s hand mixer and nearly launched flour across the kitchen! But really, you just need a bowl and a spoon, so your mixer can have the night off.

Why This Recipe Will Probably Steal the Show
I make these when cravings hit and patience is low—sometimes after those long Tuesdays that feel like they’re never gonna end. My family devours them (seriously—gone before I even grab my second one). My son calls them ‘campfire, minus the mosquitoes.’ No waiting for dough to chill, and you can totally pretend you planned to have gooey chocolate and toasted marshmallow bits melting on your counter. Also, baked cookies make your kitchen smell like a grandma’s cottage. You will thank me later.
What You’ll Need (But Feel Free To Improvise)
- 1/2 cup (1 stick or 115g) unsalted butter, melted (if all you have is salted, just skip the extra salt—no biggie)
- 1/2 cup light brown sugar, packed (sometimes I’ve used dark brown for a stronger flavor—works fine!)
- 1/4 cup granulated sugar (or just a smidge more brown sugar if that’s all that’s left in the jar)
- 1 large egg (room temp, but honestly, straight form the fridge is what usually happens here)
- 1 tsp vanilla extract (the real stuff is nice, but imitation does the trick too)
- 1 1/3 cups all-purpose flour (I tried with half whole wheat once—meh. Stick with regular for classic taste.)
- 1/2 tsp baking soda
- 1/4 tsp salt
- 3/4 cup semi-sweet chocolate chips (but hey, chop up a candy bar if that’s all you’ve got)
- 3/4 cup mini marshmallows (if you only have big ones, just cut ‘em up)
- 1/2 cup graham cracker pieces, broken into 1-inch bits (sometimes I just crush some inside a sandwich bag with a rolling pin, or honestly, a coffee mug works fine, too)
How To Do It (With Occasional Chaos)
- Crank your oven up to 350°F (175°C) and line a baking sheet with parchment. Or foil, or nothing, if you’re out—clean up is just slightly more of a bear.
- Grab your biggest bowl and toss in the melted butter, both sugars, egg, and vanilla. Stir it up until it’s smooth and glossy (this is when I usually sneak a spoonful—perks of being the baker, right?).
- Sprinkle in the flour, baking soda, and salt right on top. Stir it all together until just combined—don’t be tempted to overmix, or your cookies might be tough.
- Add in the chocolate chips, marshmallows, and graham pieces. Fold it all together gently. The dough will look chunky—don’t panic! That’s the s’mores magic.
- Scoop out heaping tablespoon-sized blobs onto your tray (sometimes I use an ice cream scoop, sometimes just a regular tablespoon—no need to be precious). Leave some space so they don’t end up one giant cookie. Actually, one giant cookie is kind of amazing… but that’s another story.
- Bake for 9–11 minutes, until the edges are golden and the centers look just barely set. Marshmallows might ooze a bit—let them! They’ll crisp up as they cool.
- Allow to cool on the tray for 5ish minutes (or as long as you can bear). If you try to move them too early and they fall apart—grab a spoon and claim it’s rustic. No judgment.
Little Notes from a Scatter-Brain
- I wrecked a batch once by forgetting the baking soda (cookies were more like sad pancakes—don’t repeat my mistakes)
- Mini marshmallows will brown lots; if you’re fussy, push a few extras on top when the cookies first come out
- Let them cool on the tray—makes all the sticky bits firm up better; they taste messier warm, but I still dive in
Variations I’ve Actually Tried (Plus One Fail)
- If you’re feeling extra, swap in peanut butter chips for half the chocolate—it’s wild
- Chopped Hershey bars look even more “campfire” (but melt more, so go easy)
- I tried caramel bits once—resulted in caramel lava. Not my finest hour. Probably skip that one.

Essential Gear (Mostly)
A big mixing bowl and a sturdy spoon will do it. Got a mixer? Go for it. If you’re short on baking sheets, rig up a roasting pan, or just bake in rounds if you must (did that during a kitchen renovation and survived).
Keeping & Storing (or Not)
Supposedly, you can stash these in an airtight tin for 2–3 days, though honestly, in my house it never lasts more than a day! You can freeze dough blobs or even baked cookies, just zap ‘em in the microwave for a few seconds and act like they’re fresh.
How I Serve These (And How My Family Argues Over Them)
I like ‘em still a little warm with a glass of cold milk, feet up on the sofa. My kids dunk theirs—in hot cocoa, in tea (honestly, British genes showing there). On second thought, one friend did crumble them on top of vanilla ice cream, and I was not mad!
Pro Tips—Learned the Hard Way
- Don’t bake too long. I once tried “just two more minutes” and got s’mores rocks. Less is more here!
- Scoop messy blobs rather than perfect balls. Those rough edges crisp up just right.
- If the dough looks too dry, actually, I find it works better if you add a teaspoon of milk.
Some Real Questions Folks Have Asked Me
- Do I have to use parchment? Nah, but it sure helps with sticky marshmallow clean-up.
- Can I use gluten-free flour? I’ve tried with a cup-for-cup blend and the cookies held up—might need an extra tablespoon, though, if dough seems runny.
- Are these way too sweet? Not in my (possibly sugar-fueled) opinion, but you can cut a tablespoon or so of sugar if you’re worried.
- What if I only have regular marshmallows? Chop ‘em up with scissors. A little sticky, but it works—plus you get to lick your fingers after.
- Do they taste best fresh? Maybe I’m in the minority but I think this tastes better the next day—if you can manage to hide one away overnight.
- Why do my marshmallows escape? Oh, mine run all over sometimes too—just call it a rustic cookie look. Scrape ‘em up, eat with reckless abandon, move on.
Honestly, these cookies are as easy as falling off a log, and twice as fun (plus, fewer bruises). If you give it a go—let me know how your version turns out. Or just tell me about the time you dropped an entire tray on the floor; no one’s judging here. Except maybe the dog (mine’s a shameless beggar, truly).
Ingredients
- 1/2 cup (1 stick or 115g) unsalted butter, melted (if all you have is salted, just skip the extra salt—no biggie)
- 1/2 cup light brown sugar, packed (sometimes I’ve used dark brown for a stronger flavor—works fine!)
- 1/4 cup granulated sugar (or just a smidge more brown sugar if that’s all that’s left in the jar)
- 1 large egg (room temp, but honestly, straight form the fridge is what usually happens here)
- 1 tsp vanilla extract (the real stuff is nice, but imitation does the trick too)
- 1 1/3 cups all-purpose flour (I tried with half whole wheat once—meh. Stick with regular for classic taste.)
- 1/2 tsp baking soda
- 1/4 tsp salt
- 3/4 cup semi-sweet chocolate chips (but hey, chop up a candy bar if that’s all you’ve got)
- 3/4 cup mini marshmallows (if you only have big ones, just cut ‘em up)
- 1/2 cup graham cracker pieces, broken into 1-inch bits (sometimes I just crush some inside a sandwich bag with a rolling pin, or honestly, a coffee mug works fine, too)
Instructions
-
1Crank your oven up to 350°F (175°C) and line a baking sheet with parchment. Or foil, or nothing, if you’re out—clean up is just slightly more of a bear.
-
2Grab your biggest bowl and toss in the melted butter, both sugars, egg, and vanilla. Stir it up until it’s smooth and glossy (this is when I usually sneak a spoonful—perks of being the baker, right?).
-
3Sprinkle in the flour, baking soda, and salt right on top. Stir it all together until just combined—don’t be tempted to overmix, or your cookies might be tough.
-
4Add in the chocolate chips, marshmallows, and graham pieces. Fold it all together gently. The dough will look chunky—don’t panic! That’s the s’mores magic.
-
5Scoop out heaping tablespoon-sized blobs onto your tray (sometimes I use an ice cream scoop, sometimes just a regular tablespoon—no need to be precious). Leave some space so they don’t end up one giant cookie. Actually, one giant cookie is kind of amazing… but that’s another story.
-
6Bake for 9–11 minutes, until the edges are golden and the centers look just barely set. Marshmallows might ooze a bit—let them! They’ll crisp up as they cool.
-
7Allow to cool on the tray for 5ish minutes (or as long as you can bear). If you try to move them too early and they fall apart—grab a spoon and claim it’s rustic. No judgment.
CLICK FOR NUTRITION INFO
↑
Approximate Information for One Serving
Serving Size:
1 serving
Calories:
150 caloriescal
Protein:
2 gg
Fat:
7 gg
Saturated Fat:
0g
Trans Fat:
0g
Cholesterol:
0mg
Sodium:
0mg
Potassium:
0mg
Total Carbs:
21 gg
Fiber:
0g
Sugar:
0g
Net Carbs:
0g
Vitamin A:
0
Vitamin C:
0mg
Calcium:
0mg
Iron:
0mg
Nutrition Disclaimers
Number of total servings shown is approximate. Actual number of servings will depend on your preferred portion sizes.
Nutritional values shown are general guidelines and reflect information for 1 serving using the ingredients listed, not including any optional ingredients. Actual macros may vary slightly depending on specific brands and types of ingredients used.
To determine the weight of one serving, prepare the recipe as instructed. Weigh the finished recipe, then divide the weight of the finished recipe (not including the weight of the container the food is in) by the desired number of servings. Result will be the weight of one serving.
Did you make this recipe?
Please consider Pinning it!