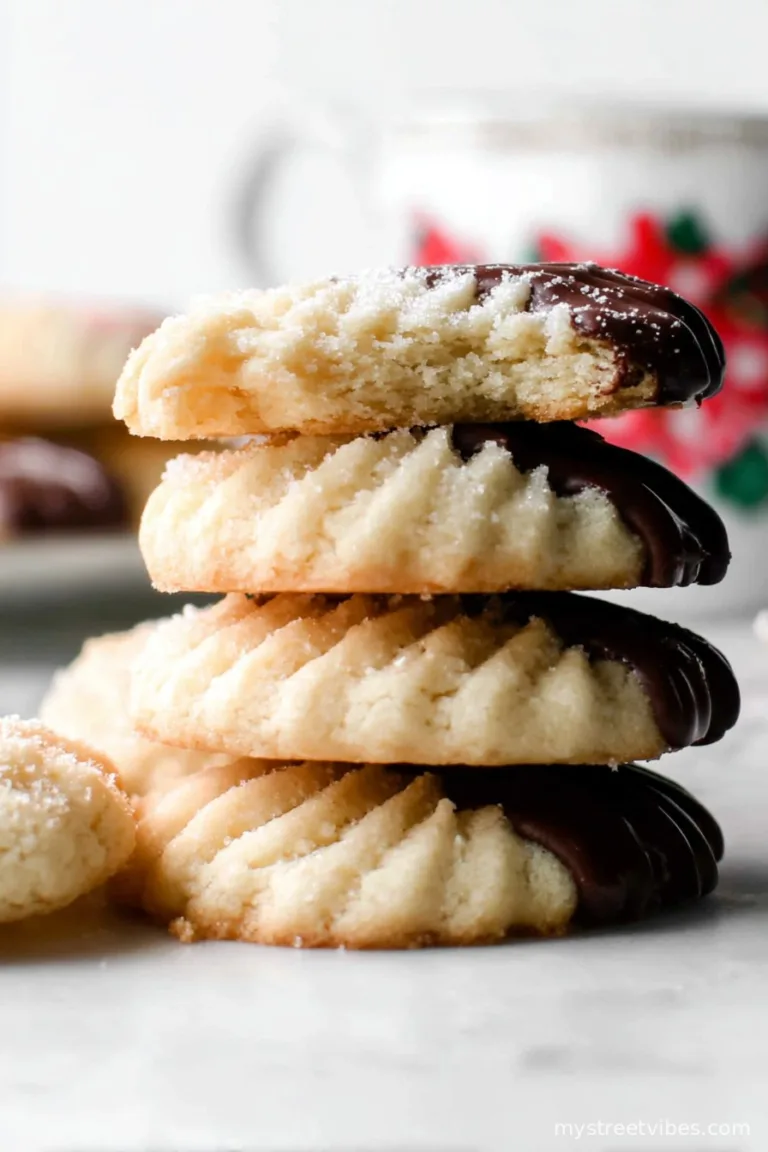
The Cookie That Feels Like a Hug
Okay, let me just say—these chewy peanut butter oatmeal cookies remind me of rainy-day baking with my mum, usually when we both wanted to avoid chores (dusting shelves? No thanks, let’s bake instead). There’s something about the peanut butter and cozy oats that makes the kitchen smell like all is right with the world. I come back to this recipe every time I need a little edible nostalgia. Plus, there’s always the game of seeing who can snag the first bite—sometimes it’s me, sometimes… well, it’s usually me. Anyway, let’s get on with it!

Why You’ll Love These (or: Why My Family Demolishes Them in Minutes)
- I make this when I’ve got that craving for something hearty but not fussy. It’s hit-the-spot baking, you know?
- My family goes wild for these because they’re chewy but not sticky (I can confirm, they vanish from the tin overnight. Actually, usually by 8 p.m.).
- Even my neighbor—who claims to hate oatmeal in cookies—once asked for the recipe. (She changed her tune fast!)
- For those days when nothing else feels right, I find these cookies cheer me up more than a new TV episode or, honestly, even a tidy house.
- The dough is forgiving, so you won’t stress if you’re interrupted mid-baking (which, trust me, happens a lot here).
What You’ll Need (with My Rambling Ingredient Thoughts)
- 3/4 cup flour (all-purpose, spooned and leveled) – Sometimes I use the cheap stuff, sometimes fancypants unbleached; it barely matters as long as it’s not self-raising.
- 3/4 cup rolled oats (may use quick-cooking oats for a smoother texture) – Grandma insisted on old-fashioned, but I sneak in quick oats if that’s all I’ve got.
- 1 tsp baking soda – makes them puffy-chewy, not flat as a pancake.
- 1/2 tsp sea salt – regular table salt if you’re out; no judgment here.
- 1/2 cup unsalted butter (room temperature) – If I forget to soften it, a 10-second zap in the microwave (don’t let it melt!) is my fix.
- 1/2 cup peanut butter (smooth or crunchy – not natural peanut butter) – This is non-negotiable: don’t use the drippy health kind; it messes with the dough.
- 1/2 cup brown sugar (packed) – light or dark, up to you. Sometimes I do half-and-half if I’m feeling experimental.
- 1/3 cup sugar – granulated. I never measure perfectly, honestly.
- 1 egg – any size in the large-ish zone.
- 1 tsp vanilla extract – Real is best, but I won’t tell if you use the cheap stuff.
Let’s Make Cookies! (Don’t Stress, It’s Straightforward)
- Get your oven cranking to 350°F (about 175°C if you measure like my cousin in Ireland). Line three baking sheets with parchment or those silicone mats. I sometimes get away with just two by reusing halfway through—no disasters yet.
- In a medium bowl, whisk together the flour, oats, baking soda, and sea salt. Don’t overthink it, just mix until everything looks evenly speckled. Set this aside out of reach of curious pets or children.
- Now, in a bigger bowl (bigger than you think you’ll need, trust me), cream together the butter, peanut butter, brown sugar, and plain sugar with a mixer. I go at it for maybe 1–2 minutes, until it’s pale and fluffy—kind of like cookie cloud. If you don’t have an electric mixer, a wooden spoon and some elbow grease works—though your arm might complain a bit (mine does).
- Add in the egg and vanilla; keep mixing until it’s all smooth and light. You’ll probably want to eat it right now—I always do, but try to resist.
- Tip the flour-oat mixture into the bowl with the creamed stuff. Fold together with a spatula until everything is just blended. It’ll look sort of sticky and fluffy—if it seems too thick, that’s normal (or that’s what I tell myself, anyway).
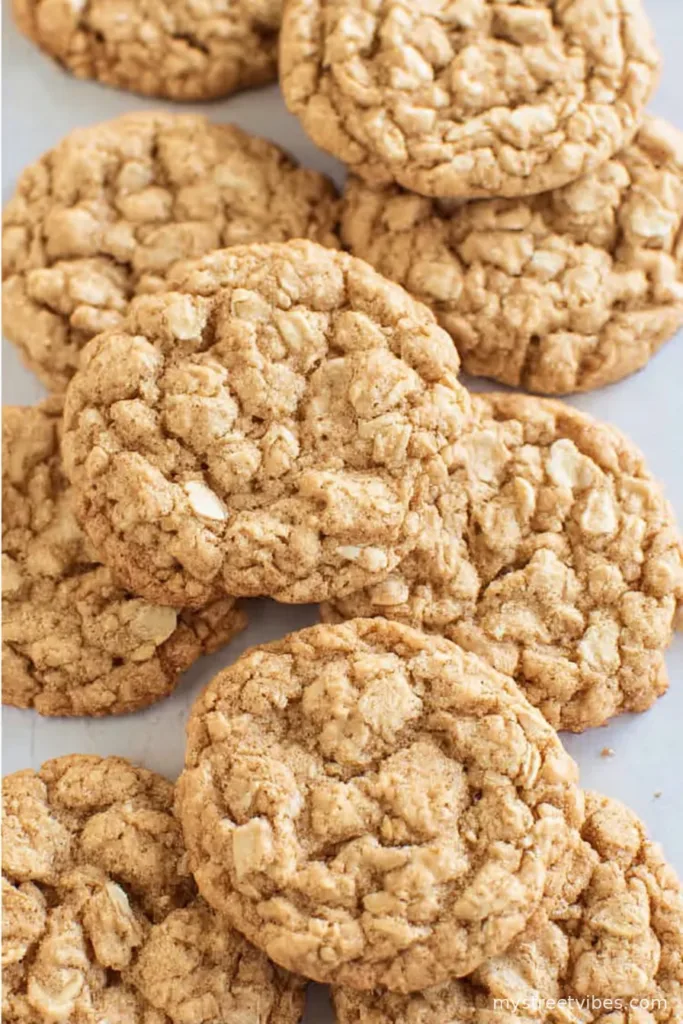
- Scoop dough onto your sheets using a two-tablespoon scoop, or a big-ish tablespoon if you don’t have one. Give each cookie a little space (they spread a smidge). Bake one sheet at a time, smack in the middle rack. They’re done in 10–11 minutes; I like to spin the pan halfway through (old habit, probably overkill).
- After baking, let the cookies hang out on the hot sheet for five minutes before moving them to a wire rack. They’ll be crazy-soft at first. Try not to nibble (unless you love warm, crumbly cookies—then go nuts!).
- Store cookies in a tightly sealed container for 3–5 days at room temp, or freeze them for up to three months—though honestly, in my house, there are never leftovers to freeze. Not once.

What I’ve Learned Along the Way (Aka: Cookie Notes)
- If the butter’s too cold, your dough will be lumpy. I learned that the hard way last winter!
- Don’t skip the cooling step on the tray—it really does help them firm up. Or, if you do, just embrace the mess and eat with a spoon.
- Peanut butter brands make a slight difference; the cookies are more reliable with regular creamy Skippy or Jif. (Just my opinion, ofc.)
- The dough is sticky! Greasing your scoop or spoon a little makes plopping it down much easier. Trust me.
If You Want to Mix Things Up…
- Sometimes I use crunchy peanut butter for those nutty bits. Kind of awesome.
- I tried tossing in mini chocolate chips once—delicious, but suddenly my kids claimed it was a ‘different cookie’ so, maybe don’t tell anyone before you try!
- Swapped oats for instant oatmeal one time; the texture was odd. Not my proudest moment.
- A little sprinkle of sea salt on top just before baking is also a sneaky upgrade.

Tool Talk (Equipment and MacGyver Approaches)
- Electric mixer is great, but a big wooden spoon and persistence will do. My grandma never owned a stand mixer and lived to be 99.
- Wire racks are handy, but in a pinch I’ve used the handle of a wooden spoon balanced on two mugs to cool cookies. Not elegant, but it works.
- Cookie scoops are cute, but an old tablespoon that’s lost its mate works fine. You might get more rustic cookies. That’s code for: they look homemade.
Storing and Keeping (Assuming You Have Leftovers…)
- Just tuck them in an airtight tin or a resealable bag on the counter. They’ll stay moist for a few days.
- If you do freeze some (miracles can happen), let them thaw on the counter in the bag so they don’t go soggy.
- But to be entirely honest, these cookies barely last until the next breakfast here. (Not that I’m eating cookies for breakfast… Ahem…)
How We Serve Them in My House
- With cold milk—my youngest says that’s the rule.
- Sometimes sandwiched with ice cream in summer, or just at midnight when I can’t sleep.
- A friend likes them with coffee for a grab-n-go breakfast. Not traditional, but who cares?
Things I Wouldn’t Skip (Cookie Wisdom from Trial and Error)
- Rotating the tray in the oven halfway through actually does help. I skipped it once, and half got darker while the other half sulked.
- If you rush cooling (guilty), you’ll get crumbly cookies. Sit on your hands for those five minutes.
FAQs (Because Apparently, I Get a Lot of Questions About These)
- Can I double the recipe?
- Absolutely! Just grab a really big bowl—or on second thought, mix half at a time if your arm gets tired.
- Do I have to use parchment paper?
- Nope. Grease the baking sheets with a bit of butter if you need to. Cleanup just isn’t as fun.
- Natural peanut butter—really a problem?
- Yeah, it makes the dough way too runny. Trust me, I’ve tried and ended up with cookie puddles.
- Can I make the dough ahead?
- Sure, chill it overnight—flavor’s even better! But let it come back to room temp or it’s impossible to scoop.
- Why three baking sheets?
- Honestly, one is sometimes enough if you don’t mind multiple rounds. Three just cuts back the waiting (and my impatience) a bit.
- How many cookies does this make?
- About 18–20, depending on how generous you are with the scooping. Or, uh, dough snacking.
So there you have it—the chewy peanut butter oatmeal cookies that have gotten my family through dozens of rainy days, exam weeks, and the odd bit of good news as well. If you bake these, let me know if they actually stick around long enough to freeze—I’d love to believe that’s possible (but haven’t seen it yet)!
Ingredients
- 3/4 cup flour (all-purpose, spooned and leveled)
- 3/4 cup rolled oats (may use quick-cooking oats for a smoother texture)
- 1 tsp baking soda
- 1/2 tsp sea salt
- 1/2 cup unsalted butter (room temperature)
- 1/2 cup peanut butter (smooth or crunchy – not natural peanut butter)
- 1/2 cup brown sugar (packed)
- 1/3 cup sugar
- 1 egg
- 1 tsp vanilla extract
Instructions
-
1Get your oven cranking to 350°F (about 175°C if you measure like my cousin in Ireland). Line three baking sheets with parchment or those silicone mats. I sometimes get away with just two by reusing halfway through—no disasters yet.
-
2In a medium bowl, whisk together the flour, oats, baking soda, and sea salt. Don’t overthink it, just mix until everything looks evenly speckled. Set this aside out of reach of curious pets or children.
-
3Now, in a bigger bowl (bigger than you think you’ll need, trust me), cream together the butter, peanut butter, brown sugar, and plain sugar with a mixer. I go at it for maybe 1–2 minutes, until it’s pale and fluffy—kind of like cookie cloud. If you don’t have an electric mixer, a wooden spoon and some elbow grease works—though your arm might complain a bit (mine does).
-
4Add in the egg and vanilla; keep mixing until it’s all smooth and light. You’ll probably want to eat it right now—I always do, but try to resist.
-
5Tip the flour-oat mixture into the bowl with the creamed stuff. Fold together with a spatula until everything is just blended. It’ll look sort of sticky and fluffy—if it seems too thick, that’s normal (or that’s what I tell myself, anyway).
-
6Scoop dough onto your sheets using a two-tablespoon scoop, or a big-ish tablespoon if you don’t have one. Give each cookie a little space (they spread a smidge). Bake one sheet at a time, smack in the middle rack. They’re done in 10–11 minutes; I like to spin the pan halfway through (old habit, probably overkill).
-
7After baking, let the cookies hang out on the hot sheet for five minutes before moving them to a wire rack. They’ll be crazy-soft at first. Try not to nibble (unless you love warm, crumbly cookies—then go nuts!).
-
8Store cookies in a tightly sealed container for 3–5 days at room temp, or freeze them for up to three months—though honestly, in my house, there are never leftovers to freeze. Not once.
CLICK FOR NUTRITION INFO
↑
Approximate Information for One Serving
Serving Size:
1 serving
Calories:
140 caloriescal
Protein:
3gg
Fat:
7gg
Saturated Fat:
0g
Trans Fat:
0g
Cholesterol:
0mg
Sodium:
0mg
Potassium:
0mg
Total Carbs:
17gg
Fiber:
0g
Sugar:
0g
Net Carbs:
0g
Vitamin A:
0
Vitamin C:
0mg
Calcium:
0mg
Iron:
0mg
Nutrition Disclaimers
Number of total servings shown is approximate. Actual number of servings will depend on your preferred portion sizes.
Nutritional values shown are general guidelines and reflect information for 1 serving using the ingredients listed, not including any optional ingredients. Actual macros may vary slightly depending on specific brands and types of ingredients used.
To determine the weight of one serving, prepare the recipe as instructed. Weigh the finished recipe, then divide the weight of the finished recipe (not including the weight of the container the food is in) by the desired number of servings. Result will be the weight of one serving.
Did you make this recipe?
Please consider Pinning it!