A Cozy Bowl When Life Gets Hectic (Or Just Cold)
I swear, the first time I made this Easy White Chicken Chili, I was convinced it was going to be one of those “eh, it’s fine” dinners—mostly because it was after a long day and I was honestly feeling a bit lazy. But would you believe, my usually picky sister actually came back for seconds? (She barely does that for pizza!) Now it’s become my emergency dinner hero for chilly days when all I want is a big bowl of something creamy and comforting. Plus—it’s the sort of recipe you can make with your brain half tuned-out, like when you’re listening to your neighbor’s drama through the kitchen window. Not that I’ve ever done that…

Why You’ll Love This—Trust Me, I Make It A LOT
- I whip this up when I’m too tired to think, and my family goes wild for it. I think it’s the creaminess and just the right amount of kick.
- This chili is a crowd-pleaser—even my friend who claims she “doesn’t do beans” will swipe seconds (then she pointedly picks out the beans, but still, it counts).
- It uses rotisserie chicken, or leftover roast chicken, or honestly, whatever cooked chicken I’ve got hanging out in the fridge. Even canned chicken works in a pinch, though don’t tell my grandmother I said that.
- You can make it as spicy (or not) as you want, which is great, because I can’t always handle the heat, but my brother would probably drink hot sauce form a mug if I let him.
What You’ll Need (Substitutions Welcome!)
- 2 cups shredded cooked chicken (rotisserie is easy, or whatever leftovers you’ve got; sometimes I just use canned chicken if I’m really desperate—won’t win any awards, but it does the job)
- 2 cans (15 oz each) of Great Northern beans, drained and rinsed (honestly, any smallish white bean works—navy or cannellini, or I’ve even used pintos by accident and it was still good)
- 1 can (4 oz) diced green chilies (if you like fire, get the hot version. I usually go for mild because I’m a wimp)
- 1 medium onion, diced (yellow, white, whatever’s in the onion basket; red works in a pinch, though it’s a bit more assertive)
- 3 cloves garlic, minced (maybe four if you’re feeling garlicky, or just a tablespoon of pre-minced to save time—no judgment)
- 1 teaspoon ground cumin (sometimes I add a bit more, ‘cause why not?)
- 1 teaspoon dried oregano
- 1/2 teaspoon chili powder (double or skip, depending on who’s coming to dinner)
- 1/2 teaspoon salt (plus more to taste—my measuring is sometimes “a generous pinch”)
- 4 cups chicken broth (homemade is great, but store-bought is more realistic)
- 1 block (8 oz) cream cheese, cubed and softened (I’m not above microwaving it if I forget to soften it on the counter…which is often)
- 3/4 cup frozen corn (half a bag, roughly; canned corn is fine too, and once I even used leftover grilled corn—game-changer)
- Juice of 1 lime (or just a splash if that’s all you’ve got)
- Chopped fresh cilantro, for topping (optional, but I’m always a sucker for the green stuff)
- Shredded Monterey Jack or Pepper Jack cheese, for topping (or cheddar—I won’t tell)
Here’s How You Do It (With a Few Tips Along the Way)
- Grab your biggest soup pot or Dutch oven and heat a swirl of oil over medium heat. Toss in your diced onion and cook until soft, 3-4 minutes (they’ll smell amazing; try not to eat one right out of the pot—it’s hot!).
- Add the garlic, cumin, oregano, chili powder, and salt. Give it a good stir. This is where your kitchen will start smelling like a Tex-Mex restaurant, which is never a bad thing.
- Stir in the green chilies and beans. Pour in the chicken broth and bring it to a gentle boil. (Don’t worry if it looks a bit pale—trust me, it’ll perk up soon.)
- Add your chicken. Give it all a stir. Lower the heat so it’s just barely bubbling, not splattering (I’ve had that happen; what a mess on the stove).
- Time for the cream cheese! Drop in the cubes and stir. You’ll probably have to be patient (I always get tempted to mash them up faster, but just let them melt and whisk occasionally). If you’re like me and impatient, breaking them up with a wooden spoon helps.
- Toss in the corn. Let it all simmer over low for about 15 minutes, stirring every now and then. This is when I usually sneak a taste to “check seasoning”—aka enjoy an early snack.
- Once it’s creamy and the flavors have gotten friendly, squeeze in your lime juice. Taste and add more salt or chili powder if you want (or more lime—I basically never measure citrus, just go til it tastes zingy enough).
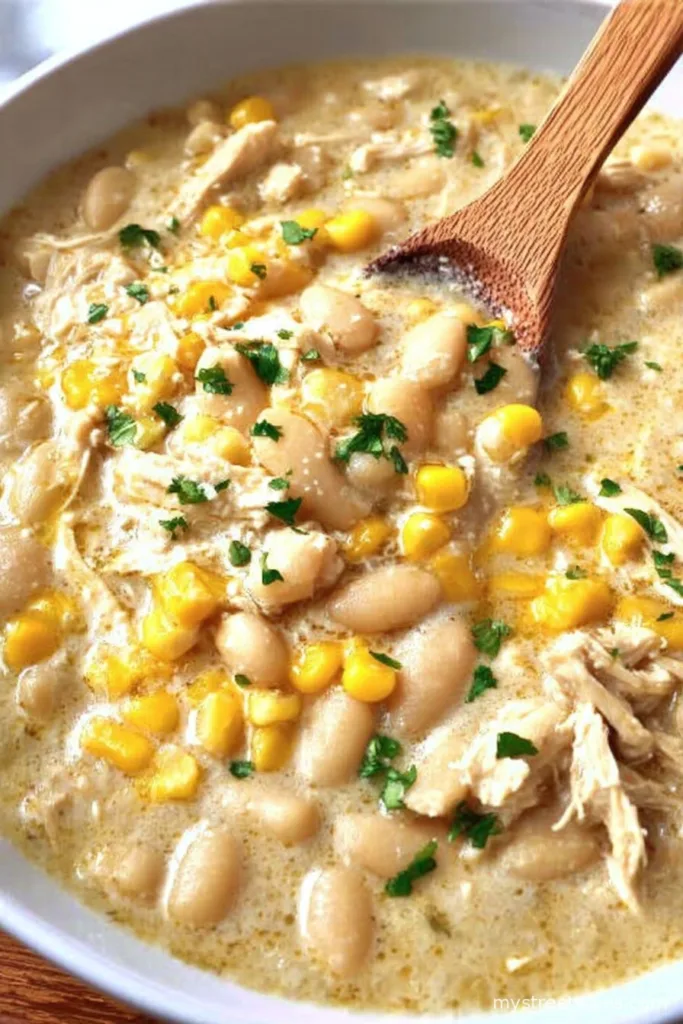
- Ladle into bowls. Top with cilantro, cheese, maybe a dollop of sour cream if you’re feeling fancy. Corn chips or torn tortillas are highly encouraged for scooping!
Stuff I’ve Learned (Don’t Make My Mistakes)
- Don’t rush the cream cheese—it really wants to sulk and melt on its own time. I tried beating it in once… ended up with tiny lumps. Still tasted good, but yeah, not pretty.
- I find it tastes even better after sitting an hour—or even in the fridge overnight. If you can wait that long, congrats, you have more willpower than me.
- If you like your chili thicker, you can mash up a few beans in the pot before adding the chicken. Or just call it “rustic” and pretend it was on purpose.
Variations I’ve Tried (For Better or Worse)
- Added a handful of baby spinach at the end. It made me feel healthier, plus it turns this into kind of a green chili stew.
- Used leftover turkey—good for the holidays! Maybe a bit gamier, but fun for a change.
- One time I tried adding potatoes instead of beans. Nope. It was just potato soup with chicken. Don’t bother—unless you really love potatoes.

What You’ll Need—But Improvise If You Have To
- A big soup pot or Dutch oven. But honestly, I’ve used a deep frying pan. Just need something roomy.
- A wooden spoon (or whatever spatula you left clean, really).
- A small whisk is nice for the cream cheese, but not essential—sometimes I just use a fork.
How To Store It (If There’s Any Left…)
This chili keeps about 3 days in the fridge in a sealed container. Though honestly, in my house it never lasts more than a day! You can freeze it, but fair warning—sometimes the cream cheese separates a bit after thawing. Tastes fine after a good stir (or maybe a brief blend with an immersion blender), but just saying, set your expectations!
How To Serve It—Here’s My Favorite Way
My favorite is to serve this chili with heaps of shredded cheese, a dollop of sour cream, and a small mountain of tortilla chips for dipping. My aunt likes hers with sliced avocado and a dash of hot sauce (she calls it “kicking it up a notch”—sometimes literally, she puts on her dancing slippers). We’ve even had it for breakfast with a fried egg on top. Don’t knock it til you try it.
Real-Life Pro Tips (Because I Messed Up First)
- I once tried making this on high heat to “save time” and burned the onions. It was… not good. Medium heat really is your friend—so is a bit of patience.
- If your cream cheese is straight from the fridge, microwave it for 20 seconds before cubing. Otherwise you’ll be poking at big cold lumps like I was the first time.
- If you’re out of lime, you can use a splash of apple cider vinegar. Not the same but it does the job!
FAQ—Because Friends Actually Text Me About This
- Can I make this in a slow cooker?
Sure thing! Toss everything except the cream cheese and corn in the slow cooker, cook on low 4-6 hours. Stir in cream cheese (let it melt, be patient) and corn for the last 30 min. Easy peasy. - What’s the best chicken to use?
I usually grab store-bought rotisserie—pull it apart with my hands and call it a day. Leftover grilled or poached is fine too. Technically you can use raw, but you’ll wanna simmer at least 25 minutes so it cooks through before adding the cream cheese. - Is there a way to make it dairy-free?
Actually, yes—I’ve used full-fat coconut milk in place of cream cheese once when my cousin brought her lactose-intolerant girlfriend over. It’s tasty, just a little coconutty. - Can I freeze leftovers?
You can, but like I said above, the texture changes a little. Still, it’s better than wasting good soup; just stir it up well after thawing. - My chili is too thick/thin—what now?
If it’s too thick, add a splash more broth or water. If it’s too thin, mash some beans or let it simmer a bit longer—don’t panic. It’ll sort itself out.
And that’s that—I hope this easy White Chicken Chili brings you as much comfort as it has me. Even if the onions burn a little or the cream cheese goes lumpy, I promise: it still tastes like home.
Ingredients
- 2 cups shredded cooked chicken (rotisserie is easy, or whatever leftovers you’ve got; sometimes I just use canned chicken if I’m really desperate—won’t win any awards, but it does the job)
- 2 cans (15 oz each) of Great Northern beans, drained and rinsed (honestly, any smallish white bean works—navy or cannellini, or I’ve even used pintos by accident and it was still good)
- 1 can (4 oz) diced green chilies (if you like fire, get the hot version. I usually go for mild because I’m a wimp)
- 1 medium onion, diced (yellow, white, whatever’s in the onion basket; red works in a pinch, though it’s a bit more assertive)
- 3 cloves garlic, minced (maybe four if you’re feeling garlicky, or just a tablespoon of pre-minced to save time—no judgment)
- 1 teaspoon ground cumin (sometimes I add a bit more, ‘cause why not?)
- 1 teaspoon dried oregano
- 1/2 teaspoon chili powder (double or skip, depending on who’s coming to dinner)
- 1/2 teaspoon salt (plus more to taste—my measuring is sometimes “a generous pinch”)
- 4 cups chicken broth (homemade is great, but store-bought is more realistic)
- 1 block (8 oz) cream cheese, cubed and softened (I’m not above microwaving it if I forget to soften it on the counter…which is often)
- 3/4 cup frozen corn (half a bag, roughly; canned corn is fine too, and once I even used leftover grilled corn—game-changer)
- Juice of 1 lime (or just a splash if that’s all you’ve got)
- Chopped fresh cilantro, for topping (optional, but I’m always a sucker for the green stuff)
- Shredded Monterey Jack or Pepper Jack cheese, for topping (or cheddar—I won’t tell)
Instructions
-
1Grab your biggest soup pot or Dutch oven and heat a swirl of oil over medium heat. Toss in your diced onion and cook until soft, 3-4 minutes (they’ll smell amazing; try not to eat one right out of the pot—it’s hot!).
-
2Add the garlic, cumin, oregano, chili powder, and salt. Give it a good stir. This is where your kitchen will start smelling like a Tex-Mex restaurant, which is never a bad thing.
-
3Stir in the green chilies and beans. Pour in the chicken broth and bring it to a gentle boil. (Don’t worry if it looks a bit pale—trust me, it’ll perk up soon.)
-
4Add your chicken. Give it all a stir. Lower the heat so it’s just barely bubbling, not splattering (I’ve had that happen; what a mess on the stove).
-
5Time for the cream cheese! Drop in the cubes and stir. You’ll probably have to be patient (I always get tempted to mash them up faster, but just let them melt and whisk occasionally). If you’re like me and impatient, breaking them up with a wooden spoon helps.
-
6Toss in the corn. Let it all simmer over low for about 15 minutes, stirring every now and then. This is when I usually sneak a taste to “check seasoning”—aka enjoy an early snack.
-
7Once it’s creamy and the flavors have gotten friendly, squeeze in your lime juice. Taste and add more salt or chili powder if you want (or more lime—I basically never measure citrus, just go til it tastes zingy enough).
-
8Ladle into bowls. Top with cilantro, cheese, maybe a dollop of sour cream if you’re feeling fancy. Corn chips or torn tortillas are highly encouraged for scooping!
CLICK FOR NUTRITION INFO
↑
Approximate Information for One Serving
Serving Size:
1 serving
Calories:
375 caloriescal
Protein:
25gg
Fat:
17gg
Saturated Fat:
0g
Trans Fat:
0g
Cholesterol:
0mg
Sodium:
0mg
Potassium:
0mg
Total Carbs:
32gg
Fiber:
0g
Sugar:
0g
Net Carbs:
0g
Vitamin A:
0
Vitamin C:
0mg
Calcium:
0mg
Iron:
0mg
Nutrition Disclaimers
Number of total servings shown is approximate. Actual number of servings will depend on your preferred portion sizes.
Nutritional values shown are general guidelines and reflect information for 1 serving using the ingredients listed, not including any optional ingredients. Actual macros may vary slightly depending on specific brands and types of ingredients used.
To determine the weight of one serving, prepare the recipe as instructed. Weigh the finished recipe, then divide the weight of the finished recipe (not including the weight of the container the food is in) by the desired number of servings. Result will be the weight of one serving.
Did you make this recipe?
Please consider Pinning it!