There are some nights I look at the clock, realize it’s nearly dinner, and contemplate whether cereal might just count as a balanced meal. But, honestly, when I get my act together (which is, let’s say, most Tuesdays), this 20 Minute Garlic Butter Cashew Chicken always saves the day. Actually, the first time I whipped it up was after a long day wrangling kids and losing the battle against laundry. The smell alone made me forget about my ever-growing sock pile—at least for a minute!
So, Why’s This Recipe Such a Hit?
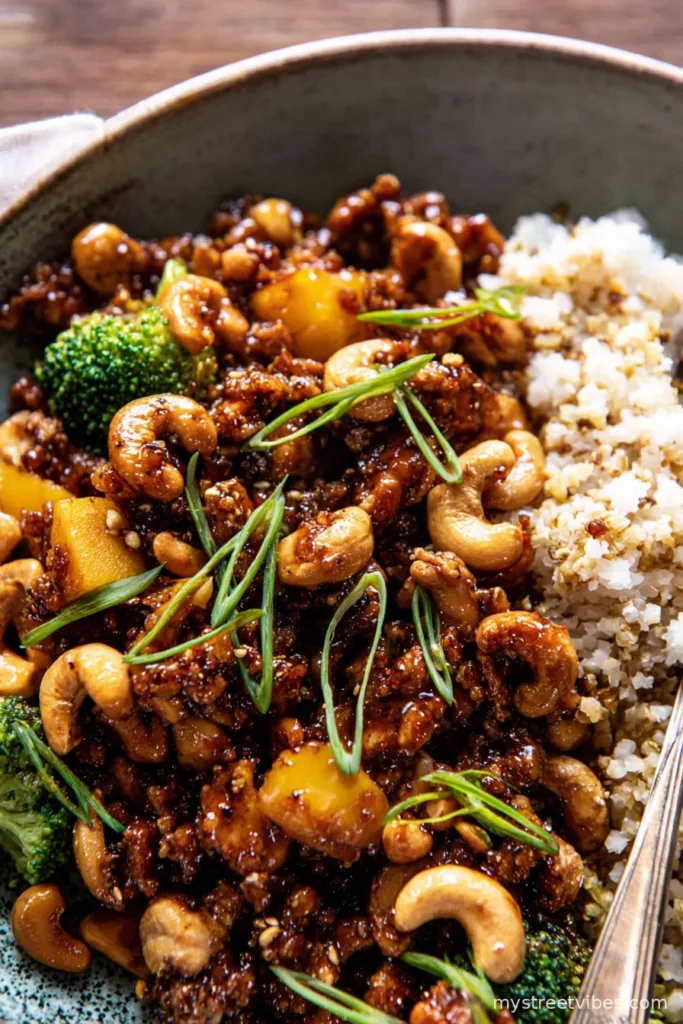
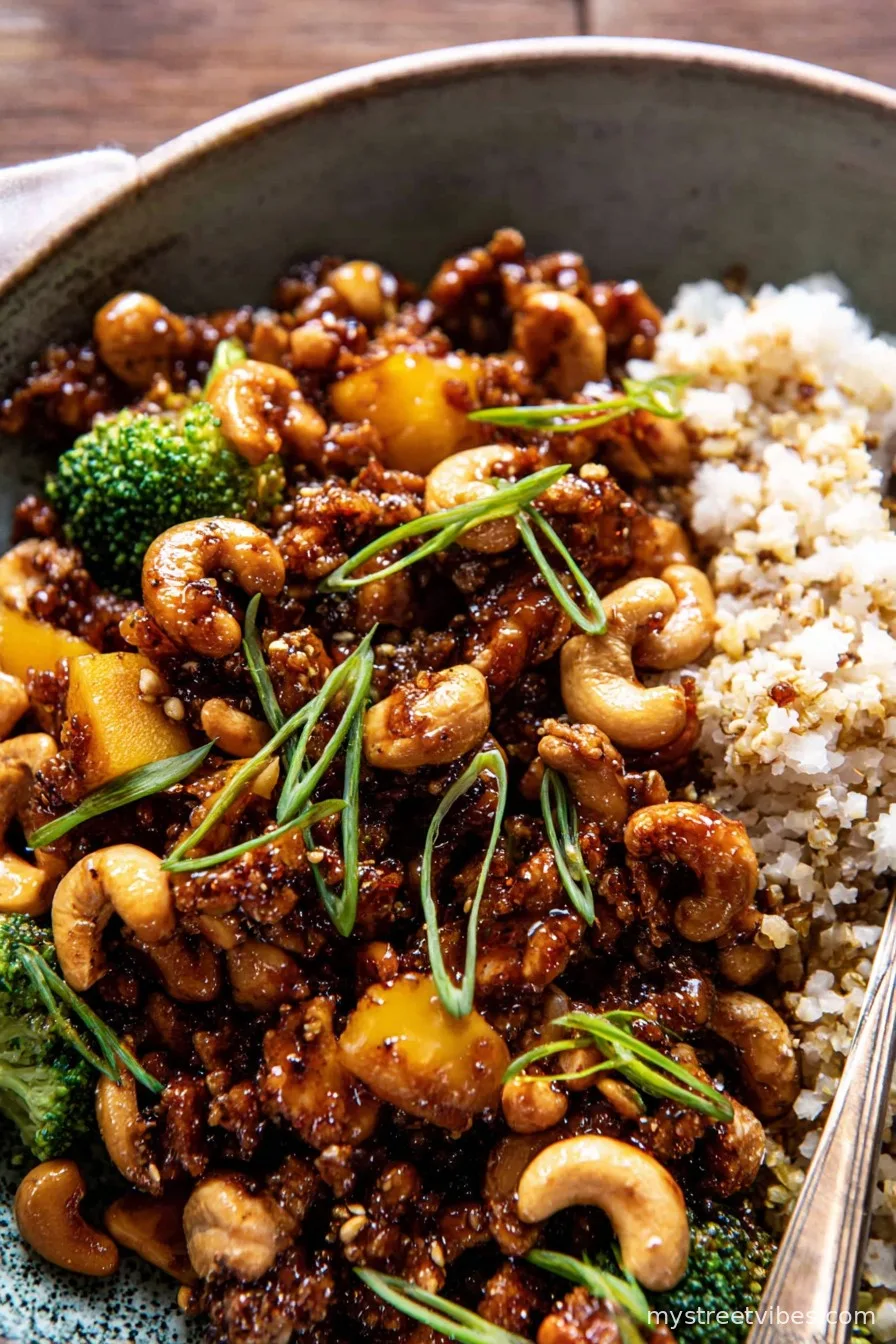
I make this when I need dinner on the table fast, or just want something with a bit of pizzazz that doesn’t use every dish in my kitchen. My family goes a bit wild for this (they actually set aside their phones—miraculous). The buttery garlic makes the kitchen smell like magic, and the cashews add just the right crunch. Bonus: the sauce thickens beautifully, even if you’re prone to a little ‘eyeballing’ here and there (guilty!). Once, I even made it with leftover rotisserie chicken. Not bad at all, just a bit less juicy.
What You’ll Need (Feel Free to Wing It)
- 500g (about 1 lb) boneless, skinless chicken breast or thigh, cut into bite-sized pieces (some weeks I use thighs—they’re juicier, but breasts work fine)
- 2 tablespoons cornstarch (honestly, potato starch works too if that’s what’s in the cupboard)
- Salt and pepper, to taste
- 3 tablespoons butter (Grandma always insisted on salted, but I usually use unsalted and a pinch more salt)
- 6 garlic cloves, finely chopped (or 2-3 teaspoons jarred stuff when you’re out, who’s judging?)
- 1/3 cup roasted cashews (sometimes I go heavy-handed—no regrets)
- 3 tablespoons soy sauce (I’ve swapped tamari or coconut aminos and lived to tell the tale)
- 1 tablespoon honey (maple syrup will do if that’s how you roll)
- 1 tablespoon rice vinegar
- 2 tablespoons water
- 1/4 teaspoon chili flakes (totally optional, but I like a little kick)
- 2 spring onions, sliced (if you forget these, it’s still good)
- Sesame seeds to finish (optional but looks fancy)
How to Make This—No Need to Stress
- Prep the Chicken: Toss the chicken pieces with the cornstarch, salt, and pepper in a bowl. Make sure they’re lightly coated—not caked; just enough for a thin layer. If it looks like floury chicken, you’ve probably added too much (I’ve done it, it’s fine).
- Start Sizzling: Heat up a big skillet or wok over medium-high. Add 2 tablespoons of the butter. Once it’s all melty and getting a little foamy, drop the chicken in a single layer (or as close as you can get in a standard pan without something flying out).
- Brown the Chicken: Let the chicken pieces get a lovely golden crust—don’t fuss too much, just let them sit for a minute before flipping. Should take about 4-6 minutes (sneak a peek, but don’t shuffle it too much or you miss the magic crust).
- Add the Garlic: Lower the heat a smidge, toss in the chopped garlic, and the final tablespoon of butter. Stir it about for a minute or so until you can smell it (I dare you not to smile at this bit). If anything sticks, a splash of water will fix it.
- Sauce and Cashews: Pour in the soy sauce, honey, rice vinegar, water, and chili flakes. Give it a quick stir, scraping any browned bits form the bottom. Cashews go in last—toast them in the pan for 30 seconds if you want extra flavor. The sauce thickens fast, so keep an eye out. If it looks clumpy or too sticky, add just a touch more water.
- Finishing Touch: Toss in the sliced spring onions and sprinkle over sesame seeds if you’re feeling extra. Taste for seasoning—a dash more salt or a smidge of honey if you like things sweeter. Take it off the heat before it gets too thick (I’ve made this mistake; you end up chiseling it out!).

A Few Notes from My (Very Lived-In) Kitchen
- Once, I tried cutting back on butter. It was… okay, but you really want the flavor so don’t skimp unless you must.
- If you use pre-cooked chicken, add it after the garlic step, just warm it through (otherwise it dries out and that’s sad chicken).
- This sauce thickens as it cools. Sometimes I reheat with a splash of water or just accept it’s become sticky and delicious in its own right.
Some Variations I’ve (Mostly) Survived
- Swapping in peanuts for cashews is fine, though I got yelled at for it once (by a very loyal cashew fan). Pecans? Oddly, not great—don’t recommend.
- Add some steamed broccoli or snap peas in with the sauce for a one-pan meal. Kind of like a stir fry but more buttery.
- If you’re feeling wild, toss in a spoon of chili crisp. Mega flavor, not for spice-shy folks!

Don’t Have a Wok or Big Skillet?
No worries! A regular frying pan is just fine—just don’t crowd it or the chicken steams instead of browns. Actually, I once tried splitting the batch into two smaller pans when I had company. It worked… but making sure both were done at the same time? Not my best plan. Still, nobody starved.
How Long Does This Last (If It Lasts)?
You can stash leftovers in an airtight container in the fridge for up to 2-3 days. Honestly though, in my house, someone always eats the last few bites before midnight—so zero experience with week-old chicken here.
How I Like to Serve It Up
I usually spoon this over some jasmine rice (because I love that stickiness), but I’ve also been known to pile it onto fluffy noodles, or even wrap leftovers in a warm naan bread with a bit of cucumber. My brother swears by eating it cold straight from the fridge—he has no shame.
Things I Learnt the Hard Way
- Don’t rush the browning step—it’s tempting but the flavor’s all in that golden crust. I once tried to hurry, and the chicken just tasted bland. Total disappointment. So, patience, grasshopper.
- Go easy with the honey; too much and you’ll end up with candy chicken. And, yes, I’ve been there.
Frequently Asked (and Sometimes Funny) Questions
- Can I make this with tofu? Sure can! I’d use extra firm, press it, cube it, and fry it just like the chicken. Actually, it soaks up the sauce really well.
- What if I only have salted cashews? No bother, just cut back a bit on extra salt you add in the beginning. I’ve used them and nobody noticed…or at least they didn’t complain.
- Can I make it ahead? Yup! I think the flavor gets even better the next day. Just add a splash of water when reheating so the sauce doesn’t get too thick.
- Is this super spicy? Not really. Chili flakes are totally optional, so you control the heat.
- Help! My sauce is too thick! Happens to me all the time. Just add a little water (or even chicken stock if you have some handy) and it’ll loosen right up.
And by the way, if you’re cooking this while simultaneously helping a kid with their algebra, just know it’s all going to turn out. Maybe the kitchen’s a bit messier, but you get a dinner that feels like a minor miracle at the end of a frenzied day.
Ingredients
- 500g (about 1 lb) boneless, skinless chicken breast or thigh, cut into bite-sized pieces (some weeks I use thighs—they’re juicier, but breasts work fine)
- 2 tablespoons cornstarch (honestly, potato starch works too if that’s what’s in the cupboard)
- Salt and pepper, to taste
- 3 tablespoons butter (Grandma always insisted on salted, but I usually use unsalted and a pinch more salt)
- 6 garlic cloves, finely chopped (or 2-3 teaspoons jarred stuff when you’re out, who’s judging?)
- 1/3 cup roasted cashews (sometimes I go heavy-handed—no regrets)
- 3 tablespoons soy sauce (I’ve swapped tamari or coconut aminos and lived to tell the tale)
- 1 tablespoon honey (maple syrup will do if that’s how you roll)
- 1 tablespoon rice vinegar
- 2 tablespoons water
- 1/4 teaspoon chili flakes (totally optional, but I like a little kick)
- 2 spring onions, sliced (if you forget these, it’s still good)
- Sesame seeds to finish (optional but looks fancy)
Instructions
-
1Prep the Chicken: Toss the chicken pieces with the cornstarch, salt, and pepper in a bowl. Make sure they’re lightly coated—not caked; just enough for a thin layer. If it looks like floury chicken, you’ve probably added too much (I’ve done it, it’s fine).
-
2Start Sizzling: Heat up a big skillet or wok over medium-high. Add 2 tablespoons of the butter. Once it’s all melty and getting a little foamy, drop the chicken in a single layer (or as close as you can get in a standard pan without something flying out).
-
3Brown the Chicken: Let the chicken pieces get a lovely golden crust—don’t fuss too much, just let them sit for a minute before flipping. Should take about 4-6 minutes (sneak a peek, but don’t shuffle it too much or you miss the magic crust).
-
4Add the Garlic: Lower the heat a smidge, toss in the chopped garlic, and the final tablespoon of butter. Stir it about for a minute or so until you can smell it (I dare you not to smile at this bit). If anything sticks, a splash of water will fix it.
-
5Sauce and Cashews: Pour in the soy sauce, honey, rice vinegar, water, and chili flakes. Give it a quick stir, scraping any browned bits form the bottom. Cashews go in last—toast them in the pan for 30 seconds if you want extra flavor. The sauce thickens fast, so keep an eye out. If it looks clumpy or too sticky, add just a touch more water.
-
6Finishing Touch: Toss in the sliced spring onions and sprinkle over sesame seeds if you’re feeling extra. Taste for seasoning—a dash more salt or a smidge of honey if you like things sweeter. Take it off the heat before it gets too thick (I’ve made this mistake; you end up chiseling it out!).
CLICK FOR NUTRITION INFO
↑
Approximate Information for One Serving
Serving Size:
1 serving
Calories:
390cal
Protein:
37 gg
Fat:
18 gg
Saturated Fat:
0g
Trans Fat:
0g
Cholesterol:
0mg
Sodium:
0mg
Potassium:
0mg
Total Carbs:
19 gg
Fiber:
0g
Sugar:
0g
Net Carbs:
0g
Vitamin A:
0
Vitamin C:
0mg
Calcium:
0mg
Iron:
0mg
Nutrition Disclaimers
Number of total servings shown is approximate. Actual number of servings will depend on your preferred portion sizes.
Nutritional values shown are general guidelines and reflect information for 1 serving using the ingredients listed, not including any optional ingredients. Actual macros may vary slightly depending on specific brands and types of ingredients used.
To determine the weight of one serving, prepare the recipe as instructed. Weigh the finished recipe, then divide the weight of the finished recipe (not including the weight of the container the food is in) by the desired number of servings. Result will be the weight of one serving.
Did you make this recipe?
Please consider Pinning it!