You know that feeling when you want something homey, nostalgic, and just the tiniest bit extra (without digging out three pans or five knives)? That’s pretty much why I fell in love with Hot Italian Sub Sliders. One time I made a double batch for a spontaneous game night—let’s just say I saw grown adults racing to the kitchen island for seconds, and I barely got one myself. Oh, and a warning: make these once, and people will just show up “by coincidence” around dinnertime. Seriously, my neighbor still brings it up in the grocery store (in the cold cuts aisle, of course).

Why I Keep Making These Sliders (Even When I Should Probably Make Salad)
I whip these up when my family is hangry and patience is, well, thin as a pepperoni slice. My kids think these sliders are way more fun than regular sammies (I totally agree, actually). Also, if you’re having people over, these disappear from the table so fast you’d think they owed someone money. And let’s be honest: there’s not much that makes you feel like a genius cook quite like a blanket of melty cheese over anything. A word to the wise—don’t underestimate just how sticky and cheesy your hands will get during assembly. But hey, some things are worth a little mess.
Here’s What You’ll Need (But No Need to Stress the Details)
- 12 soft slider rolls or Hawaiian rolls (I sometimes use mini ciabatta rolls if the store is out—turns out just fine)
- 6 thick slices of provolone cheese (honestly, mozzarella works okay too if you’re in a pinch)
- 12 slices of deli ham (Black Forest or honey ham both work; my grandmother absolutely insists on Black Forest, but she’s not always here, is she?)
- 12 slices of Genoa salami (some days I swap in turkey salami—no one notices)
- 12 slices of pepperoni (spicy or mild, your call)
- 1/2 cup jarred banana pepper rings, drained (I skip this for the kids, but secretly pile extra on my half)
- 1/3 cup shredded lettuce (iceberg, but I’ve used spinach once—didn’t love it, truthfully)
- 1 medium tomato, thinly sliced
- 1/4 cup Italian dressing (the kind from the bottle; homemade if you’re feeling fancy, but bottled totally works)
- 3 tablespoons melted butter
- 1 teaspoon dried Italian herbs
- 1/4 teaspoon garlic powder (or more if you’re a garlic fan, I won’t judge!)
- Pinch of kosher salt
- Freshly ground black pepper, to taste
How To Throw These Together Without Losing Your Mind
- Preheat your oven to 350°F (about 180°C). I usually forget to do this until halfway through prepping, so don’t stress if you need to set the oven late. Grease a 9×13 inch baking dish with a dab of melted butter.
- Slice the rolls in half horizontally (don’t separate them—think of these as one big sandwich for now), and lay the bottom halves in your baking dish.
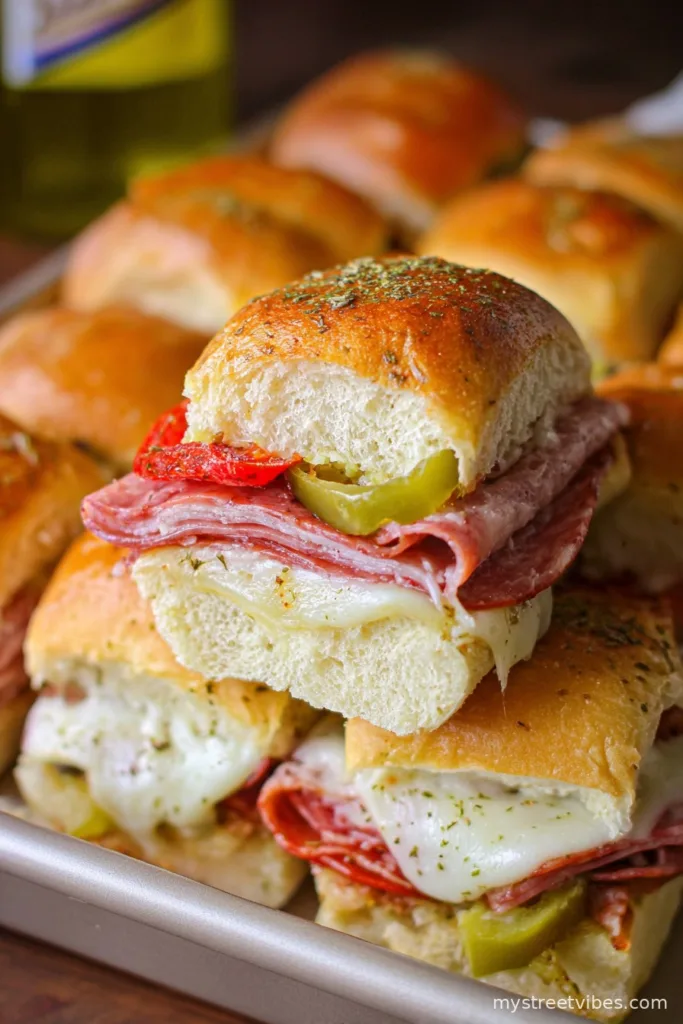
- Layer the ham, then the salami, then the pepperoni—if you want to switch up the order, well, wild times. Cover with provolone slices. Top with tomato slices and then the shredded lettuce. Banana peppers can go on top or below the cheese, doesn’t matter much, just spread ’em out good.
- Drizzle the Italian dressing evenly over all the fillings. (This is where I sneak a taste of that peppery ham. Who’s judging?)
- Carefully set the top halves of the rolls back in place. If some fillings escape out the sides, just shove ’em back in—happens every time.
- Mix melted butter, Italian herbs, garlic powder, salt, and a few turns of black pepper in a bowl. Brush this herby butter mixture (generously!) over the tops of your sliders. Use every last drop; you’ll thank yourself after.
- Cover loosely with foil and bake for 15 minutes. Remove foil and bake another 6-8 minutes—tops should get a little golden and the cheese melty.
- Let cool for a few minutes (I know, the waiting is agony), then cut along the roll lines. Serve warm! Extra napkins highly recommended.

Some Notes that Exist Because I’ve Messed Up Before
- Lettuce gets a bit wilty—don’t worry, it’s still tasty. I actually think it adds a little more old-school sub shop vibes.
- Melted cheese sometimes sticks to the knife. If you wipe your knife after each slice, things get less, um, chaotic. Or, just accept it. That’s what I do now.
Variations I’ve Actually Tried (Plus a Fail!)
- Turkey instead of ham—works, but not quite as robust.
- Swiss for provolone—yum, but gets really gooey, so expect extra mess.
- I once tried adding red onion, but my daughter picked out every ring, so maybe skip if you’ve got picky eaters.
- I baked ’em with sweet peppers thinking I’d invented something new, but honestly, they just made things too soggy.

Equipment: Use What You’ve Got
All you really need is a 9×13 baking dish and a small bowl for your butter mixture. Don’t have a pastry brush? Grab a spoon or just use clean fingers (honestly, it works).
Storing Leftovers (If You Even Get That Far)
Pop leftovers in an airtight container and refrigerate. They’ll keep for a day or two, but honestly, in my house, they rarely make it past breakfast the next day. Once, we even had a cold slider for breakfast. Not bad!
How I Like to Serve These (Feel Free to Copy)
I usually set ’em out with extra napkins, a pile of chips, and sometimes dill pickle slices. My youngest likes a squeeze of ranch on his (don’t ask). Every once in a blue moon, we’ll do ‘em for lunch with a big salad and a cup of soup. Perfect for movie night, too.
My “Pro Tips” Learned the Messy Way
- Don’t rush the baking time—underdone cheese just isn’t as fun. I tried pulling them out early once—regretted it, cheese pull was a flop.
- If you’re expecting company, think about doubling the recipe. Learned this one the hard way as I watched everyone fight over the last slider.
- I’ve found assembling straight in the dish is way easier than trying to move them later. Trust me.
Some Real Questions I’ve Gotten (with Real Answers)
- Can I make these ahead? Sort of—I do the assembly, cover, and refrigerate, then bake right before serving. But if you’re using fresh veggies inside, sometimes they’ll get soggy. Maybe skip what gets watery if you’re prepping ahead.
- Do they freeze well? Eh, not really. The bread does this sad, weird thing when it thaws. Best fresh!
- What’s the best cheese? Honestly, whatever you have on hand. Provolone just feels “right” to me, but you do you. A blend is good too.
- How spicy is it? Totally up to you—use spicy pepperoni and extra banana peppers if you like the heat. Or go mild, no shame in that. Sometimes I just make half spicy for us adults.
- Do I have to use Italian dressing? Sure you can swap for oil & vinegar if you want to get more classic. But truthfully, bottled works great and is less fuss.
Alright, that’s the long and winding tale of my Hot Italian Sub Sliders. Give ‘em a try—you may find yourself making these on autopilot soon. And on a totally unrelated note, if anyone has a foolproof way to get melted cheese out of a sweater, let me know.
Ingredients
- 12 soft slider rolls or Hawaiian rolls
- 6 thick slices of provolone cheese
- 12 slices of deli ham
- 12 slices of Genoa salami
- 12 slices of pepperoni
- 1/2 cup jarred banana pepper rings, drained
- 1/3 cup shredded lettuce
- 1 medium tomato, thinly sliced
- 1/4 cup Italian dressing
- 3 tablespoons melted butter
- 1 teaspoon dried Italian herbs
- 1/4 teaspoon garlic powder
- Pinch of kosher salt
- Freshly ground black pepper, to taste
Instructions
-
1Preheat your oven to 350°F (about 180°C). I usually forget to do this until halfway through prepping, so don’t stress if you need to set the oven late. Grease a 9×13 inch baking dish with a dab of melted butter.
-
2Slice the rolls in half horizontally (don’t separate them—think of these as one big sandwich for now), and lay the bottom halves in your baking dish.
-
3Layer the ham, then the salami, then the pepperoni—if you want to switch up the order, well, wild times. Cover with provolone slices. Top with tomato slices and then the shredded lettuce. Banana peppers can go on top or below the cheese, doesn’t matter much, just spread ’em out good.
-
4Drizzle the Italian dressing evenly over all the fillings. (This is where I sneak a taste of that peppery ham. Who’s judging?)
-
5Carefully set the top halves of the rolls back in place. If some fillings escape out the sides, just shove ’em back in—happens every time.
-
6Mix melted butter, Italian herbs, garlic powder, salt, and a few turns of black pepper in a bowl. Brush this herby butter mixture (generously!) over the tops of your sliders. Use every last drop; you’ll thank yourself after.
-
7Cover loosely with foil and bake for 15 minutes. Remove foil and bake another 6-8 minutes—tops should get a little golden and the cheese melty.
-
8Let cool for a few minutes (I know, the waiting is agony), then cut along the roll lines. Serve warm! Extra napkins highly recommended.
CLICK FOR NUTRITION INFO
↑
Approximate Information for One Serving
Serving Size:
1 serving
Calories:
260 caloriescal
Protein:
12gg
Fat:
13gg
Saturated Fat:
0g
Trans Fat:
0g
Cholesterol:
0mg
Sodium:
0mg
Potassium:
0mg
Total Carbs:
23gg
Fiber:
0g
Sugar:
0g
Net Carbs:
0g
Vitamin A:
0
Vitamin C:
0mg
Calcium:
0mg
Iron:
0mg
Nutrition Disclaimers
Number of total servings shown is approximate. Actual number of servings will depend on your preferred portion sizes.
Nutritional values shown are general guidelines and reflect information for 1 serving using the ingredients listed, not including any optional ingredients. Actual macros may vary slightly depending on specific brands and types of ingredients used.
To determine the weight of one serving, prepare the recipe as instructed. Weigh the finished recipe, then divide the weight of the finished recipe (not including the weight of the container the food is in) by the desired number of servings. Result will be the weight of one serving.
Did you make this recipe?
Please consider Pinning it!