If you’ve ever wondered what to do with that jug of sourdough discard (you know, the one that gives you mild guilt every time you bake?), let me tell you—this pizza dough has probably rescued me more times than I can count. I once tried to toss my discard into waffles and, well, let’s just say the dog ate pretty well that morning. But this pizza crust? It never lets me down. Sometimes I come home wrecked from work, my youngest manages to locate a single olive in the fridge, and suddenly everyone’s shouting for pizza night. Enter: sourdough discard pizza dough. It’s the hero I didn’t know my weeknights needed.
Why I Can’t Stop Making This
I make this pizza dough when I can’t stare another dry, store-bought crust in the face (sorry, supermarket—your pizza base tastes like cardboard to me now). My family devours it every time, even when all I’ve got is a sad jar of leftover marinara and some bits of cheese—plus, I get to feel smug about not wasting perfectly good sourdough starter. I swear, half the appeal is that it feels almost too easy, and yet I’ve never heard a complaint. Wait, actually my partner complains if I don’t make enough, but that’s on him, right?
The Ingredients I Grab (And My Swaps)
- 150g (about 3/4 cup) sourdough discard (mine is unfed from the fridge—works fine!)
- 270g (about 2 1/4 cups) all-purpose flour (I’ve used bread flour—makes it chewier, but any will do, honestly)
- 160ml (2/3 cup) warm water
- 1 tablespoon olive oil (I go cheap on the oil, but toss in extra if you like a richer crust)
- 1 teaspoon salt
- 1 teaspoon sugar (optional, but gives a hint of color—sometimes I skip it if I’m feeling contrary)
- 1 teaspoon instant yeast (or active dry, just bloom it first in the water if that’s what you’ve got)
Here’s How I Throw It All Together
- Add your sourdough discard, warm water, and olive oil to a big mixing bowl. Stir it up a bit—doesn’t need to be pretty.
- Toss in the flour, salt, sugar, and yeast. I usually dump it all in at once, then stir with a wooden spoon until it starts coming together (it’ll look messy, and that’s fine).
- Knead by hand for 5 to 8 minutes, just until you’ve got a squishy, slightly tacky dough. If it clings to your hands like toddler glue, sprinkle in more flour a spoon at a time.
- Lightly oil the bowl (I forget this step half the time—don’t worry, just scrape more aggressively later), stick the dough back in, and cover with cling film or a clean tea towel.
- Let it rise somewhere cozy for 1 hour, or until doubled. My kitchen in winter takes forever, so I pop it near the kettle. If the dough isn’t quite doubled, just keep waiting—it listens in its own weird way.
- Once it’s puffed up nicely, punch it down (oddly satisfying), then turn it out onto a floured surface. Shape it gently into a ball. Let it sit for 10-15 minutes—this is where I grate cheese or sneak a slice of pepperoni.
- Preheat your oven to the hottest it goes (mine is 250°C / 480°F, but closer is fine) with your pizza stone or baking sheet inside, if you remember.
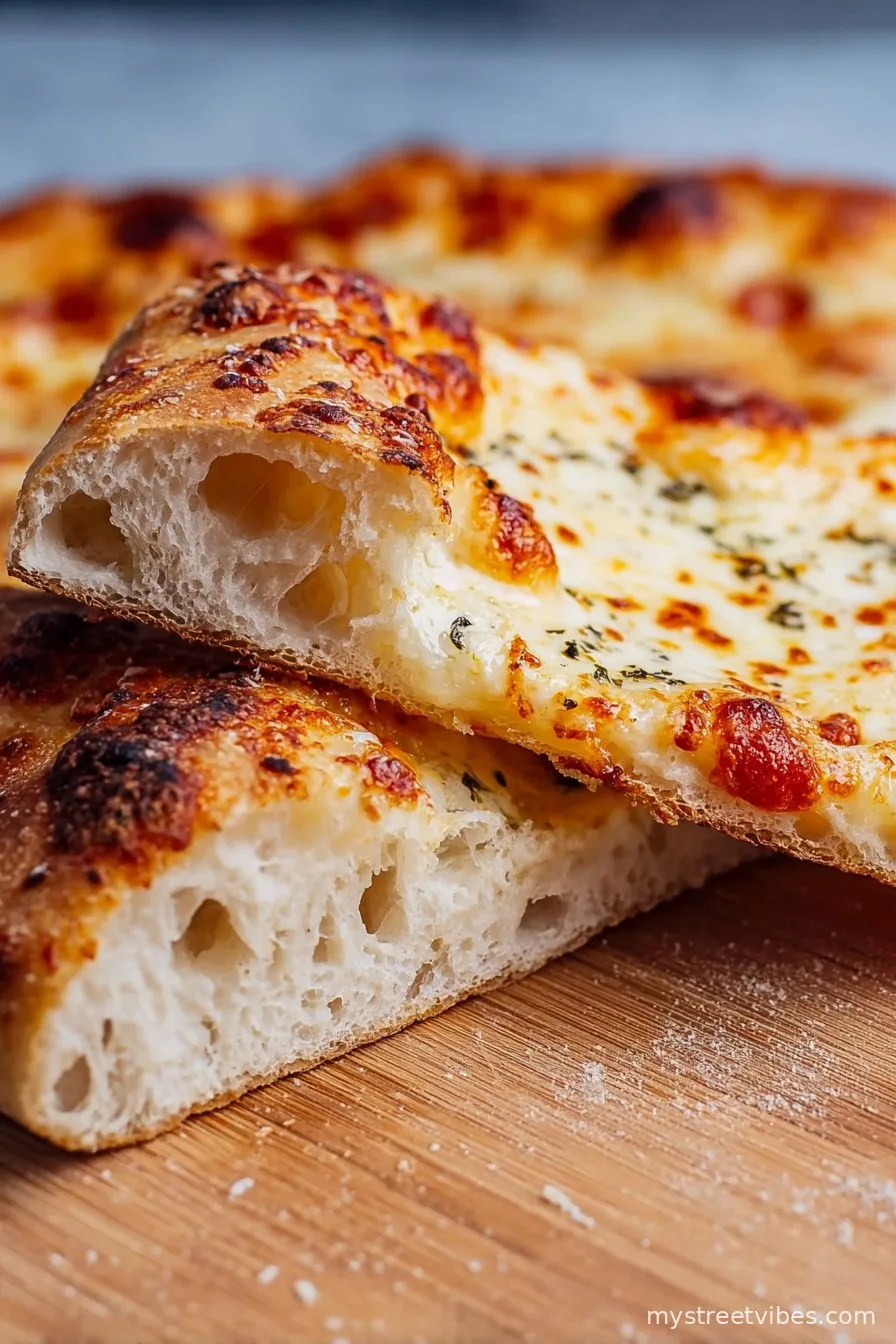
- Roll or stretch the dough into your preferred pizza shape. I like thin crust, so I get ruthless, but you do you.
- Top it up! Sauce, cheese, shifty fridge vegetables, salami that’s seen better days—anything goes. Don’t overload: learned that the messy way.
- Slide it onto your hot stone or baking sheet. Bake for 10-13 minutes, till it’s golden and bubbly. The first time I made this, I burnt the bottom, so start checking early!
Things I Wish I’d Known (Notes)
- If your dough’s not rising, your kitchen might be chilly. Try putting the bowl in the (off) oven with just the light on. Saved me more than once.
- I once forgot the oil—crust was still fine, just a bit tougher. Live and learn.
- Don’t panic if the discard smells strong—after baking, it mellows out loads.
Pizzas I’ve Experimented With (Variations)
- Used half whole wheat flour once—not bad, though a bit dense. I liked it, the kids less so.
- Folded in dried herbs and garlic powder—tasted like grown-up delivery pizza!
- Tried a sweet version with honey instead of sugar, topped with peaches and ricotta. Not my greatest hit, but my mate Dave loved it for some reason.

Equipment: What I Use (And Workarounds)
- I love my pizza stone, but a preheated baking sheet totally works. No rolling pin? Use a bottle of wine (empty or full, your business).
How I Store the Leftovers
Leftovers keep in the fridge, wrapped in foil or a zip bag, for up to 3 days. But honestly, in my house it never makes it past breakfast the next day—the cold slice situation here is intense.
How We Serve It
Big fan of serving straight from the board, sliced into wedges (in our house we all fight over the corner pieces). Sometimes I drizzle with chilli oil or toss a salad on the side if I’m being fancy. Oh, and always with a cold drink on a Friday night. Must be something in the water.
Things I’ve Learned the Hard Way (Pro Tips)
- I tried rushing the rise once—dough ended up tough as boots. Don’t do it; patience is your best friend here.
- If you add way too much flour during kneading, it’ll get dry. Better to be a bit sticky than bone dry.
- Bake on high heat, even if it makes you nervous—crispy base or bust.
Real Questions I’ve Been Asked (FAQs)
- Can I freeze this dough?
- Yeah! Just wrap well, freeze after the first rise. Thaw in the fridge overnight. (I sometimes forget, so the counter’s fine too—just slower.)
- Do I have to use yeast even with discard?
- Honestly, a little yeast gives a better rise and texture, but you could go without—just give it way more time and expect a tangier taste.
- My dough is super sticky—is that normal?
- Yep, totally (sometimes it’s extra humid or your discard is wetter than mine). Add flour bit by bit, but don’t go overboard.
- What if I don’t have a pizza stone?
- See above: just use an upside-down preheated baking tray. Crispy enough for most—plus fewer burns trying to slide dough around!
There you have it—my favorite lazy-dough, no-fuss pizza that lets me put sourdough discard to good use. Actually, on second thought, it might be the one good habit I’ve picked up form lockdown baking. Let me know if you try something weird with your toppings; I’m always up for new ideas (except pineapple, which is where my family draws the line—controversial, I know).
Ingredients
- 150g (about 3/4 cup) sourdough discard (mine is unfed from the fridge—works fine!)
- 270g (about 2 1/4 cups) all-purpose flour (I’ve used bread flour—makes it chewier, but any will do, honestly)
- 160ml (2/3 cup) warm water
- 1 tablespoon olive oil (I go cheap on the oil, but toss in extra if you like a richer crust)
- 1 teaspoon salt
- 1 teaspoon sugar (optional, but gives a hint of color—sometimes I skip it if I’m feeling contrary)
- 1 teaspoon instant yeast (or active dry, just bloom it first in the water if that’s what you’ve got)
Instructions
-
1Add your sourdough discard, warm water, and olive oil to a big mixing bowl. Stir it up a bit—doesn’t need to be pretty.
-
2Toss in the flour, salt, sugar, and yeast. I usually dump it all in at once, then stir with a wooden spoon until it starts coming together (it’ll look messy, and that’s fine).
-
3Knead by hand for 5 to 8 minutes, just until you’ve got a squishy, slightly tacky dough. If it clings to your hands like toddler glue, sprinkle in more flour a spoon at a time.
-
4Lightly oil the bowl (I forget this step half the time—don’t worry, just scrape more aggressively later), stick the dough back in, and cover with cling film or a clean tea towel.
-
5Let it rise somewhere cozy for 1 hour, or until doubled. My kitchen in winter takes forever, so I pop it near the kettle. If the dough isn’t quite doubled, just keep waiting—it listens in its own weird way.
-
6Once it’s puffed up nicely, punch it down (oddly satisfying), then turn it out onto a floured surface. Shape it gently into a ball. Let it sit for 10-15 minutes—this is where I grate cheese or sneak a slice of pepperoni.
-
7Preheat your oven to the hottest it goes (mine is 250°C / 480°F, but closer is fine) with your pizza stone or baking sheet inside, if you remember.
-
8Roll or stretch the dough into your preferred pizza shape. I like thin crust, so I get ruthless, but you do you.
-
9Top it up! Sauce, cheese, shifty fridge vegetables, salami that’s seen better days—anything goes. Don’t overload: learned that the messy way.
-
10Slide it onto your hot stone or baking sheet. Bake for 10-13 minutes, till it’s golden and bubbly. The first time I made this, I burnt the bottom, so start checking early!
CLICK FOR NUTRITION INFO
↑
Approximate Information for One Serving
Serving Size:
1 serving
Calories:
200 caloriescal
Protein:
6gg
Fat:
3gg
Saturated Fat:
0g
Trans Fat:
0g
Cholesterol:
0mg
Sodium:
0mg
Potassium:
0mg
Total Carbs:
38gg
Fiber:
0g
Sugar:
0g
Net Carbs:
0g
Vitamin A:
0
Vitamin C:
0mg
Calcium:
0mg
Iron:
0mg
Nutrition Disclaimers
Number of total servings shown is approximate. Actual number of servings will depend on your preferred portion sizes.
Nutritional values shown are general guidelines and reflect information for 1 serving using the ingredients listed, not including any optional ingredients. Actual macros may vary slightly depending on specific brands and types of ingredients used.
To determine the weight of one serving, prepare the recipe as instructed. Weigh the finished recipe, then divide the weight of the finished recipe (not including the weight of the container the food is in) by the desired number of servings. Result will be the weight of one serving.
Did you make this recipe?
Please consider Pinning it!