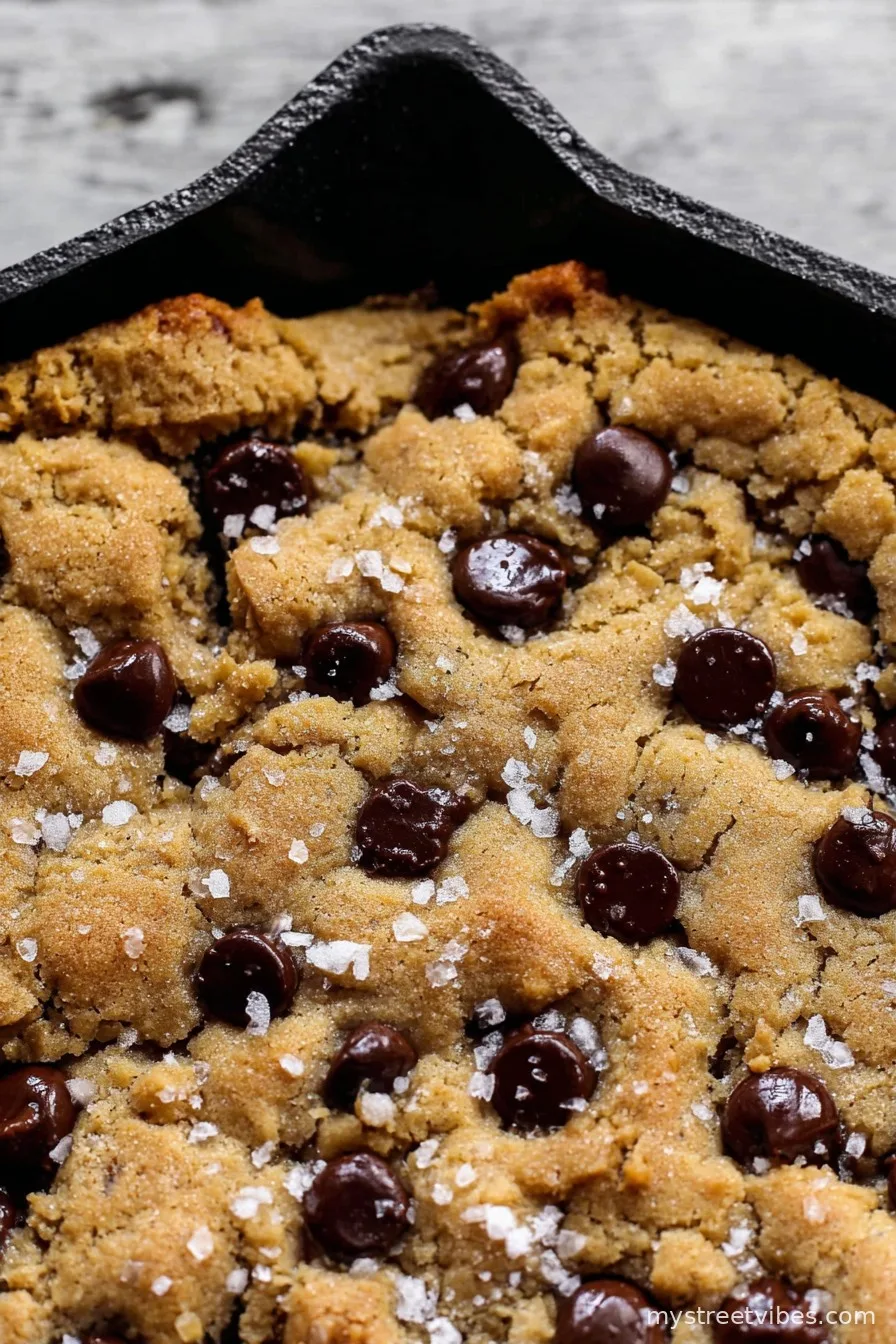
Let Me Tell You About My Skillet Cookie Mishaps…
Alright, so you know how some recipes become the sort of thing you make so often the edges of the page are smudged? Yeah, this Salted Chewy Gooey Chocolate Chip Skillet Cookie is that one for me. There’s just something about pulling a bubbling, chocolate-heavy cookie out of a too-hot oven that feels like an event (the kind of very low-stakes event I wish real life had more of). First time I made this, I forgot to let it cool, and tried shoveling spoonfuls while doing a weird hop-dance around the kitchen. Earned myself a minor tongue singe, but honestly, worth it. Would do again.
Why You’ll Love This (Or Why We Can’t Stop Making It)
I bring this out when everyone wants a dessert but no one feels like scooping out 24 little cookie balls. My family goes absolutely bonkers for it, partly because of its glorious, underbaked middle (if gooey’s not your thing… actually, scratch that, just let someone else have your slice.) Also, you get lots of edge and center pieces – somehow both a little crispy and like pure cookie dough. Plus, you basically make it in one pan, so less dishes. Which is, let’s face it, the dream. Oh, and if you’re the sort who suffers form impatience like me, it’s a lot faster than chilling cookie dough overnight. Or, you know, ever.
Here’s What You’ll Need (And a Few Swaps)
- 1 cup (225g) unsalted butter (I sometimes use salted and just skip the extra salt, honestly can’t tell much difference)
- 1 cup packed brown sugar (Grandma swears by dark; I’ve used both in a pinch)
- 1/2 cup granulated sugar (caster sugar’s fine, or just do all brown for extra chewiness)
- 2 large eggs (room temp? In theory… sometimes I skip the waiting and they survive)
- 2 tsp real vanilla extract (if you splash in a little more, I won’t tell)
- 2 1/4 cups all-purpose flour (bread flour makes it even chewier, but not essential)
- 1 tsp baking soda
- 1/2 tsp table salt (but see note above if your butter’s already salted)
- 2 cups chocolate chips (I do half dark, half milk, but do what makes you happy)
- Flaky sea salt for sprinkling (highly recommend, but kosher salt works in a jam)
How To Make It: Messy but Worthwhile Steps
- Preheat your oven to 350°F (175°C). Stick your trusty 10-inch cast iron skillet (or, honestly, any oven-safe pan) on the stove. Sometimes I forget to preheat until I’m already halfway in. It’s fine! Just wait a bit after entering your panic spiral.
- Melt butter in the skillet over low-ish heat. Let it get melty, but not sizzling (if it browns a bit, that’s actually delicious). Swirl it around. This is when the kitchen already starts smelling wonderful. Swirl your finger in it and panic-check if it’s too hot for eggs (I always do this… probably should be more scientific but, well).
- Take the skillet off the heat—then mix in both sugars, right into the pan. It’ll look a little greasy at first. Completely normal! Stir till mostly smooth-ish.
- When the pan’s just warm (not lava-level hot), beat in the eggs and splashy vanilla. If it looks streaky, eh, that’s ok. (I usually taste at this stage, and only sometimes feel guilty.)
- Here comes flour, baking soda, and salt. Sprinkle them in, then stir until you get a shaggy, thick, slightly sticky dough (try not to overthink the stirring—10 seconds too little/too much has never ruined it for me).
- Dump in most of the chocolate chips, give it a final stir so they’re a bit uneven. Save a handful to scatter dramatically on top for that classic bakery look.
- Smooth the dough out roughly (perfection is overrated) and press remaining chips into the top. Sprinkle with flaky salt if you fancy.
- Bake 20-25 minutes. The edges should look set, but the center? Still jiggly. Don’t overbake—seriously, I once left it in for 30 minutes and got a chocolatey brick (still edible though, if you dunk it in coffee…).
- Let it cool a bit. Or don’t. Grab a spoon, go wild. If it collapses a little in the middle, you did it right.
Notes Born From Trial, Error, and Chocolate-fueled Chaos
- If your skillet is bigger, just spread the dough a little thinner—watch the bake time, it cooks faster. If smaller, overflow is possible (been there, not pretty, but oh so tasty).
- Once I tried it with coconut sugar – was weirdly crumbly. Maybe just stick to brown if you can.
- Actually, I find it tastes even better the next morning. Cold, with coffee? Yes please.
Some Twists To Try – And A Fail Confession
- Pecans or walnuts on top – definitely works if you love a bit of crunch.
- Peanut butter swirl? Makes it richer, almost too much, but in a good way.
- Tried throwing in marshmallows once – they just sort of disappeared and the edges got weirdly tacky. Wouldn’t do again.

No Skillet? No Problem (Probably)
Okay, so everyone hypes the whole cast-iron thing, and yes, it does help with those crispy bits. But honestly, I’ve made this in a regular oven-proof pie dish, or even a cake tin lined with parchment, and nobody noticed but me. Just reduce bake time if yours is thinner than standard.
How To Store (If You Don’t Eat It All First)
Just cover the whole skillet with foil, or pop pieces into an airtight tin. Stays soft about three days. But, truthfully, this rarely survives past breakfast in our house. Still good zapped in the microwave next day, though!
How We Serve It (There’s Basically No Wrong Way)
I plop the whole skillet in the middle of the table, hand out spoons, and let everyone dig in. Sometimes we scoop it out, serve with vanilla ice cream or even a dollop of thick cream (my eldest swears whipped cream is superior; can’t say I disagree, except when I sneak some plain with coffee in the morning). Once we tried cutting it into wedge-shaped slices—felt overly ambitious but fun for company.
Things I Learned The Hard Way (Take It From Me)
- Don’t skip letting the butter cool slightly before adding eggs, unless you want scrambled eggs surprise (gross, but I did choke it down anyway…)
- I once tried to use fancy extra-dark chocolate bars chopped up—jammed up the texture and didn’t melt the same. Stick with chips or blocks for even meltiness.
- If you rush the cooling, the middle sort of turns into lava soup. Wait ten minutes, at least. Yes, it’s torture.
FAQ – Yes, I Get These (Or Variations Of)
- Can I make this gluten-free?
- I’ve tried it with a 1:1 gluten free blend, and yeah, it works! Bit more crumbly but honestly, still tasty.
- What about dairy-free?
- Sub in vegan butter and good quality dairy-free chocolate chips. Tastes slightly different, but still gets demolished.
- Does it freeze well?
- Funny you ask—never had leftovers long enough to test freezing baked. But you can freeze the dough, then bake straight from frozen (add 5-ish mins).
- Is it chewy or gooey?
- Kind of both! Edges = chewy, middle = gooey. Someone always complains about the ratio, but secretly eats both.
- Can I reduce the sugar?
- If you must, a bit less sugar is fine, but don’t go too low or you lose that fudgey texture. Trust me, I’ve tried.
- Wait, can I make it without a skillet?
- Yep, see above about cake tins or pie dishes. One time I tried it in a glass Pyrex dish and just had to bake it a smidge longer.
And if you’re wondering about that weird burn scar on my wrist, let’s just say it’s a badge of honor from this very cookie. Keep your oven mitts close, pal.
Ingredients
- 1 cup unsalted butter, melted
- 1 cup packed brown sugar
- 1/2 cup granulated sugar
- 2 large eggs
- 2 teaspoons vanilla extract
- 2 1/4 cups all-purpose flour
- 1 teaspoon baking soda
- 1/2 teaspoon kosher salt
- 1 1/2 cups semi-sweet chocolate chips
- Flaky sea salt, for topping
Instructions
-
1Preheat oven to 350°F (175°C). Lightly grease a 10-inch oven-safe skillet or cast-iron pan.
-
2In a large bowl, whisk together melted butter, brown sugar, and granulated sugar until well combined.
-
3Add eggs and vanilla extract to the mixture and whisk until smooth.
-
4Stir in flour, baking soda, and kosher salt until just combined. Fold in chocolate chips.
-
5Spread dough evenly in prepared skillet. Bake for 22-25 minutes, or until the edges are golden but the center remains soft and gooey.
-
6Remove from oven and sprinkle with flaky sea salt. Let cool slightly before serving warm.
CLICK FOR NUTRITION INFO
↑
Approximate Information for One Serving
Serving Size:
1 serving
Calories:
430 caloriescal
Protein:
5gg
Fat:
23gg
Saturated Fat:
0g
Trans Fat:
0g
Cholesterol:
0mg
Sodium:
0mg
Potassium:
0mg
Total Carbs:
53gg
Fiber:
0g
Sugar:
0g
Net Carbs:
0g
Vitamin A:
0
Vitamin C:
0mg
Calcium:
0mg
Iron:
0mg
Nutrition Disclaimers
Number of total servings shown is approximate. Actual number of servings will depend on your preferred portion sizes.
Nutritional values shown are general guidelines and reflect information for 1 serving using the ingredients listed, not including any optional ingredients. Actual macros may vary slightly depending on specific brands and types of ingredients used.
To determine the weight of one serving, prepare the recipe as instructed. Weigh the finished recipe, then divide the weight of the finished recipe (not including the weight of the container the food is in) by the desired number of servings. Result will be the weight of one serving.
Did you make this recipe?
Please consider Pinning it!!