If I Can Make a Japanese Cake Roll, So Can You
Alright, before we even get started, confession time: the first time I ever tried making this Japanese cake roll, I fully expected it to turn into some sort of pancake-tortilla hybrid and not, you know, a fluffy, envy-inducing roll. It didn’t—sort of. Actually, that first one was way too sticky but the second (don’t tell anyone) was a work of art. I make this for birthdays, random Tuesdays, or pretty much anytime my sweet tooth won’t shut up. Trust me, if you’ve ever been curious about those light-as-air cake rolls you see in Japanese bakeries, this is your sign to dive in. If nothing else, you’ll get to tell the tale of rolling a cake without it cracking. (It happens to the best of us. Literally cracked mine the fourth time and just called it a ‘rustic swirl.’)
Why You’ll Love This Japanese Cake Roll
I make this when I want something fancy but don’t want to clean-up a tornado of flour. My family goes crazy for this because it’s so soft you basically don’t need teeth (grandma really appreciated that). Plus, it just looks way fancier than it really is. Pro tip: It’s a perfect “I made this from scratch” flex for potlucks – even if the filling’s a bit uneven. (I used to get so frustrated with my filling squishing out; now I just lean into it and call it ‘extra creamy.’) Also, when you roll it up, there’s this moment that feels like gambling—but, like, the fun kind where the worst case is you get to eat wonky cake.
Gather These Ingredients (But No Judgment If You Swap Stuff)
- 4 large eggs, room temp (I once forgot to bring them to room temp; still worked out, just slightly less fluffy!)
- 70g (a heavy quarter cup plus a bit) granulated sugar – sometimes I use caster sugar if that’s what’s in the cupboard
- 60g cake flour (all purpose works in a pinch, but don’t tell my cousin in Osaka that I said that)
- 2 tablespoons milk (full-fat or non-dairy – almond is decent; oat… not so much, honestly)
- 20g unsalted butter (sometimes I use margarine if desperate. Don’t @ me)
- 1 teaspoon vanilla extract
- For the filling: 3/4 cup chilled heavy cream, 2 tbsp sugar, splash of vanilla (sometimes I get wild and add a spoonful of fruit jam – strawberry is my jam. Sorry.)
- Optional: berries or fruit of your choice, or just leave it classic
How I Actually Make A Japanese Cake Roll (The Good, The Bad, and The Delicious)
- Preheat your oven to 350°F (180°C). Line an 8×12 inch or so jellyroll pan with parchment—leave a bit hanging over the sides. If you only have a bigger tray, just spread the batter thinner and reduce the baking time a little.
- Separate your eggs (don’t drop any shell bits in! I always do, then fish them out like an archaeologist). Beat the egg whites in a big, clean bowl. Add the sugar in 2 or 3 batches as you go, whipping up stiff, glossy peaks. It’ll look almost like shaving foam (but don’t taste at this point, it’s weirdly bland).
- Gently beat the egg yolks with a fork. Stir in vanilla, milk and cooled melted butter, then gently sift in the flour. This is where I mix until just incorporated—no need to arm-wrestle it. A few lumps are fine.
- Now, fold those egg whites into the yolk mixture in batches—start with a third to lighten it, then the rest. Be gentle! It’s more like a lazy river than a rapid. If it looks deflated, I used to panic, but actually it’ll still rise decently.
- Pour into the tray, smooth it out with a spatula, then gently tap it on the counter. Pop in the oven for about 12–14 minutes—watch it like a hawk after 11. It’s done when golden and just springy when you press with a finger.
- Now, the slightly ridiculous step: flip the hot cake onto a clean towel (parchment on top). Peel off parchment. Roll it up gently, towel and all, while warm. Don’t freak if it cracks a bit; happens to the best. Let it cool rolled up—this ‘trains’ it to not break later.
- While it’s cooling, whip your cream with sugar and vanilla. Sometimes, on a lazy Sunday, I just buy pre-whipped cream—nobody has ever complained.
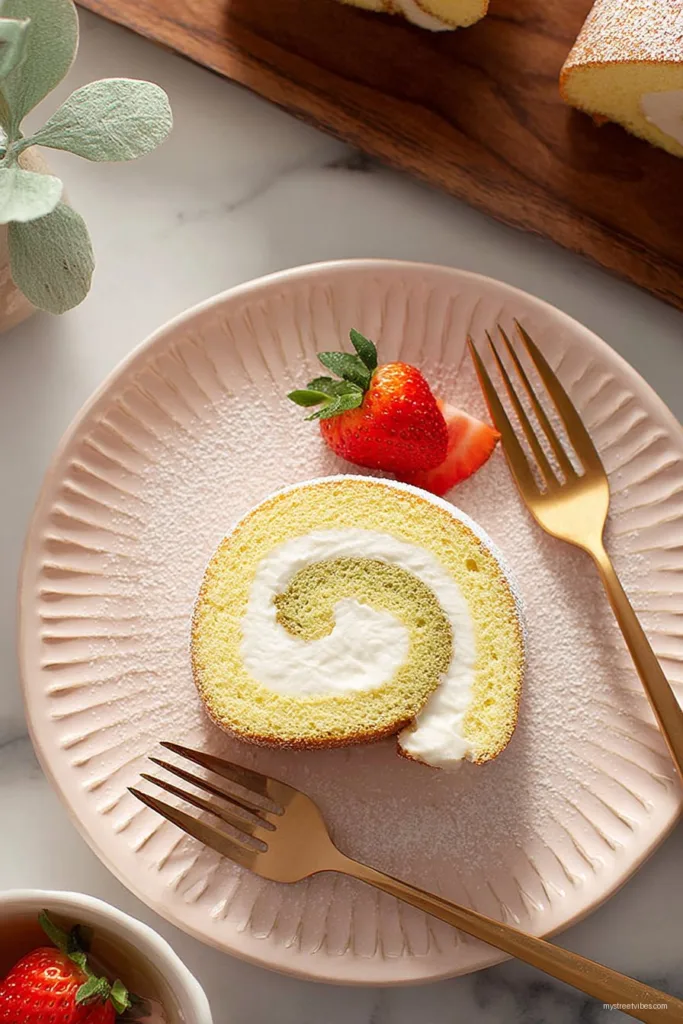
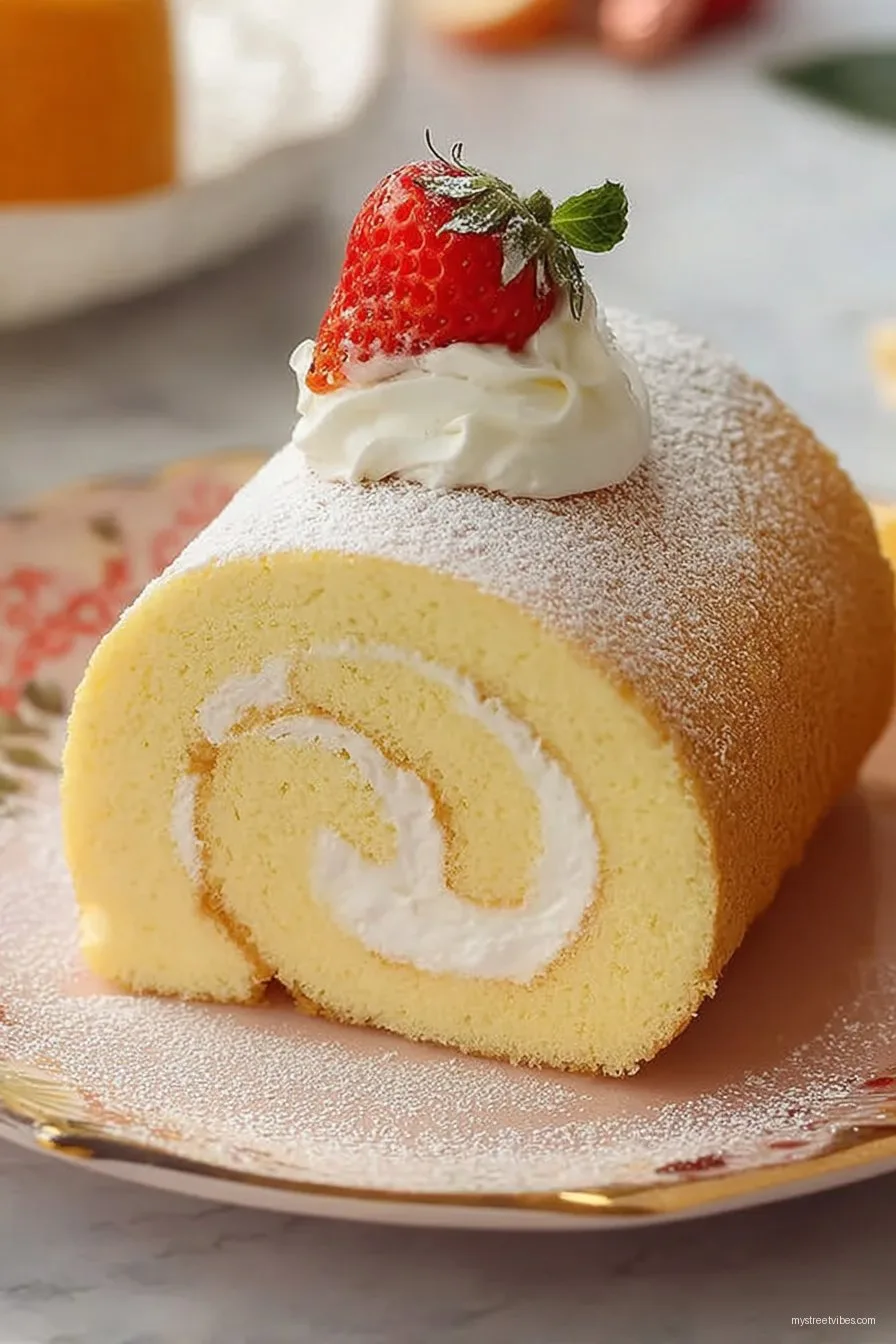
- Once cool, unroll and spread the cream (plus fruit if you like) right to the edges. Leave a border if you want tidier spirals, but who cares, really?
- Re-roll (without towel, obviously), slice off the ends (I eat these in the kitchen standing up with tea), dust with powdered sugar if you’re feeling fancy. That’s it. Snap a pic for the ‘gram if that’s your thing!
Some Things I’ve Learned – Notes from the Trenches
- If the cake sticks, I realized I probably didn’t line my pan well—so now I just slather on extra parchment paper, even if it feels wasteful. Better safe than scraping cake glue.
- Don’t overwhip the egg whites—once I made meringue, basically, and the cake turned out dry.
- If the cake cracks, embrace it. Seriously, just dust it with extra powdered sugar and call it ‘rustic.’ Nobody’s ever turned down a slice (except one friend, but she just doesn’t like cake. Weirdo.)
- You can skip the fruit, but it honestly brightens things up in summer. I even tried it once with diced mango (SO good!)
Variations I’ve Attempted (Some Are Hits, Others… Less So)
- Matcha swirl: Add 2 tsp matcha powder to the flour. Looks cool, tastes earthy. Kids weren’t huge fans, but I love it.
- Cocoa cake: Swap 1.5 tbsp flour for cocoa powder. Tastes like a super light chocolate Swiss roll. My attempt with three layers and three colors—gorgeous in theory, but it turned into cake Jenga and collapsed.
- Dairy free: Used coconut cream for the filling. Not bad, just different.
What You Need (And Honest Workarounds)
- Electric mixer—stand or hand. I’ve used a whisk once when my mixer died mid-recipe. My elbow’s never forgiven me, but it’s possible!
- Jelly roll pan or baking tray—just use what you have; tray size just slightly changes how thick the sponge is. Sometimes I use a roasting dish, not orthodox but works fine.
- Parchment paper. If you forget, grease the heck out of your pan or risk major regret.
- A kitchen towel for rolling. (Or tin foil in a pinch—tried it, a little awkward but does the job.)
How to Store (If You Somehow Still Have Leftovers)
Wrap leftovers in plastic wrap, pop in the fridge. Good for 2 days, probably longer, but honestly, in my house it never lasts more than a day! The flavors kind of marry overnight, which is nice if you have that kind of self-control. (I do not.)
How We Serve It (My Family’s Traditions, For What It’s Worth)
I like thickish slices (less chance of it flopping over) with a handful of seasonal fruit on the side – or just keep it classic with tea. My uncle insists on serving it with instant coffee, because “that’s what you’d get at a Showa-era cafe,” but honestly, any hot drink is good.
Mistakes I’ve Made & Pro Tips
- I once tried rushing the rolling while the cake was too hot—melted my cream everywhere. Wait until it’s just warm, not steaming!
- Don’t skip the parchment. Cleaning welded sponge off a pan is, well, not my idea of fun.
- If you beat the egg whites too much, the sponge cracks more. But even cracked, it’s still tasty…just not Instagrammable. (I have a highlight called ‘cake oops’ for good reason.)
FAQ – You’ve Actually Asked Me These
- Can I make this without an electric mixer?
Yeah, but you’ll need strong biceps (or a helpful kid). I did it once for a camping trip and, whew, my arm needed a rest after. - Does it freeze well?
Not really. The texture gets weird when thawed, kind of squeaky. Fresh wins here. - Can I double the recipe?
In theory, yes. Just use a bigger tray—but watch your oven, as it might bake unevenly. I tried once and the middle was undercooked, so maybe just make two separate cakes. - Is there a video you recommend?
Oh, totally—Nami from Just One Cookbook has a great visual step-by-step: check it out here. I picked up my parchment-towel trick from there! - What about flavor ideas?
Go wild: I like yuzu curd (find it at Asian supermarkets or online, like on Umami Insider), or keep it simple with classic strawberry jam. The cake’s a blank canvas, really.
By the way, if you want to geek out over the science of sponge cakes, Serious Eats has this super interesting breakdown (here’s the link)—I learned loads there, but promise you don’t have to understand all the science to pull off a soft, fluffy roll.
Last thing: if you ever see my cake roll at a party, there’s a 98% chance I ate the ugly ends myself in the kitchen. Perks of being the cook!

Ingredients
- 4 large eggs, separated
- 90g granulated sugar
- 60ml whole milk
- 40ml vegetable oil
- 60g cake flour
- 1 tsp vanilla extract
- 200ml heavy whipping cream
- 20g powdered sugar
Instructions
-
1Preheat oven to 350°F (175°C). Line a 10×12 inch baking tray with parchment paper.
-
2In a bowl, whisk egg yolks with 45g sugar until pale and creamy. Add milk, oil, and vanilla extract. Sift in cake flour and mix until smooth.
-
3In a separate bowl, beat egg whites until foamy. Gradually add remaining 45g sugar and whisk until stiff peaks form.
-
4Gently fold the meringue into the yolk mixture in three additions. Pour the batter into the prepared tray and smooth the surface.
-
5Bake for 18-20 minutes until lightly golden and springy. Cool completely with a towel covering the top.
-
6Whip cream with powdered sugar until stiff peaks form. Spread evenly over cooled cake, then carefully roll the cake into a log. Slice and serve.
CLICK FOR NUTRITION INFO
↑
Approximate Information for One Serving
Serving Size:
1 serving
Calories:
220 caloriescal
Protein:
4gg
Fat:
13gg
Saturated Fat:
0g
Trans Fat:
0g
Cholesterol:
0mg
Sodium:
0mg
Potassium:
0mg
Total Carbs:
21gg
Fiber:
0g
Sugar:
0g
Net Carbs:
0g
Vitamin A:
0
Vitamin C:
0mg
Calcium:
0mg
Iron:
0mg
Nutrition Disclaimers
Number of total servings shown is approximate. Actual number of servings will depend on your preferred portion sizes.
Nutritional values shown are general guidelines and reflect information for 1 serving using the ingredients listed, not including any optional ingredients. Actual macros may vary slightly depending on specific brands and types of ingredients used.
To determine the weight of one serving, prepare the recipe as instructed. Weigh the finished recipe, then divide the weight of the finished recipe (not including the weight of the container the food is in) by the desired number of servings. Result will be the weight of one serving.
Did you make this recipe?
Please consider Pinning it!!