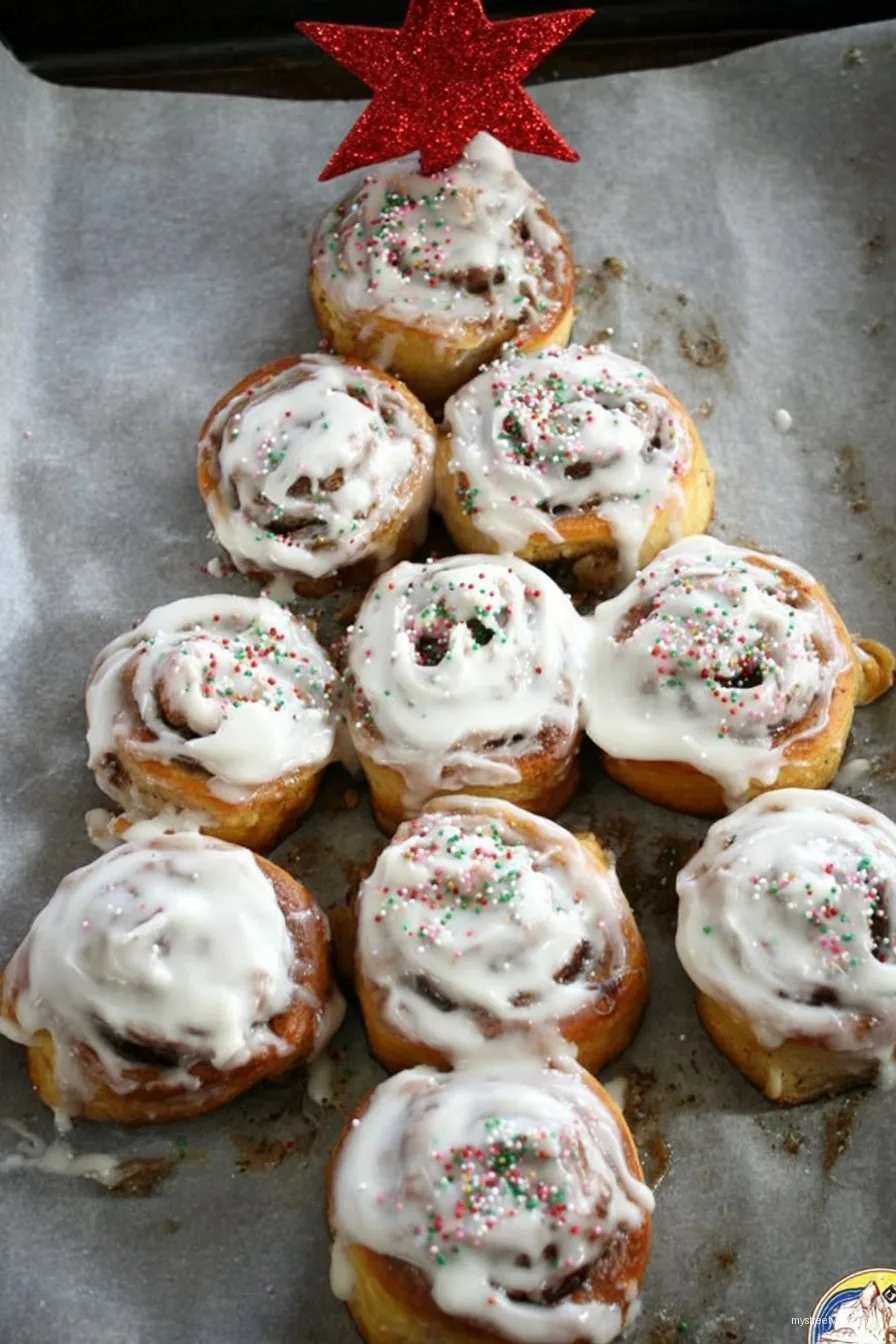
So, Christmas Tree Cinnamon Rolls. Let me tell you, if you want something festive and kind of ridiculously adorable (my sister once called these “the least stressful Christmas tradition we’ve got”), this is the recipe. The first time I made these, I used a baking sheet way too flimsy and the whole “tree” sort of… slumped sideways. Looked like a tree caught in a windstorm, but it still tasted fantastic. Family still laughs about my lopsided masterpiece! Anyway, this recipe’s become a staple for us—especially when I’m aiming to look like I’ve “tried” without actually breaking a sweat.
Why I Keep Coming Back to This Recipe (And Maybe You Will Too)
I make these when I want Christmas breakfast to feel special but I’ve run out of clean mixing bowls (or patience). My family goes bonkers for them because, hello, they look awesome on Instagram and you get those gooey cinnamon middles every bite. Plus, they’re friendly to little helper hands—kids can decorate them or sneak icing like mine do. I used to get stressed with yeast dough, but honestly, using store-bought rolls works just fine. You’re among friends here—no judgment.
What You’ll Need (Substitutions Welcome!)
- 1 tube of refrigerated cinnamon rolls (Pillsbury’s the classic, but sometimes I grab the store brand—no one notices!)
- Green food coloring (don’t stress if you’ve only got blue and yellow, just mix ‘em)
- M&Ms or colorful candy (I’ve used Skittles in a pinch, but they do get a bit chewy)
- Powdered sugar for extra snow, you know?
- Butter (a knob, melted—real or margarine, honestly, who’s checking?)
If you’re feeling ambitious, you can make dough form scratch. (Here’s a legit cinnamon roll dough recipe from Sally’s Baking Addiction if you’re in that mood.) But I usually just opt for easy-peasy—especially Christmas morning!
Okay, Here’s How to Pull Off Christmas Tree Cinnamon Rolls
- Prep your stuff: Heat the oven according to whatever the roll tube says. Spray a baking sheet with nonstick spray (I forget this step about half the time. Still edible, but a bit stickier.)
- Shape the tree: Place one cinnamon roll at the top, then work your way down, making lines of 2, then 3, then 4 rolls, forming a kind of triangle (or, if you’re like me, an interpretative tree). Plop the last roll at the bottom as a little trunk.
- Bake: Pop it in the oven. Watch it like a hawk because these can go from golden to “how did it get so dark so fast” faster than you think. 13-18 minutes usually works. Grab a cup of tea while you wait—or just stare at the oven like I do.
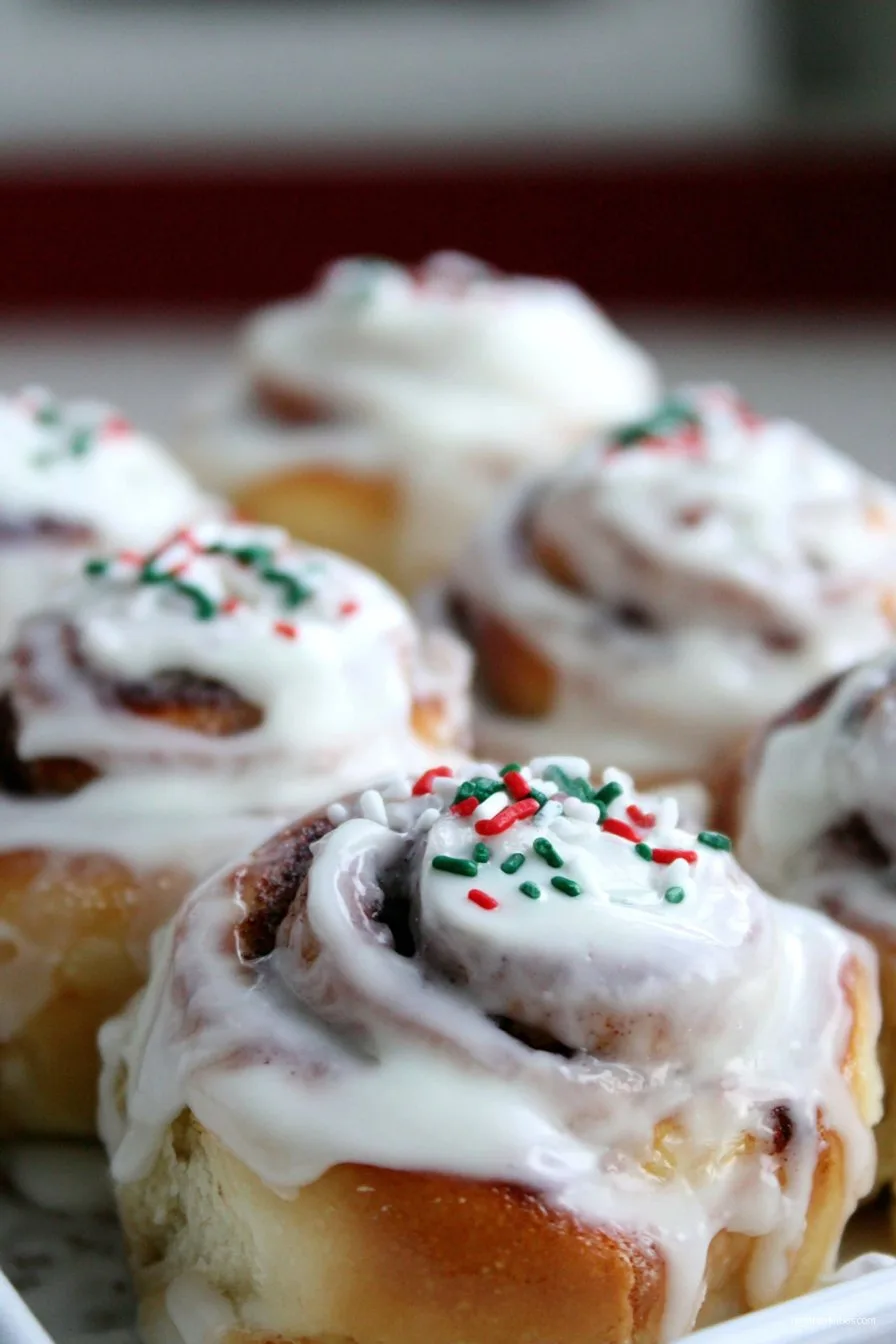
- Make the frosting green: Mix the icing (comes with the rolls) with a few drops of green food coloring. If you go too bright, don’t panic; paler is fine too! Smear it all over while they’re still a bit warm. (This is where I, uh, “test” the corner roll. Quality control.)
- Decorate the tree: Let the kids go wild with M&Ms, silver sprinkles, whatever makes you happy! Sometimes we use mini marshmallows too, but they kind of roll off.
- Dust with icing sugar: Just a pinch—makes it feel snowy. Or a blizzard, if you’re heavy-handed like my nephew.
And that’s kind of it. The hard part is waiting for them to cool so you don’t burn your tongue—I speak from experience. Actually, on second thought, slightly burnt tongues might be the price of admission.
If You Like a Bit More Context… (Notes from My Experience)
- Don’t use parchment when you can’t find your baking spray—it sometimes sticks. (Live and learn.)
- Let the rolls touch, but not too close. Otherwise, you get some mutant shapes at the edges—still tasty though!
- One time I tried to be fancy and piped extra icing on as garland. Looked a bit… err, less festive than I’d hoped. But it tasted good!
Variations I’ve Tried (With Mixed Results…)
- Extra spice: Added a dash of nutmeg and orange zest. Delicious! Made the whole house smell like Christmas.
- Chocolate version: Swapped the icing for chocolate spread. My youngest wasn’t convinced, but I was.
- Attempted vegan: Used vegan store bought rolls. Dough worked, but my “homemade” vegan frosting just kind of dribbled everywhere. Points for effort?
What If You Don’t Have All the Gadgets?
If you don’t have a baking sheet, use a casserole dish—or even a pizza pan. I’ve baked these on foil over a rack in a pinch (looked funny, still tasted brilliant). And if you don’t have a knife to spread icing, just use the back of a spoon. Life’s too short to fuss about kitchen gear.
How Do You Store These?
Technically you can store leftovers in an airtight box for a couple days. But honestly, in my house these are gone while they’re still warm. If you do want them next day, a quick zap in the microwave makes ‘em soft again (though nothing’s quite like fresh from the oven.)
How We Like to Eat Them (Serving Suggestions)
I think they’re best with strong coffee, but my partner insists on hot chocolate and whipped cream—each to their own! And sometimes for Christmas brunch, we plop the “tree” in the middle of the table and let everyone pull off a branch, picnic style.
Lessons Learned (A Few Pro Tips I Picked Up the Hard Way)
- Don’t rush the cooling or your icing will slide right off. I once tried to serve these straight from oven, and ended up with a cinnamon swamp. (Still, folks ate it with spoons. Can’t win.)
- If you’re using food coloring, mix it in gradually—you can always add more, but you can’t take it away. Trust me, I turned the frosting neon Hulk green once; not exactly a winter wonderland vibe.
FAQ—Stuff People Have Actually Asked Me
- Can I make these ahead? You can but they’re way softer straight out of the oven. If you must prep ahead, shape and bake, then reheat and ice just before eating.
- What if I only have small cinnamon rolls? No stress, just make a skinnier tree—or a bush? (That’s what I did last year when the store was out of the big ones.)
- Can I freeze them? Sort of; freeze after baking before icing. But honestly, they lose that “fresh baked” magic, so I’d rather not.
- How do you stop the candy from melting? Wait till the rolls are just warm not hot. Or just eat them quick—problem solved!
- Any dress-up suggestions? Oh, for sure. Try using sparkling sugar for “snow” or those edible gold stars—my niece says they’re the best.
Final digression: Once, I accidentally swapped the powdered sugar for flour when dusting the top. Let’s just say the photos looked better than the taste… Luckily cinnamon covers a multitude of sins. Anyway, happy baking—may your tree stand tall and not windblown!
Ingredients
- 1 can refrigerated cinnamon roll dough (8 count)
- 3 tablespoons unsalted butter, melted
- 2 tablespoons granulated sugar
- 1 tablespoon ground cinnamon
- 4 ounces cream cheese, softened
- 3/4 cup powdered sugar
- 2 tablespoons milk
- Green food coloring
- Assorted holiday sprinkles and decorations
- Colored chocolate candies or edible pearls (for ornaments)
Instructions
-
1Preheat the oven to 350°F (175°C) and line a baking sheet with parchment paper.
-
2Unroll the cinnamon roll dough and arrange the pieces on the prepared baking sheet in a tree shape, starting with a single roll at the top and lining up rows below to form a triangle.
-
3Brush the rolls with melted butter and sprinkle with a mixture of granulated sugar and ground cinnamon for extra flavor.
-
4Bake for 20-22 minutes or until golden brown. Let cool slightly.
-
5Prepare the frosting by beating cream cheese, powdered sugar, milk, and a few drops of green food coloring until smooth. Spread or pipe the green frosting over the cooled rolls to resemble a Christmas tree.
-
6Decorate with sprinkles and chocolate candies to mimic ornaments. Serve warm and enjoy!
CLICK FOR NUTRITION INFO
↑
Approximate Information for One Serving
Serving Size:
1 serving
Calories:
310 caloriescal
Protein:
4gg
Fat:
11gg
Saturated Fat:
0g
Trans Fat:
0g
Cholesterol:
0mg
Sodium:
0mg
Potassium:
0mg
Total Carbs:
48gg
Fiber:
0g
Sugar:
0g
Net Carbs:
0g
Vitamin A:
0
Vitamin C:
0mg
Calcium:
0mg
Iron:
0mg
Nutrition Disclaimers
Number of total servings shown is approximate. Actual number of servings will depend on your preferred portion sizes.
Nutritional values shown are general guidelines and reflect information for 1 serving using the ingredients listed, not including any optional ingredients. Actual macros may vary slightly depending on specific brands and types of ingredients used.
To determine the weight of one serving, prepare the recipe as instructed. Weigh the finished recipe, then divide the weight of the finished recipe (not including the weight of the container the food is in) by the desired number of servings. Result will be the weight of one serving.
Did you make this recipe?
Please consider Pinning it!!