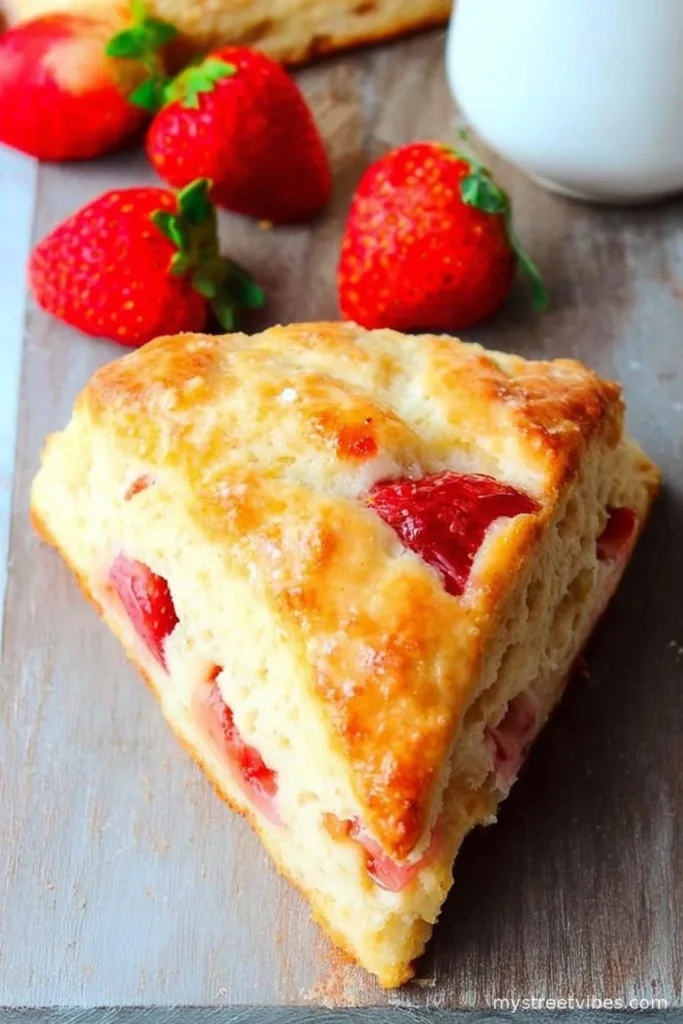
Let’s Bake Strawberry Scones (Grab a Cup, I’ll Tell You How…)
Okay, so here’s the thing: I never really planned to become “the scone person,” but somehow after one rainy Sunday baking mishap (flour everywhere, cat suspiciously glittery), strawberry scones became my calling card. That first batch was a bit lumpy, but the kitchen smelled amazing, and nobody really cares about wonky shapes when there are warm scones on the table, right? And honestly—fresh strawberries in scones just feel fancy and laid-back at the same time, like wearing slippers with a ballgown (not that I’ve tried, but I would if I owned a ballgown).

Why I Keep Making These (and Why You’ll Probably Want to Too)
I usually bake these when strawberries are looking sad in the fridge and I’m not up for making jam. My family loses their minds over them—the scones, not the jam, although that’s good too. Kids will sniff out the strawberries before you’ve even finished mixing, and somehow there are never any left for breakfast the next day. They’re fantastic with tea, and the dough is forgiving, so even if you mess up (I’ve forgotten the sugar before, oops) you’ll still wind up munching something delicious. Plus, they’re way less fussy than folks imagine—seriously, don’t overthink it.
What Goes Into My Strawberry Scones (and, Well, a Few Cheats)
- 2 cups (about 250g) all-purpose flour (sometimes I use half whole wheat if I’m feeling “virtuous”… it’s just a different taste, you decide)
- 1/3 cup sugar (granulated, but caster is fine if that’s all you have—don’t stress it)
- 2 tsp baking powder (I use whatever’s not clumped into a rock)
- 1/4 tsp baking soda
- 1/2 tsp salt (I’ve used flakey sea salt when out of regular salt, it’s fine!)
- 6 tbsp cold unsalted butter, cut into cubes (sometimes I freeze then grate it, but more on that in a sec)
- 1 egg (large, or, you know, whatever size your chickens lay if you’ve got those)
- 1/2 cup plain Greek yogurt or sour cream (full-fat is richer, but I won’t judge light versions)
- 1 tsp vanilla extract (no worries if it’s the “imitation” kind)
- 1 cup fresh strawberries, diced (frozen strawberries work too—just defrost and pat dry really well or else you’ll have pink mush, a lesson I learned the hard way)
- About 2 tbsp milk or cream for brushing (“about” because sometimes I just slosh a bit from the jug, ha)
- 2 tbsp coarse sugar for sprinkling (optional, but seriously, just makes them look snazzy)
How I Actually Make These Strawberry Scones
- Preheat your oven to 400°F (200°C). Skip this if you want to live on the edge, but honestly, hot ovens help prevent scone sadness.
- In a big bowl, mix together your flour, sugar, baking powder, baking soda, and salt. Don’t worry about perfect mixing—I usually just swish a fork around and call it a day.
- Add the cold, cubed butter. Now, you can use a pastry cutter, two forks, or even your chilly hands—just smush it together until the mix is kinda crumbly, with some bits pea-sized and some bigger. It shouldn’t look neat. (Sometimes I grate my butter if I remember to freeze it—makes me feel very clever.)
- In a separate bowl or little jug, whisk the egg, yogurt, and vanilla. Pour that into the dry bowl. Try not to overmix or panic—it’s okay if streaks remain.
- Fold in the diced strawberries gently. If you over stir, you’ll get pink, soggy dough. Not the worst, just a bit odd-looking.
- Tip the dough onto a floured surface (or a bit of parchment for less mess) and pat gently into a thick round. About 1 inch (2.5cm) thick is what I aim for—but a bit more or less is honestly fine.
- Cut into 8 wedges with a knife—my slices are never even, but after baking you won’t notice. Or, for drop scones, just scoop with a spoon. Who’s judging?
- Place on a baking tray lined with parchment (or just a greased pan—if it sticks, well, more for the birds outside).
- Brush the tops (not the sides!) with milk or cream, then sprinkle with that coarse sugar if you have it handy.
- Bake for 16–20 minutes or until the tops are golden and a bit crusty. I always rotate the tray halfway because my oven has “hot spots” (or maybe it’s just moody?).
- Let them cool for a little while if you can stand it—10 minutes is good. This is usually when I sneak a test scone, burned tongue and all.
What I’ve Noticed After Many Batches (Notes to My Future Self… and You)
- Using Greek yogurt gives a slightly tangier flavor which is surprisingly nice—but sour cream is creamier. I swap between them depending on what’s left in the fridge.
- Strawberries will bleed into the dough a bit. It’s normal. Pink streaks don’t mean anything’s gone wrong (I panicked once, didn’t need to).
- If the dough seems too wet, just add a sprinkle of flour before patting it out. Sticky is good; runny is not.
- Cutting the scones smaller makes more, but they won’t look like the ones in bakeries. Kids actually prefer the little mini ones though.
If You’re Feeling Experimental (Variations I’ve Tried… And Regretted)
- Adding a bit of lemon zest is nice. Once I tried orange zest—it tasted odd, wouldn’t recommend.
- You can swap half the strawberries for blueberries (tasty) or even raspberries (watch for extra berry juice, though—could get messy).
- Chocolate chips instead of part of the fruit? Yes! But one time I tried white chocolate and it was a sweetness overload, so go easy.

Kitchen Gadgets and When You Don’t Have Them
People say you need a pastry cutter. I usually couldn’t find mine, so I just use my fingertips. Even a fork works in a pinch, though it’s a bit slow-going. No whisk? Use a fork. No baking tray? I once used the bottom of a roasting pan—works fine, just don’t tell Mary Berry.
Keeping Scones Fresh (Or, Why That’s Mostly Hypothetical)
In theory, you can store these in an airtight tin for up to a couple days. In practice? They usually disappear in a matter of hours. If you do have leftovers, a quick 10-second zap in the microwave is lovely, but don’t overdo it or they’ll go rubbery. You can freeze them too—wrap tightly and they should last a month or so (not that mine ever make it that far).
How I Like To Serve ‘Em
Warm, always. If nobody’s watching, I’ll split and add a dab of butter and a smidge of homemade strawberry jam (from that batch I almost burned last summer). Sometimes for brunch, we pile them with whipped cream and extra berries. My mum used to insist on tea, but honestly they’re pretty decent with a coffee or cold milk too.
The Things I Wish I’d Known (Learned the Hard Way!)
- I once rushed the chilling step and wound up with flat, sad scones. Cold dough equals happy scones; now I stick my tray in the fridge for ten minutes before baking if it’s extra warm in the house.
- Don’t skip parchment paper—it’s a cheat for easy cleanup, and trust me, burnt sugar on metal trays is a pain to scrub.
- Overmixing is the silent scone killer. Just bring the dough together until it holds—lumps are not the enemy.
Burning Questions About Strawberry Scones (Because Friends Ask!)
- Can I double the recipe? Yep, and I have, though my teen nicked half before they cooled.
- Help! My scones spread out and merged! Did you use super soft butter? Or maybe it was a really warm day. Try a bit more flour next time—or chill the shaped dough briefly before baking.
- Frozen fruit or nah? Works in a pinch, but honestly, I think fresh is best. If you do go frozen, dry it like your life depends on it.
- What if I don’t have yogurt or sour cream? I’ve used buttermilk, and runny crème fraîche once (accidentally), and both are decent in a pinch.
- Can I make these gluten free? Probably, with a decent all-purpose gluten free flour blend and a pinch of xanthan gum (or so my friend tells me).
- Do these taste better the next day? I mean, maybe, but I wouldn’t really know. On second thought, I think a day-old scone slathered in jam has its charm!
If you’re still reading—well, you’re probably as hungry as I am. Go on and give it a bash. (And shout if your scones mysteriously vanish before you’ve had a second… happens to the best of us!)
Ingredients
- 2 cups (about 250g) all-purpose flour (sometimes I use half whole wheat if I’m feeling “virtuous”… it’s just a different taste, you decide)
- 1/3 cup sugar (granulated, but caster is fine if that’s all you have—don’t stress it)
- 2 tsp baking powder (I use whatever’s not clumped into a rock)
- 1/4 tsp baking soda
- 1/2 tsp salt (I’ve used flakey sea salt when out of regular salt, it’s fine!)
- 6 tbsp cold unsalted butter, cut into cubes (sometimes I freeze then grate it, but more on that in a sec)
- 1 egg (large, or, you know, whatever size your chickens lay if you’ve got those)
- 1/2 cup plain Greek yogurt or sour cream (full-fat is richer, but I won’t judge light versions)
- 1 tsp vanilla extract (no worries if it’s the “imitation” kind)
- 1 cup fresh strawberries, diced (frozen strawberries work too—just defrost and pat dry really well or else you’ll have pink mush, a lesson I learned the hard way)
- About 2 tbsp milk or cream for brushing (“about” because sometimes I just slosh a bit from the jug, ha)
- 2 tbsp coarse sugar for sprinkling (optional, but seriously, just makes them look snazzy)
Instructions
-
1Preheat your oven to 400°F (200°C). Skip this if you want to live on the edge, but honestly, hot ovens help prevent scone sadness.
-
2In a big bowl, mix together your flour, sugar, baking powder, baking soda, and salt. Don’t worry about perfect mixing—I usually just swish a fork around and call it a day.
-
3Add the cold, cubed butter. Now, you can use a pastry cutter, two forks, or even your chilly hands—just smush it together until the mix is kinda crumbly, with some bits pea-sized and some bigger. It shouldn’t look neat. (Sometimes I grate my butter if I remember to freeze it—makes me feel very clever.)
-
4In a separate bowl or little jug, whisk the egg, yogurt, and vanilla. Pour that into the dry bowl. Try not to overmix or panic—it’s okay if streaks remain.
-
5Fold in the diced strawberries gently. If you over stir, you’ll get pink, soggy dough. Not the worst, just a bit odd-looking.
-
6Tip the dough onto a floured surface (or a bit of parchment for less mess) and pat gently into a thick round. About 1 inch (2.5cm) thick is what I aim for—but a bit more or less is honestly fine.
-
7Cut into 8 wedges with a knife—my slices are never even, but after baking you won’t notice. Or, for drop scones, just scoop with a spoon. Who’s judging?
-
8Place on a baking tray lined with parchment (or just a greased pan—if it sticks, well, more for the birds outside).
-
9Brush the tops (not the sides!) with milk or cream, then sprinkle with that coarse sugar if you have it handy.
-
10Bake for 16–20 minutes or until the tops are golden and a bit crusty. I always rotate the tray halfway because my oven has “hot spots” (or maybe it’s just moody?).
-
11Let them cool for a little while if you can stand it—10 minutes is good. This is usually when I sneak a test scone, burned tongue and all.
CLICK FOR NUTRITION INFO
↑
Approximate Information for One Serving
Serving Size:
1 serving
Calories:
260 caloriescal
Protein:
5gg
Fat:
10gg
Saturated Fat:
0g
Trans Fat:
0g
Cholesterol:
0mg
Sodium:
0mg
Potassium:
0mg
Total Carbs:
38gg
Fiber:
0g
Sugar:
0g
Net Carbs:
0g
Vitamin A:
0
Vitamin C:
0mg
Calcium:
0mg
Iron:
0mg
Nutrition Disclaimers
Number of total servings shown is approximate. Actual number of servings will depend on your preferred portion sizes.
Nutritional values shown are general guidelines and reflect information for 1 serving using the ingredients listed, not including any optional ingredients. Actual macros may vary slightly depending on specific brands and types of ingredients used.
To determine the weight of one serving, prepare the recipe as instructed. Weigh the finished recipe, then divide the weight of the finished recipe (not including the weight of the container the food is in) by the desired number of servings. Result will be the weight of one serving.
Did you make this recipe?
Please consider Pinning it!