If You’ve Never Had Smothered Pork Chops, You’re in for a Treat
Alright, friend, pull up a chair and let me tell you: few things beat the cozy satisfaction of smothered Pork Chops. This was practically a weeknight ritual at my grandma’s house. You’d smell those chops sizzling away two blocks before you even made it up the porch—made me run, rain or shine! Certainly more enthusiastic than I was about math homework. The secret to truly fantastic smothered Pork Chops (if you ask my family) is equal parts patience and not skimping on the onions. Oh, and don’t panic if the kitchen looks like a flour bomb went off—happens to the best of us.
Why You’ll Love This (Or, Why My Family Does)
I make this dish when I need something hearty that practically hugs you from the inside out. My family goes mad for smothered pork chops—my partner puts in special requests for them after any rough week at work. And honestly, if you’re the sort that finds gravy-making a bit intimidating, let me tell you: I’ve burned the bottom of the pan, I’ve had lumpy gravy, but somehow it always turns out delicious. (It’s the magic of butter. Or just good luck!) Plus, cleanup is relatively painless because it’s mostly a one-pan deal, unless you count the floury mixing bowl—which I don’t.
Smothered Pork Chops Ingredients (With Some Real Talk)
- 4 bone-in pork chops (about 1 inch thick) – boneless works if that’s all you’ve got, but I like the bone for flavor. Grandma claimed it was non-negotiable—love you, Gran!
- Salt and black pepper (a generous sprinkle)
- 1 cup all-purpose flour (or sometimes I grab self-rising if we’re low)
- 2 tablespoons olive oil (canola works in a pinch; once used bacon grease—whoa)
- 2 tablespoons butter (real, salted butter is my go-to)
- 2 large yellow onions, thinly sliced (Vidalia if they’re in season)
- 3 garlic cloves, minced (or a teaspoon of garlic powder when I can’t be bothered)
- 2 cups chicken broth (or beef broth, or my neighbor’s homemade stock that she barters for fresh bread)
- 1 teaspoon dried thyme (oregano works too, but thyme is my MVP)
- 1 teaspoon paprika (I prefer smoked, but whatever’s in the drawer goes in)
- 1/4 cup heavy cream (optional but it makes the gravy sing!)
How I Throw It All Together — Directions
- Pat the pork chops dry with a paper towel (don’t skip this or you’ll be in splash city). Season both sides generously with salt and pepper. If you think it’s enough, add a little more.
- Pour the flour into a shallow dish and dredge each chop until they’re wearing a nice flour coat. Shake off the excess—unless you’re into super-thick breading. Sometimes a little messy flour trail forms on the counter, but eh, adds character.
- Heat up the olive oil and butter together in a big skillet over medium-high heat. (Honestly, I wait until a tiny flour bit starts sizzling—my unofficial readiness test.)
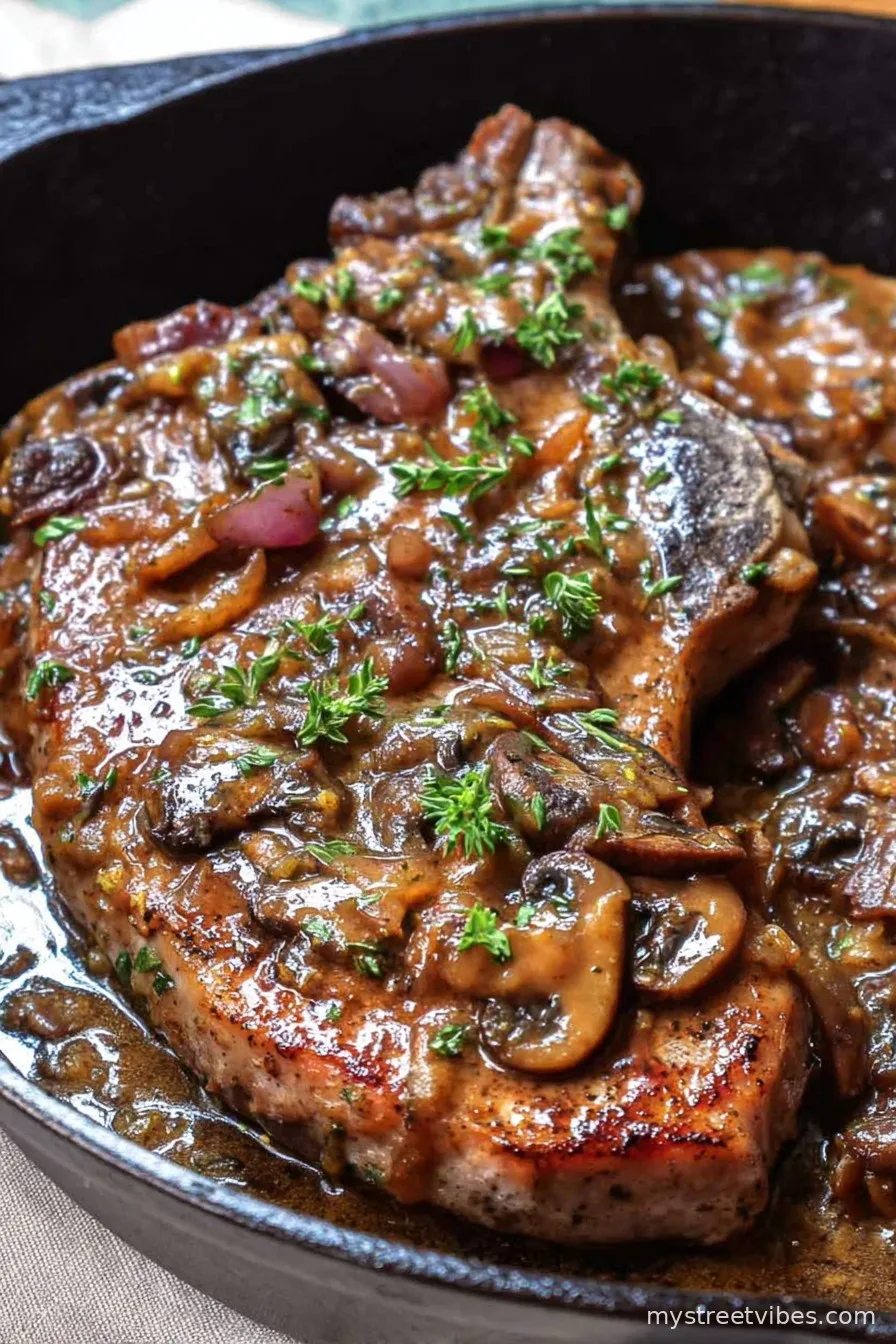
- Gently lay the pork chops in. Don’t overcrowd them, give them breathing room. Sear for 3-4 minutes per side till you get beautiful golden crusts, then set them aside on a plate. If one falls apart, just pretend it was artsy. (This is where I usually sneak a tiny taste if no one’s looking.)
- Toss your sliced onions into the hot pan. Let them get soft and golden – takes about 8 minutes. Scrape up those lovely brown bits, because that’s all the flavor hiding out! If you need to, splash in a bit more oil.
- Add garlic and cook for about one minute—careful not to let it burn or all your neighbors will know (ask me how I know…)
- Stir in about 2 tablespoons of that leftover dredging flour. Makes things look a bit clumpy at first, but just trust the process. Cook another 2 minutes to lose that raw flour flavor.
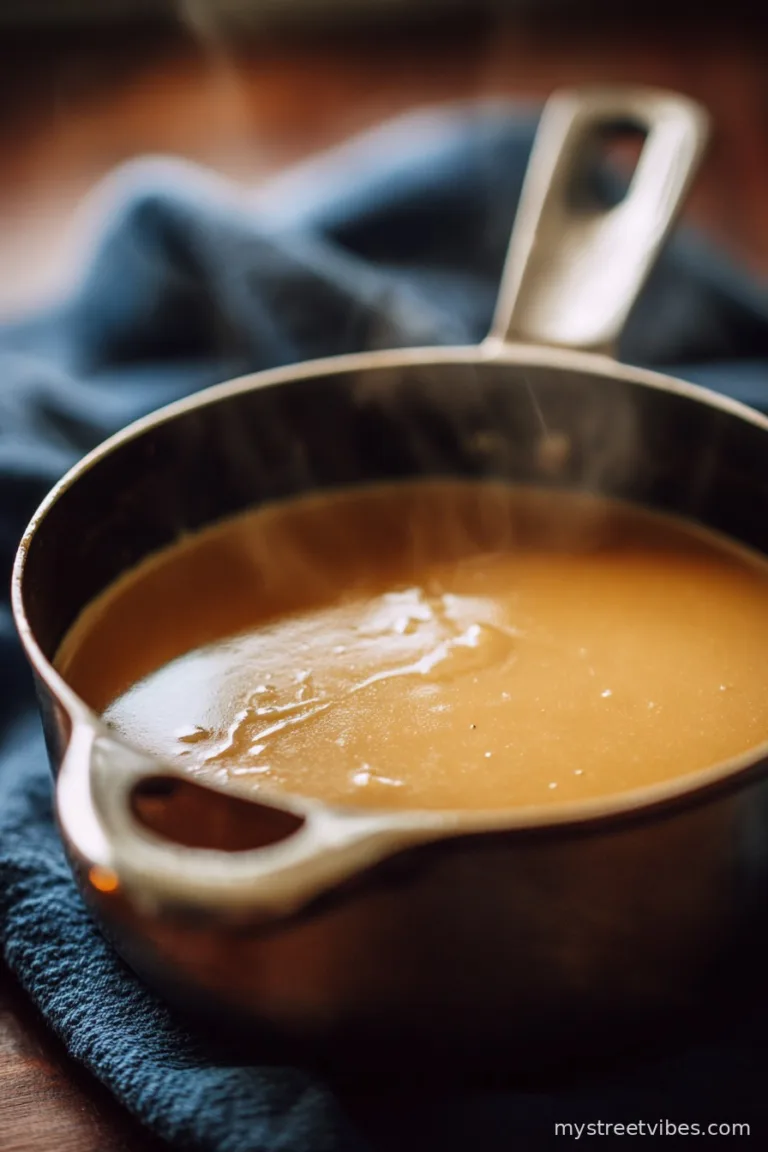
- Slowly pour in the broth while stirring. On second thought, maybe do it gradually so things don’t lump up. Add thyme and paprika. Bring to a simmer and let it bubble for 3–4 minutes to thicken. It’ll look weird before it looks right, promise.
- Slide the chops and any juices back into the pan. Spoon some onions and gravy over each so they feel cozy. Cover and keep at a low simmer for 25 to 30 minutes—flipping once—till they’re tender.
- If you’re feeling fancy (or indulgent), stir in the cream at the end. Simmer just another couple of minutes. Taste and adjust seasoning—the true chef’s privilege.

Notes from Many Messy Kitchens
- If your gravy clumps, whisk it a bit or use a fork to smash out any stubborn lumps. (Sometimes I just call it “rustic.”)
- Don’t worry if your onions brown a bit too much; they add sweetness, not ruin.
- I’ve sometimes made this in a Dutch oven if my regular pan mysteriously disappears. Worked just fine.
- Chicken thighs with the same method taste fab, though the cook time changes.
Variations I’ve Messed With (For Better or Worse)
- Added fresh mushrooms in with the onions—honestly, delicious!
- Tried apple slices once… Not my favorite, but my cousin swears by it so, to each their own.
- Subbed in coconut milk for the cream out of curiosity. Won’t do that again (unless you love coconut, then maybe?)
- Once I tried tossing carrots in but they just rolled around stubbornly – not worth it unless they’re pre-cooked, I guess.

What About Equipment? Do I Really Need All That?
All you really need is a big skillet (mine is cast iron, but any heavy pan does the trick). If you don’t have a lid that fits, I’ve used a pizza pan in a pinch. For slicing onions, even a dull knife gets the job done—it just tests your patience.
How Do I Store These (Assuming You Actually Have Leftovers)
Technically, you can pop leftovers in an airtight container and store in the fridge for up to 3 days. But honestly, in my house it never lasts more than a day! You can reheat gently on the stove. The gravy might thicken up in the fridge, so I sometimes splash in a spoonful of broth or water when reheating.
How I Like to Serve Smothered Pork Chops
Usually, we ladle it over creamy mashed potatoes. (I’ll fight anyone who says rice is better, though secretly I’ll eat both.) In a pinch? Just good, crusty bread for gravy-mopping. My sister ups the ante with green beans on the side—she’s the vegetable police in the family.
Pro Tips (Or, “What I Learned the Hard Way”)
- I once tried rushing the simmer time and wound up with chewy pork—a humbling lesson. Let time do its thing.
- Forgetting to taste and adjust at the end? Regret! That last splash of salt or hit of cream can mean everything.
- The right onion makes a difference. Vidalia is extra sweet if you can find it, though regular onions hold up too.
Wait, But What About…
- Can I make this with thin pork chops? Sure—just shorten the simmer, maybe 12-15 minutes. But don’t blame me if they dry out a bit! Bone-in thick ones hold up better. (Though I’ve still done it when time is tight.)
- Is the cream optional? Yep, entirely. It just makes the gravy creamier but it’s rich enough without it, especially if the pork is fatty.
- Gluten-free possible? You bet. I’ve used a gluten-free flour blend and it worked fine—just not quite as silky a gravy, but still great.
- Chicken or beef broth? Either works, honestly. Chicken is milder, beef makes it richer. Sometimes I use half and half if that’s what’s lurking in the back of the fridge.
- Can I make it ahead? Oh, absolutely. In fact, I think this tastes better the next day—if you can stand to wait for leftovers; I rarely can. If it thickens up too much, add a splash of broth when you reheat.
- No cast iron? Use anything you’ve got. I’ve even tried it once in a deep sauté pan on a camp stove—tasted like childhood summers (and burnt sausage, but that’s another story).
Anyway, if you made it this far, thanks for hanging in! Hope you love this recipe as much as we all do around here. And if you spill flour on the cat, just laugh it off—it happens to the best of us.
Ingredients
- 4 bone-in pork chops (about 1 inch thick)
- Salt and black pepper (a generous sprinkle)
- 1 cup all-purpose flour
- 2 tablespoons olive oil
- 2 tablespoons butter
- 2 large yellow onions, thinly sliced
- 3 garlic cloves, minced
- 2 cups chicken broth
- 1 teaspoon dried thyme
- 1 teaspoon paprika
- 1/4 cup heavy cream (optional)
Instructions
-
1Pat the pork chops dry with a paper towel (don’t skip this or you’ll be in splash city). Season both sides generously with salt and pepper. If you think it’s enough, add a little more.
-
2Pour the flour into a shallow dish and dredge each chop until they’re wearing a nice flour coat. Shake off the excess—unless you’re into super-thick breading. Sometimes a little messy flour trail forms on the counter, but eh, adds character.
-
3Heat up the olive oil and butter together in a big skillet over medium-high heat. (Honestly, I wait until a tiny flour bit starts sizzling—my unofficial readiness test.)
-
4Gently lay the pork chops in. Don’t overcrowd them, give them breathing room. Sear for 3-4 minutes per side till you get beautiful golden crusts, then set them aside on a plate. If one falls apart, just pretend it was artsy. (This is where I usually sneak a tiny taste if no one’s looking.)
-
5Toss your sliced onions into the hot pan. Let them get soft and golden – takes about 8 minutes. Scrape up those lovely brown bits, because that’s all the flavor hiding out! If you need to, splash in a bit more oil.
-
6Add garlic and cook for about one minute—careful not to let it burn or all your neighbors will know (ask me how I know…)
-
7Stir in about 2 tablespoons of that leftover dredging flour. Makes things look a bit clumpy at first, but just trust the process. Cook another 2 minutes to lose that raw flour flavor.
-
8Slowly pour in the broth while stirring. On second thought, maybe do it gradually so things don’t lump up. Add thyme and paprika. Bring to a simmer and let it bubble for 3–4 minutes to thicken. It’ll look weird before it looks right, promise.
-
9Slide the chops and any juices back into the pan. Spoon some onions and gravy over each so they feel cozy. Cover and keep at a low simmer for 25 to 30 minutes—flipping once—till they’re tender.
-
10If you’re feeling fancy (or indulgent), stir in the cream at the end. Simmer just another couple of minutes. Taste and adjust seasoning—the true chef’s privilege.
CLICK FOR NUTRITION INFO
↑
Approximate Information for One Serving
Serving Size:
1 serving
Calories:
490 caloriescal
Protein:
38gg
Fat:
28gg
Saturated Fat:
0g
Trans Fat:
0g
Cholesterol:
0mg
Sodium:
0mg
Potassium:
0mg
Total Carbs:
25gg
Fiber:
0g
Sugar:
0g
Net Carbs:
0g
Vitamin A:
0
Vitamin C:
0mg
Calcium:
0mg
Iron:
0mg
Nutrition Disclaimers
Number of total servings shown is approximate. Actual number of servings will depend on your preferred portion sizes.
Nutritional values shown are general guidelines and reflect information for 1 serving using the ingredients listed, not including any optional ingredients. Actual macros may vary slightly depending on specific brands and types of ingredients used.
To determine the weight of one serving, prepare the recipe as instructed. Weigh the finished recipe, then divide the weight of the finished recipe (not including the weight of the container the food is in) by the desired number of servings. Result will be the weight of one serving.
Did you make this recipe?
Please consider Pinning it!