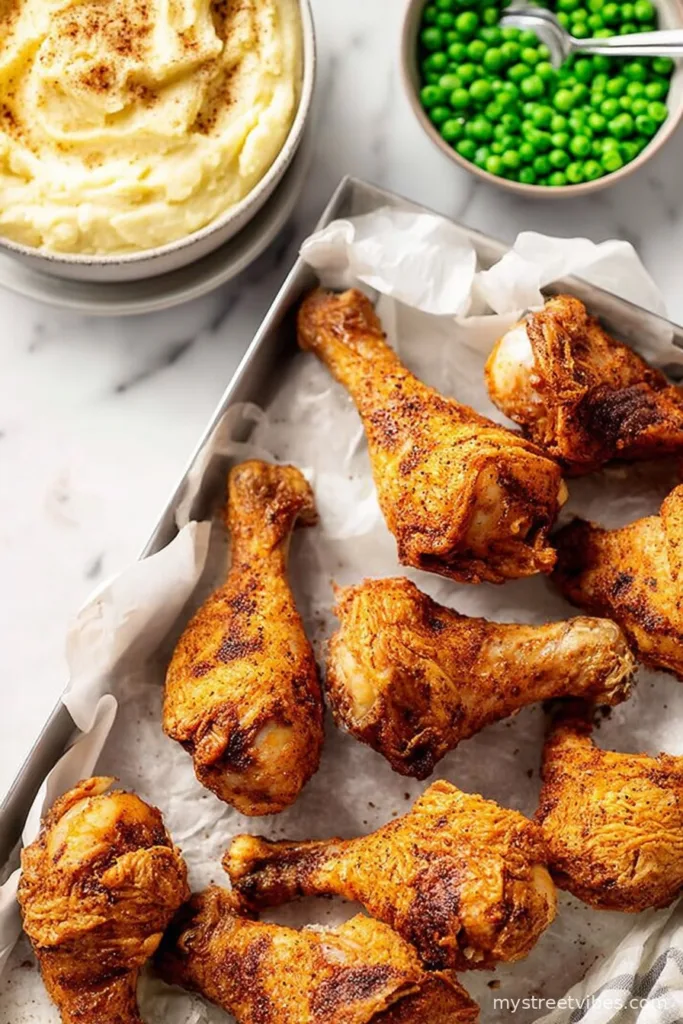
Hey, Drumstick Lovers—This One’s for You
You know those weeks when you open the fridge, spot some chicken, and all the motivation you can muster is, “Well, at least drumsticks never go outta style”? That’s me most Mondays. I’ve made this seasoned crispy drumsticks recipe so many times, my oven probably dreams about it. I remember my cousin Tom once ate six in a row during a family BBQ, then blamed it on a ‘growth spurt.’ (He was 32). Anyway, this one’s been a lifesaver for busy nights, lazy Sundays, or anytime you want the house to smell amazing and the kids to come running—plus, there’s nothing sexier than not frying and splattering oil all over your kitchen, am I right?
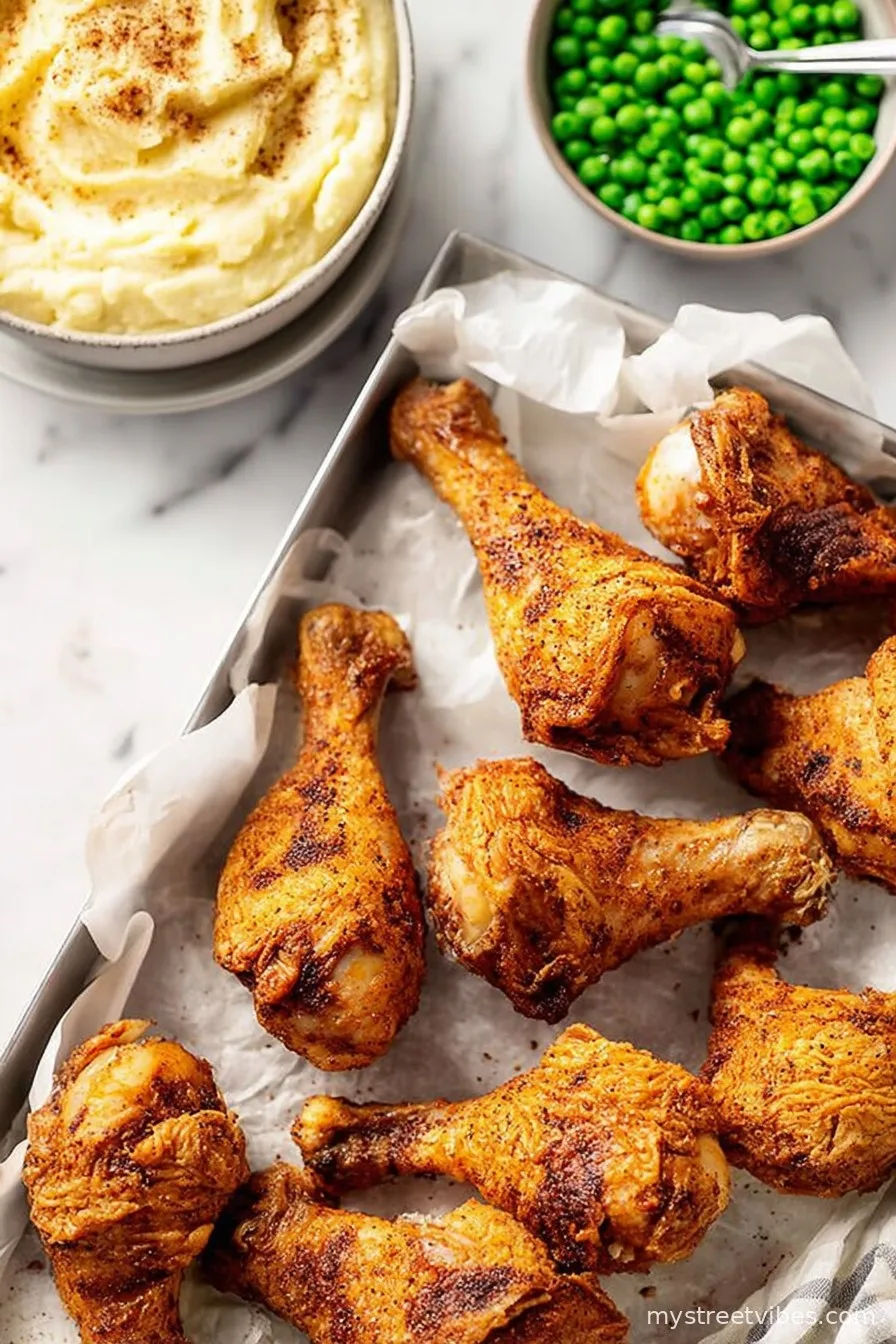
Why Everyone in My House Loses It for These Chicken Drumsticks
I roll out this recipe when I want something that looks like you worked way harder than you actually did. My family goes nuts for the crispy, craggly bits (and lets me know if I skimp on seasoning—never again). I figured out you can get things nearly as good as deep-fried drumsticks without all the drama. One time, my attempt at healthy oven-baked chicken was so bland, even the dog snubbed it, but this one? Even picky eaters have to admit it’s got crunch. If you’re after an easy dinner that tricks everyone into thinking you’re a kitchen legend, grab some napkins.
Ingredients You’ll Need (and Some Fun Swaps)
- 8 chicken drumsticks (bone-in, skin on is my usual; if you’re in a rush, boneless thighs also work but they won’t be drumsticks anymore, obviously)
- 2 tablespoons olive oil (sometimes I use melted butter if I’m feeling extra fancy – or lazy, honestly, I just grab whatever’s closest)
- 3/4 cup all-purpose flour (plain flour, you know the drill; sometimes I do half with cornmeal for more crunch, which is nice but not required)
- 1 teaspoon smoked paprika (regular sweet paprika will do; my aunt swears by the smoked but you use you)
- 1/2 teaspoon garlic powder
- 1/2 teaspoon onion powder
- 1 teaspoon kosher salt (or normal table salt; sea salt if you’re feeling posh, but don’t stress)
- 1/2 teaspoon ground black pepper
- 1/2 teaspoon dried thyme (or Italian seasoning if that’s all you’ve got, and some days that’s absolutely what I do)
- 1/4 teaspoon cayenne pepper (optional, unless you like a bit of a kick; sometimes I’ll double it because, well, why not?)
- Cooking spray or a few drizzles more olive oil, for the baking tray
How I Make ‘Em (Just Follow the Flow)
- Preheat your oven to 220°C (425°F). I always forget and stand there waiting like a numpty, so maybe do this first for once.
- Pat the chicken drumsticks dry with paper towels. This, apparently, is what makes things crispy and not soggy—learned it the messy way, trust me.
- Toss the drumsticks in a big bowl and drizzle with olive oil. Use your hands! Feels weird, but better coating.
- In a separate large-ish bowl, mix together the flour, paprika, garlic powder, onion powder, salt, pepper, thyme, and cayenne. I usually give it a good whisk so there are no sneaky flour pockets.
- Roll each drumstick in the flour mix, pressing lightly so the coating sticks. If some spots are bald, just press more on. No one’s judging.
- Arrange your drumsticks on a foil-lined baking tray (makes cleanup one million times easier) that’s been lightly sprayed with cooking spray or drizzled with oil.
- Spray or drizzle the drumsticks with a bit more oil—this is where I try to avoid totally drowning mine but don’t go too light if you want real crunch.
- Bake for about 35–40 minutes, flipping once halfway through. If you see some strange bubbling going on partway, don’t panic—it’ll sort itself out. I usually sneak a taste at about 35 minutes, but only if no one’s watching.
- Take ‘em out when golden and crispy. Let ‘em rest a few mins before you dive in (or burn your tongue and regret it, like me last Tuesday).

Lived and Learned: Notes from My Kitchen Fumbles
- If your coating goes patchy, just smear a bit of extra flour mix right on the bald spots—it bakes up just fine.
- Extra large drumsticks take a tad longer, smaller ones burn quick, so keep an eye out especially if your oven’s got a mind of its own.
- Honestly, it always seems crispier if you let them rest on a rack after baking, but sometimes the rack is buried, so straight on the tray works too (no shame).
- I once forgot the cayenne—pretty tame, but my nephew was thrilled. A win for the mild crowd?
Variations (Some Wins, Some Facepalms)
- I’ve swapped the flour for panko breadcrumbs—that came out more like pub chicken, which I kind of loved.
- Lemon zest in the flour mix? Yes, tasted great, but didn’t win everyone over—Tom said it was “too fancy.”
- One time I tried marinating the chicken in yogurt before breading—kind of messy, didn’t get as crispy, wouldn’t bother again unless you like saucy fingers.

No Special Gear? No Problem
A baking rack helps keep things extra crispy underneath, but if you can’t find yours (mine lives in mysterious places), just bake straight on the foil and give them a flip at halftime—works a treat. Old sheet pans? Totally fine. Mixing bowls of questionable size? As long as it fits, you’re winning.
How Long Can You Store These? (Spoiler: Not Long at My Place)
So, these technically keep in the fridge for up to 3 days. I almost never get to test that because leftovers? What leftovers. If you do have some, they reheat super well in the oven (180°C/350°F for about 10 minutes) but lose their charm in the microwave. You can freeze them, but honestly, I think they’re best fresh—don’t blame me if they disappear the same night.
How I Love to Serve ‘Em (And a Family Quirk)
My ideal way: big pile in the center of the table, lots of napkins, and a side of sliced cucumbers for crunch (my mum swears this counts as salad). Sometimes, if I’m in a fancy mood, I’ll throw them next to mashed potatoes and call it Sunday dinner. You do you—maybe even a squeeze of lemon if you’re feeling posh.
Pro Tips I Learned the Hard Way
- I once tried rushing the flip halfway through—don’t! The coating just peeled right off, leaving a sad, bald drumstick graveyard.
- Press the flour mix on, don’t just roll! Actually, it really does help with those clumpy crispy bits we love.
- Oil is your friend, just don’t drown it or you’ll fry instead of bake. Sounds obvious but I’ve made that puddle mistake.
FAQs (Aka “You’ve Actually Asked Me These”)
- Can I do these with wings? Totally — just watch the baking time. They cook way faster, so check around 25 minutes.
- What if I have skinless drumsticks? It’ll still work, but less crispy magic. Maybe try doubling the oil and extra breadcrumbs.
- Can I make this gluten-free? Yep, swap in your fave GF flour (Bob’s Red Mill seems fine—or whatever’s in the cupboard).
- Why’d my chicken come out soggy? A wet tray or not enough oil usually. Or, you didn’t let it rest after baking. Learn form my past!
- Is it really spicy? Not unless you go heavy on the cayenne, mate. Start light, add more if you’re wild.
If you try this, let me know how it works out—or what wild side dishes you add on, or even if you totally forget to flip them and the world didn’t end. This recipe always brings a little comfort (and a great excuse for a finger-lickin’ feast). Stay crispy!
Ingredients
- 8 chicken drumsticks (bone-in, skin on is my usual; if you’re in a rush, boneless thighs also work but they won’t be drumsticks anymore, obviously)
- 2 tablespoons olive oil (sometimes I use melted butter if I’m feeling extra fancy – or lazy, honestly, I just grab whatever’s closest)
- 3/4 cup all-purpose flour (plain flour, you know the drill; sometimes I do half with cornmeal for more crunch, which is nice but not required)
- 1 teaspoon smoked paprika (regular sweet paprika will do; my aunt swears by the smoked but you use you)
- 1/2 teaspoon garlic powder
- 1/2 teaspoon onion powder
- 1 teaspoon kosher salt (or normal table salt; sea salt if you’re feeling posh, but don’t stress)
- 1/2 teaspoon ground black pepper
- 1/2 teaspoon dried thyme (or Italian seasoning if that’s all you’ve got, and some days that’s absolutely what I do)
- 1/4 teaspoon cayenne pepper (optional, unless you like a bit of a kick; sometimes I’ll double it because, well, why not?)
- Cooking spray or a few drizzles more olive oil, for the baking tray
Instructions
-
1Preheat your oven to 220°C (425°F). I always forget and stand there waiting like a numpty, so maybe do this first for once.
-
2Pat the chicken drumsticks dry with paper towels. This, apparently, is what makes things crispy and not soggy—learned it the messy way, trust me.
-
3Toss the drumsticks in a big bowl and drizzle with olive oil. Use your hands! Feels weird, but better coating.
-
4In a separate large-ish bowl, mix together the flour, paprika, garlic powder, onion powder, salt, pepper, thyme, and cayenne. I usually give it a good whisk so there are no sneaky flour pockets.
-
5Roll each drumstick in the flour mix, pressing lightly so the coating sticks. If some spots are bald, just press more on. No one’s judging.
-
6Arrange your drumsticks on a foil-lined baking tray (makes cleanup one million times easier) that’s been lightly sprayed with cooking spray or drizzled with oil.
-
7Spray or drizzle the drumsticks with a bit more oil—this is where I try to avoid totally drowning mine but don’t go too light if you want real crunch.
-
8Bake for about 35–40 minutes, flipping once halfway through. If you see some strange bubbling going on partway, don’t panic—it’ll sort itself out. I usually sneak a taste at about 35 minutes, but only if no one’s watching.
-
9Take ‘em out when golden and crispy. Let ‘em rest a few mins before you dive in (or burn your tongue and regret it, like me last Tuesday).
CLICK FOR NUTRITION INFO
↑
Approximate Information for One Serving
Serving Size:
1 serving
Calories:
340cal
Protein:
32 gg
Fat:
17 gg
Saturated Fat:
0g
Trans Fat:
0g
Cholesterol:
0mg
Sodium:
0mg
Potassium:
0mg
Total Carbs:
13 gg
Fiber:
0g
Sugar:
0g
Net Carbs:
0g
Vitamin A:
0
Vitamin C:
0mg
Calcium:
0mg
Iron:
0mg
Nutrition Disclaimers
Number of total servings shown is approximate. Actual number of servings will depend on your preferred portion sizes.
Nutritional values shown are general guidelines and reflect information for 1 serving using the ingredients listed, not including any optional ingredients. Actual macros may vary slightly depending on specific brands and types of ingredients used.
To determine the weight of one serving, prepare the recipe as instructed. Weigh the finished recipe, then divide the weight of the finished recipe (not including the weight of the container the food is in) by the desired number of servings. Result will be the weight of one serving.
Did you make this recipe?
Please consider Pinning it!