So Here’s My Story About Roasting Zucchini and Squash
If you’ve ever stared at a pile of squash from the summer farmers market and thought, “Um, what now?”…well, hi, me too. Years ago, my neighbor dropped off what felt like a tractor-load of zucchini and yellow squash. (Bless her though—who knew two people had so much squash in their backyard?) I didn’t want any of it to go to waste, so after a few wobbly experiments (involving odd casseroles, don’t ask), I discovered my family is obsessed with simple roasted zucchini and squash. Now it’s a staple for barbecues, impromptu weeknight dinners, and let’s be honest—those times when I need to sneak veggies onto my kids’ plates. One time I forgot them in the oven and they got extra toasty—my husband actually liked them even more that way. So yeah, these are nearly goof-proof.

Why you’ll end up making this again (and again)
I make this a lot when I want something fresh but really can’t be bothered to stand at the stove forever (hello, lazy evenings). My family goes bonkers for it—especially that chewy, brown bit at the edge that inevitably escapes the spatula. You know, that golden sweet spot where the olive oil and herbs cling? That’s the money bite. Sometimes, when I’m in a hurry, I just toss everything in a bowl and hope for the best—and it still works! Plus, confession: I now actually prefer zucchini when it’s taken a trip through a hot oven, even if I never thought I’d say that as a kid.
Let’s Talk Ingredients
- 2 medium zucchini, sliced into rounds (or half-moons if you want a little drama)
- 2 medium yellow squash, sliced (if you only have zucchini, just use four of those—nobody will notice)
- 2 tablespoons olive oil (I’ve used avocado oil when I ran out, worked fine… but don’t tell my Italian aunt)
- 1 teaspoon kosher salt (sea salt pinch will do if that’s all you’ve got)
- ½ teaspoon freshly ground black pepper
- 1 teaspoon dried Italian herbs (or just a handful of chopped parsley, or, honestly, the random dried herbs hiding in your pantry)
- 1 garlic clove, minced (optional—skip it if you’re not a fan, or use garlic powder if your patience is thin)
- 1/4 cup grated Parmesan cheese (I sometimes forget this and it’s still great, but the cheese is next-level)
This is How I Do It (Not Always Perfectly)
- Preheat your oven to 425°F (or a bit lower if you’re anxious about burning—sometimes I go with 400°F).
- Line a big ol’ baking sheet with parchment paper, or foil, or just go wild and use nothing if you like a challenge when cleaning up. Spread a tiny splash of oil if not using paper—makes it less sticky.
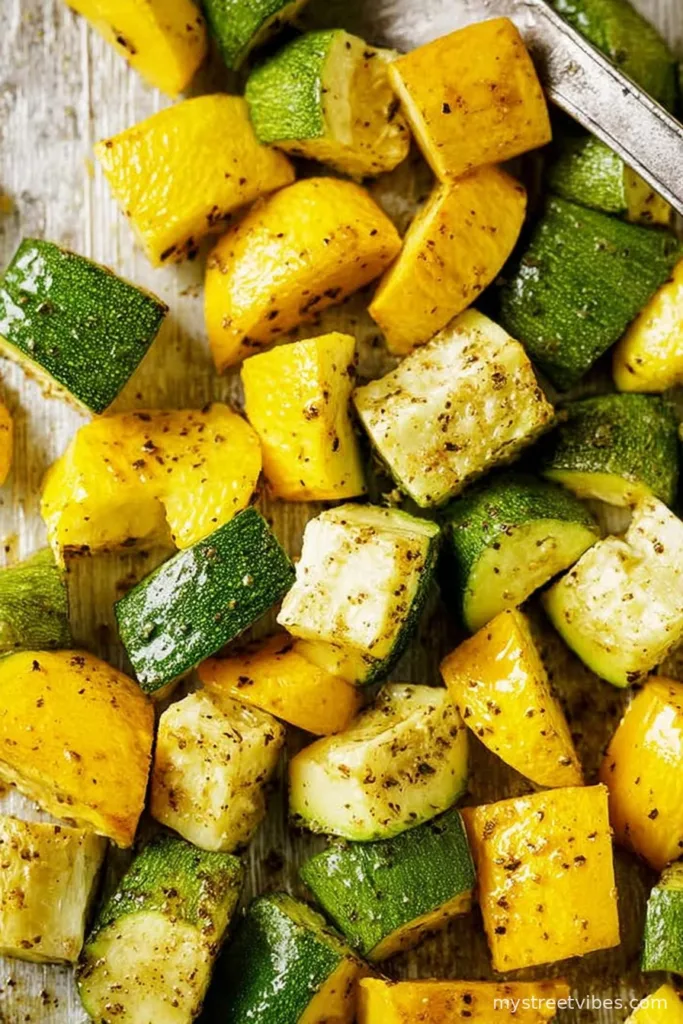
- Slice up your zucchini and yellow squash into rounds (about 1/4 inch thick, but nobody is getting out a ruler). I usually just eyeball it. If you want them to roast super quick, half-moons also work well.
- Toss all your sliced squash in a big bowl. Drizzle over the olive oil, sprinkle the salt and pepper, then add your Italian herbs and garlic. I use my hands to mix because it’s faster, but a spoon works too (as long as you don’t mind chasing slices around the bowl).
- Spread the mixture onto your prepared baking sheet in a single, haphazard layer. Don’t stress if they overlap a little—it all somehow evens out, though the ones touching get a tiny bit softer.
- Bake for about 18–22 minutes, checking halfway to give everything a shake or a gentle flip. This is where I usually sneak a taste. Don’t worry if some pieces look extra brown around the edges—that’s flavor.
- After 15 minutes, sprinkle the grated Parmesan over the tops. That cheesy crust is a game-changer (just don’t forget the oven mitt—I learned the hard way, ouch).
- Pull them from the oven when they look golden with some crispy bits—usually around the 20-minute mark. Eat straight away or let them sit a minute if you like them less piping hot (I burn my tongue at least half the time anyway).
A Few Notes From My “Oops, That Didn’t Work” File
- If you pile too many veggies on top of each other, they’ll steam instead of roast and get a little soggy. Not the end of the world, but definitely less tasty.
- Actually, I find it works better if you use a wider sheet pan rather than a smaller one—it spreads things out, so you get more crispy action.
- I once used way too much garlic. Trust me, a little goes a long way (unless you’re fighting off vampires, then by all means).
Stuff I Tried: Variations
- Sometimes I add red pepper flakes for a bit of kick. My oldest always complains, but I love it.
- Lemon zest is really nice for a fresh twist. Or a little balsamic drizzle at the end—fancy, huh?
- I tried honey once (don’t do it—the texture goes a bit mushy, and the flavor kind of fights with the squash).
- Swapping in a sprinkle of cheddar when I’m out of Parmesan is solid, though you lose that nutty bite. Still cheesy, still yum.

Gear: What If You Don’t Have the Right Pan?
Okay, if you don’t have a gigantic baking sheet, just use two smaller ones or even a big casserole dish (though things may roast less evenly, but hey, it’ll work). Or go rogue and try a pizza stone—I did that once just out of curiosity and it sorta worked, crispy bases but a pain to clean.
Keeping Leftovers (If Any Survive)
Honestly, in my house, this rarely lasts more than a single meal; but if you do have leftovers, just pop them in an airtight container in the fridge. They’re still tasty the next day—probably even better because the flavors mingle (or so I tell myself when I’m eating them cold straight from the bowl). I wouldn’t recommend freezing–the texture gets downright peculiar.
How I Like to Serve It
I love putting roasted zucchini and squash alongside anything—grilled chicken, pasta (especially a little linguini with extra cheese), or even tucked into sandwiches. My little one likes dipping pieces in ranch, which, well, whatever gets vegetables eaten! Occasionally, if I’m feeling extra, I’ll toss a fried egg on top for lunch. Not traditional; just good.
Pro tips (Mostly Learned the Hard Way)
- I once tried rushing the roast at a higher temp—don’t do that. The edges get burnt before the middle softens. 425°F seems like magic to me.
- If you want extra crunch, let the pan sit on the oven rack for a minute or two after you turn the oven off. That final blast crisps everything up.
- Don’t be tempted to skip the salt; it draws out a bit of water and amps up flavor (left that out once, very bland, very sad).
Roasted Zucchini and Squash Q&A (Actual Questions from Real People, I Swear)
- Can I use only zucchini? Oh, totally. I do it all the time if that’s what’s overflowing in my fridge. Same goes for just yellow squash.
- Will this work on the grill? You bet—though use a grill basket or go with thicker slices so you don’t lose half your veggies through the grates! Trust me, nobody likes fishing charred squash out of hot coals.
- Can I prep this ahead of time? You can slice and toss with oil and seasonings early in the day; just wait until you’re about to cook to put it on the pan. If you leave it sitting too long, it gets watery (learned this the hard way… ew).
- What if my squash is a little floppy? It’s fine—don’t stress. Roasting perks it up, though maybe just cut away any really mushy spots first.
- How do I know when they’re done? When they get those brown edges and your kitchen smells incredible, they’re there. Don’t sweat being a minute over or under, it’s very forgiving. (Unlike soufflé. Never again.)
And that’s my two cents (plus some change) on one of the chillest veggie recipes in my wheelhouse. Hope someone in your house nabs the crispy bits before you do, or not—sometimes you’ve got to keep chef’s privileges for yourself!
Ingredients
- 2 medium zucchini, sliced into rounds (or half-moons if you want a little drama)
- 2 medium yellow squash, sliced (if you only have zucchini, just use four of those—nobody will notice)
- 2 tablespoons olive oil (I’ve used avocado oil when I ran out, worked fine… but don’t tell my Italian aunt)
- 1 teaspoon kosher salt (sea salt pinch will do if that’s all you’ve got)
- ½ teaspoon freshly ground black pepper
- 1 teaspoon dried Italian herbs (or just a handful of chopped parsley, or, honestly, the random dried herbs hiding in your pantry)
- 1 garlic clove, minced (optional—skip it if you’re not a fan, or use garlic powder if your patience is thin)
- 1/4 cup grated Parmesan cheese (I sometimes forget this and it’s still great, but the cheese is next-level)
Instructions
-
1Preheat your oven to 425°F (or a bit lower if you’re anxious about burning—sometimes I go with 400°F).
-
2Line a big ol’ baking sheet with parchment paper, or foil, or just go wild and use nothing if you like a challenge when cleaning up. Spread a tiny splash of oil if not using paper—makes it less sticky.
-
3Slice up your zucchini and yellow squash into rounds (about 1/4 inch thick, but nobody is getting out a ruler). I usually just eyeball it. If you want them to roast super quick, half-moons also work well.
-
4Toss all your sliced squash in a big bowl. Drizzle over the olive oil, sprinkle the salt and pepper, then add your Italian herbs and garlic. I use my hands to mix because it’s faster, but a spoon works too (as long as you don’t mind chasing slices around the bowl).
-
5Spread the mixture onto your prepared baking sheet in a single, haphazard layer. Don’t stress if they overlap a little—it all somehow evens out, though the ones touching get a tiny bit softer.
-
6Bake for about 18–22 minutes, checking halfway to give everything a shake or a gentle flip. This is where I usually sneak a taste. Don’t worry if some pieces look extra brown around the edges—that’s flavor.
-
7After 15 minutes, sprinkle the grated Parmesan over the tops. That cheesy crust is a game-changer (just don’t forget the oven mitt—I learned the hard way, ouch).
-
8Pull them from the oven when they look golden with some crispy bits—usually around the 20-minute mark. Eat straight away or let them sit a minute if you like them less piping hot (I burn my tongue at least half the time anyway).
CLICK FOR NUTRITION INFO
↑
Approximate Information for One Serving
Serving Size:
1 serving
Calories:
120cal
Protein:
4 gg
Fat:
7 gg
Saturated Fat:
0g
Trans Fat:
0g
Cholesterol:
0mg
Sodium:
0mg
Potassium:
0mg
Total Carbs:
9 gg
Fiber:
0g
Sugar:
0g
Net Carbs:
0g
Vitamin A:
0
Vitamin C:
0mg
Calcium:
0mg
Iron:
0mg
Nutrition Disclaimers
Number of total servings shown is approximate. Actual number of servings will depend on your preferred portion sizes.
Nutritional values shown are general guidelines and reflect information for 1 serving using the ingredients listed, not including any optional ingredients. Actual macros may vary slightly depending on specific brands and types of ingredients used.
To determine the weight of one serving, prepare the recipe as instructed. Weigh the finished recipe, then divide the weight of the finished recipe (not including the weight of the container the food is in) by the desired number of servings. Result will be the weight of one serving.
Did you make this recipe?
Please consider Pinning it!