Alright, here’s why I love these Rice Paper Dumplings
If I’m honest, the first time I tried to make Rice Paper Dumplings it was absolute chaos—rice paper stuck to pretty much everything (including my sleeve, for reasons unknown), filling spilled out, and I dropped one on the floor right in front of my very judgmental cat. Now, a few tries later, these have become my guilty pleasure snack… sometimes I even make a batch for what starts as a simple snack and quietly becomes my entire dinner. My cousin Jen asks for these all the time, and she’s not subtle about her cravings. If you’ve never pan-crisped rice paper before, prepare for a minor kitchen revelation.
Why You’ll Love This (Or at Least Laugh at My Attempts)
I make these mostly when I have leftover veggies (or when I realize the mushrooms are on their last legs). My family goes a bit wild for them—especially when I sneak in extra garlic, which I do, sorry not sorry. They’re honestly the best finger food for movie nights, though you will get sticky fingers. I used to be so annoyed at how fragile rice paper seemed, but actually, if you give it a quick dip and work fast, it’s not nearly as fussy as it pretends to be.
Ingredients? Oh, Here Comes the List…
- 10 sheets of rice paper (any brand works, my grandmother swears by Rose Brand but honestly whatever you grab will do)
- 1 cup shredded carrots (sometimes I swap in zucchini—I know it’s not traditional, but I live on the edge)
- 1 cup chopped shiitake mushrooms (white mushrooms also work, or skip mushrooms and double the cabbage if that’s all you’ve got!)
- 1 cup finely shredded cabbage (I use whatever color’s in my fridge—purple is fun but green is classic)
- 2 green onions, sliced thin
- 2 cloves garlic, minced (or a big spoonful from the jar if it’s a Tuesday… or you’re just feeling lazy)
- 1 tbsp soy sauce (I sometimes use tamari for gluten-free friends)
- 1 tsp toasted sesame oil
- 1/2 tsp sugar (or a pinch, let’s be honest, eyeball it)
- Oil, for pan-frying (I just splash in my usual cooking oil, no exact science here)
- Optional: Pinch of chili flakes, dash of white pepper, or a squirt of sriracha if you’re feeling spicy
How I Throw These Together (Some Steps May Vary Due to Snack Urgency)
- Start by prepping your filling: Toss the carrots, mushrooms, cabbage, green onions, and garlic in a big bowl. Drizzle over soy sauce, sesame oil, and sugar; mix it up with your hands or a spoon—this is where I usually sneak a taste and adjust whatever’s missing (probably more garlic in my case).
- Grab a shallow dish big enough for the rice paper (a pie tin or baking dish is perfect, but honestly, I’ve used a frying pan in a pinch). Fill it with warm water.
- Dip a rice paper sheet in the water for about 10–15 seconds (not too long, or it’ll be a floppy mess); lay it out on a damp towel or a nonstick surface—this is important unless you love extra cleaning.
- Spoon 2–3 tablespoons of filling onto the lower third of the rice paper. Fold up the bottom, tuck in the sides, and roll it up like a little burrito. It might look wonky—don’t panic, mine do too.
- Optional but awesome: Dip and roll a second layer with another rice paper sheet for extra crunch (I started doing this after a friend suggested it and, honestly, it never looked back).
- Repeat with the rest—sometimes I run out of filling before rice paper or vice versa; if you do, just snack on the leftovers or call it good.
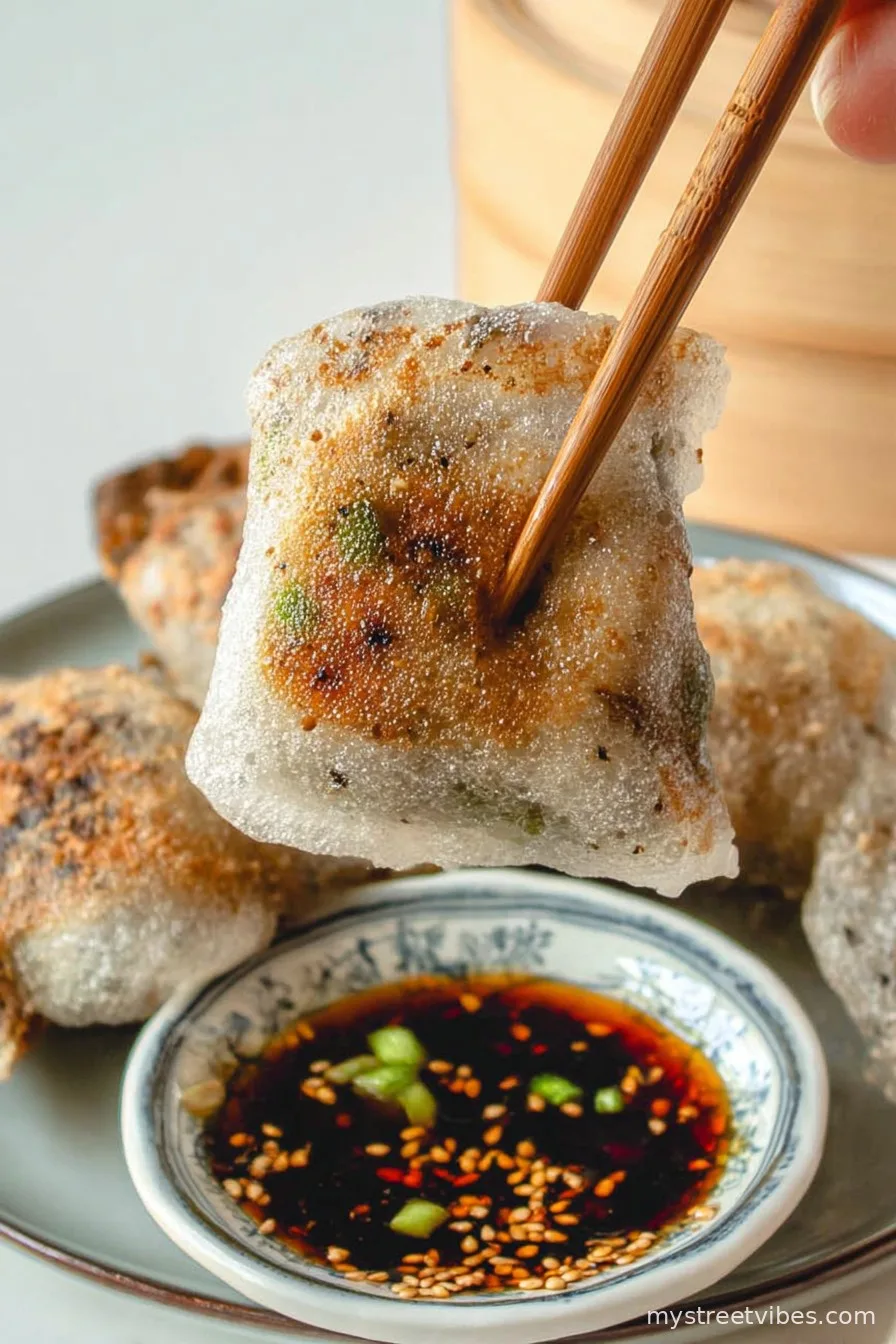
- Heat a generous slick of oil in a nonstick skillet over medium-high. Plop in the dumplings, smooth side down—don’t crowd the pan. Fry for 2–3 minutes per side, pressing gently, until golden and crispy. (Don’t worry if a few leak, or stick a little, or char up—mine always do!)
- Transfer to a plate, let them cool a minute (they’re hotter than you think). Then… devour.

Notes Because I’ve Messed Up Enough Times
- Pro tip: If your rice paper is sticking, try wetting your hands or switching to a silicone mat. Or just yell a little—sometimes it helps.
- The double-wrap trick makes the dumplings sturdier and gives them more crunch, but I still eat plenty single-wrapped when I’m impatient.
- I’ve tried freezing the rolled, uncooked dumplings. To be honest, the texture gets a bit rubbery—but if you’re desperate, it’s fine in a pinch.
If You Wanna Shake Things Up (Variations I’ve Attempted)
- Added diced shrimp once—my brother loved it, but I found it made the dumplings a little too “bouncy” (you know what I mean).
- Used leftover roast chicken and hoisin sauce instead of veggies… Not bad, but I think veggies really shine here.
- I once tried crumbling feta inside (don’t ask why, it was late)—the flavor’s nice, but the texture is all wrong.

Handy Gear (But Not Life or Death Tools)
- A nonstick skillet: Yes, this actually helps a lot, but if you don’t have one, just oil a regular frying pan more generously. I’ve made these outdoors in a cast iron on the grill, too, which is ridiculous but fun.
- A shallow dish for soaking the rice paper. Worst case? I’ve used a dinner plate before, and just nudged the rice paper around until it softened.
- Something to press down the dumplings (spatula, mug bottom, your hand—watch out, it’s hot!)
How to Store (No Promise You’ll Have Leftovers)
They honestly never last more than a day at my place, but for the record: cooled dumplings go in an airtight container in the fridge; re-crisp in a hot pan. They’re not bad cold, but do get a bit chewy by day two—so yeah, best fresh, but edible in that late-night snack emergency.
Serving—It’s a Party or a Solitary Snack
I love dunking these in a mixture of soy sauce and sriracha. Sometimes I serve them with crispy lettuce leaves or thin cucumber slices for a sort of DIY lettuce wrap sitch. On my cousin’s birthday we put them out with sweet chili dipping sauce, and they vanished in what felt like sixty seconds flat.
Mistakes I’ve Learned From (AKA Pro Tips, Kinda)
- One time I tried rushing the frying step—don’t. They’ll stick and tear. Better to be a tad patient and get that crispy, golden shell.
- If you overstuff, they will burst in the pan. It’s tempting but maybe keep your enthusiasm to a reasonable level (at least at the rolling stage).
- The fillings can be a bit wet—sometimes I squeeze out extra liquid from the veg so the finished dumplings aren’t soggy. But sometimes I forget and, honestly, it’s still delish.
Questions I Actually Get From Friends
- Can I bake these instead of frying? You can, but you don’t get that crunchy exterior I crave. They end up kinda chewy. But if you must, brush with oil and bake at 200°C/400°F for ~20 min, flip halfway.
- Do you have to cook the filling first? Nope, it cooks inside the dumpling as it fries. Plus, it’s quicker (and sometimes I’m in a hurry).
- My rice paper keeps tearing—is it me? Oh, been there. Check your soak time—if it’s floppy like a jellyfish, that’s too long. Try 10 seconds and see how it goes. And honestly, even torn dumplings still taste great.
- What other veggies can I use? Whatever’s lurking in your fridge. Peppers, corn, even chopped spinach. One time I tossed in some leftover noodles—not traditional, but nobody complained.
Anyway, let me know how yours turn out! If they’re a little wonky, welcome to the club. And if they’re perfect, tell me your secrets because mine are always a bit… rustic. Enjoy!
Ingredients
- 10 sheets of rice paper (any brand works, my grandmother swears by Rose Brand but honestly whatever you grab will do)
- 1 cup shredded carrots (sometimes I swap in zucchini—I know it’s not traditional, but I live on the edge)
- 1 cup chopped shiitake mushrooms (white mushrooms also work, or skip mushrooms and double the cabbage if that’s all you’ve got!)
- 1 cup finely shredded cabbage (I use whatever color’s in my fridge—purple is fun but green is classic)
- 2 green onions, sliced thin
- 2 cloves garlic, minced (or a big spoonful from the jar if it’s a Tuesday… or you’re just feeling lazy)
- 1 tbsp soy sauce (I sometimes use tamari for gluten-free friends)
- 1 tsp toasted sesame oil
- 1/2 tsp sugar (or a pinch, let’s be honest, eyeball it)
- Oil, for pan-frying (I just splash in my usual cooking oil, no exact science here)
- Optional: Pinch of chili flakes, dash of white pepper, or a squirt of sriracha if you’re feeling spicy
Instructions
-
1Start by prepping your filling: Toss the carrots, mushrooms, cabbage, green onions, and garlic in a big bowl. Drizzle over soy sauce, sesame oil, and sugar; mix it up with your hands or a spoon—this is where I usually sneak a taste and adjust whatever’s missing (probably more garlic in my case).
-
2Grab a shallow dish big enough for the rice paper (a pie tin or baking dish is perfect, but honestly, I’ve used a frying pan in a pinch). Fill it with warm water.
-
3Dip a rice paper sheet in the water for about 10–15 seconds (not too long, or it’ll be a floppy mess); lay it out on a damp towel or a nonstick surface—this is important unless you love extra cleaning.
-
4Spoon 2–3 tablespoons of filling onto the lower third of the rice paper. Fold up the bottom, tuck in the sides, and roll it up like a little burrito. It might look wonky—don’t panic, mine do too.
-
5Optional but awesome: Dip and roll a second layer with another rice paper sheet for extra crunch (I started doing this after a friend suggested it and, honestly, it never looked back).
-
6Repeat with the rest—sometimes I run out of filling before rice paper or vice versa; if you do, just snack on the leftovers or call it good.
-
7Heat a generous slick of oil in a nonstick skillet over medium-high. Plop in the dumplings, smooth side down—don’t crowd the pan. Fry for 2–3 minutes per side, pressing gently, until golden and crispy. (Don’t worry if a few leak, or stick a little, or char up—mine always do!)
-
8Transfer to a plate, let them cool a minute (they’re hotter than you think). Then… devour.
CLICK FOR NUTRITION INFO
↑
Approximate Information for One Serving
Serving Size:
1 serving
Calories:
160cal
Protein:
3 gg
Fat:
5 gg
Saturated Fat:
0g
Trans Fat:
0g
Cholesterol:
0mg
Sodium:
0mg
Potassium:
0mg
Total Carbs:
27 gg
Fiber:
0g
Sugar:
0g
Net Carbs:
0g
Vitamin A:
0
Vitamin C:
0mg
Calcium:
0mg
Iron:
0mg
Nutrition Disclaimers
Number of total servings shown is approximate. Actual number of servings will depend on your preferred portion sizes.
Nutritional values shown are general guidelines and reflect information for 1 serving using the ingredients listed, not including any optional ingredients. Actual macros may vary slightly depending on specific brands and types of ingredients used.
To determine the weight of one serving, prepare the recipe as instructed. Weigh the finished recipe, then divide the weight of the finished recipe (not including the weight of the container the food is in) by the desired number of servings. Result will be the weight of one serving.
Did you make this recipe?
Please consider Pinning it!