Let Me Tell You Why I Crave These Red Velvet Cookies
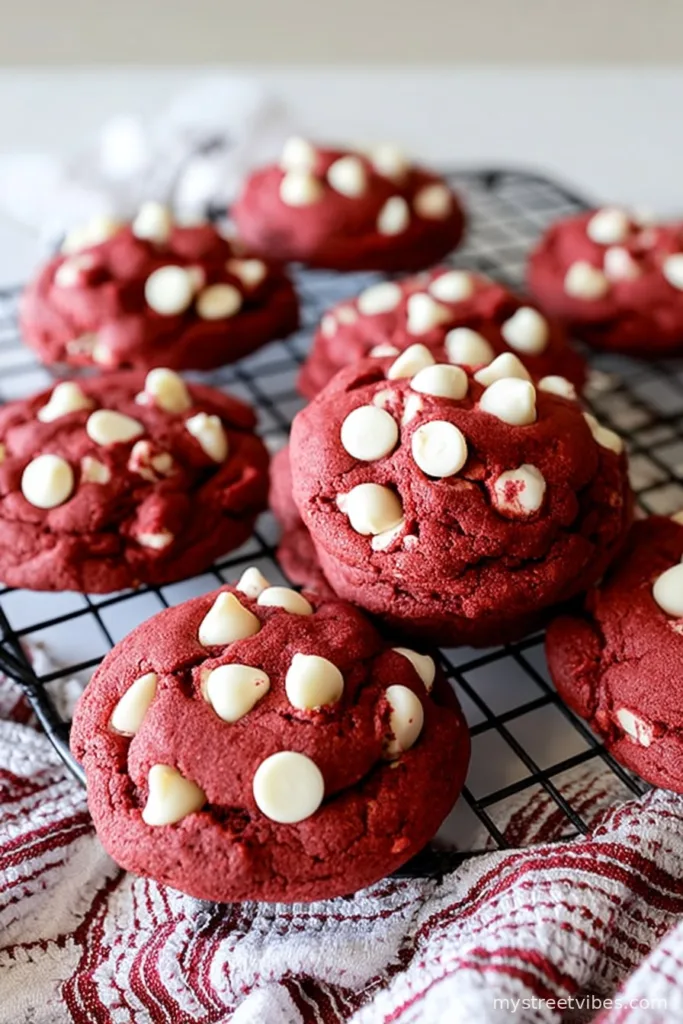
I know, I know—there’s so many cookie recipes out there. But hear me out for a sec. The first time I made these Red Velvet Cookies with White Chocolate Chips, I was procrastinating actual work and figured, why not? (Fun fact: I nearly dyed my kitchen towels red. Learn from my mistakes and keep the food colouring away from fabric, folks.) The smell when they come out of the oven—it’s like a warm hug, and even my grumpy brother starts hovering around the kitchen pretending he’s just passing through. And don’t even get me started on how they look. Those bright crimsons with little white chocolate freckles, honestly, they make store-bought cookies look a bit sad.

Oh, and if you ever feel like people are unimpressed at bake sales, just show up with a batch of these—trust me, you’ll suddenly have five new best friends. Or, as my aunt Sheila so elegantly put it after eating three, “Well, these are a right treat!”
Why You’ll Wanna Keep This Recipe Handy
I make these when I need to bribe my family into doing chores (works better than cash sometimes!) and when I’m missing home a bit, especially during winters here in Canada. My family goes wild for them because they’re chewy on the inside, crispy on the edges and those white chocolate chips melt into little sweet pools. One time, my timer broke and half the batch was slightly burnt—not ideal, but oddly, they sort of loved the crunchier ones. Go figure!
Oh, and the dough is a gorgeous red, which makes baking them feel a bit fancier than your usual chocolate chip fare. Plus, you don’t need fancy ingredients—unless you count red food colouring, which I forget to buy at least half the time. No one’s perfect; just use cocoa powder and call it a ‘rustic’ cookie if you’re in a jam.
Here’s What You’ll Need (And What You Can Swap)
- 2 cups all-purpose flour (I sometimes use spelt flour if I’m feeling healthy, but honestly, plain works best)
- 2 tbsp unsweetened cocoa powder (Grandma insisted on Dutch processed, but I’ve used basic supermarket stuff—no complaints)
- 1 tsp baking soda
- 1/2 tsp salt
- 1/2 cup unsalted butter, softened (I’ve tried margarine in a pinch; softer but a little less rich)
- 3/4 cup brown sugar, packed
- 1/4 cup white sugar (you can just use all brown sugar, to be honest—I do when I run out)
- 1 large egg
- 1 tbsp milk
- 2 tsp vanilla extract
- 1 tbsp red food colouring (liquid or gel) (I’ve left it out before; cookies go brown but still taste fab)
- 1 1/3 cups white chocolate chips (Chunks or chopped up white chocolate bars do the job too. Even mixed milk and white if I’m almost out!)
Here’s How I Whip Them Up (Or Try To!)
- First, get your oven heating to 350°F (or 175°C, if you’re fancy). Line a big baking tray with parchment. Oh, or just butter it if you’re all out of parchment like I always am.
- In a big bowl, whisk the flour, cocoa, baking soda, and salt. It’ll go everywhere if you rush this or, in my case, if the dog bumps your elbow while you whisk (he’s a menace).
- Elsewhere, cream butter, sugars together till fluffy. Just use a fork if your mixer is missing or, you know, buried behind the blender you never use. (This is where I sneak a taste. The dough is magic even unbaked.)
- Drop in the egg, milk, vanilla, and all that beautiful red food colouring. Beat it until it’s smooth. Don’t sweat if it still looks a bit streaky, the dry stuff will fix it up in the next step.
- Chuck in the dry ingredients and stir until almost combined—seriously, stop just before it looks fully mixed. Overmixing turns things tough; I learned that one the hard way.
- Fold in all those white choc chips (no shame if you nibble a few. Actually, inevitable.)
- Scoop out heaping tablespoons onto your tray, leaving space for the magic to happen (by which I mean, for them to spread). You might get 18 to 22 depending how big you go.
- Bake 9-11 minutes—keep a close eye, they go from red velvet dream to hard hockey puck quickly. Sides should be set but middles still look a wee bit underdone. Trust me, they’ll finish as they cool. Always do.
- Let ‘em sit on the tray about 5 min (I know, the worst part—the waiting), then move to a wire rack to cool. If you’ve no wire rack, just move them to a spare plate. No judgement here.
Notes from My Not-So-Perfect Test Kitchen
- Chilling the dough helps if your kitchen’s hot. But honestly, I’m rarely that patient. They spread more but still taste cracking.
- Once tried doubling the cocoa for ‘more chocolatey-ness’…but, it drowned out the whole red velvet vibe. Not worth it—just embrace the subtlety.
- If your red food colouring is weak (the cheap stuff at the grocery, cough cough), use a bit extra to avoid pale, sad-looking cookies.
Variations, For When You’re Feeling Adventurous
- Chopped pecans? Oh, absolutely. Adds a nutty crunch (my dad thinks it’s wild but he’s wrong).
- Dark chocolate chips instead of white for a twist—my cousin prefers this, says it’s ‘more grown up,’ but I like the classic better.
- Tried putting in a pinch of cinnamon once—honestly… it fought with the red velvet thing. Wouldn’t do it again, but you might like experimenting.

Do You Really Need Fancy Equipment?
An electric mixer is helpful, but honestly, elbow grease and a wooden spoon do just fine if you don’t mind a mini workout. I once shaped the cookies with a soup spoon cause my cookie scoop was AWOL—messier but worked. No wire rack? Just slide the cookies onto a spare chopping board, easy as pie.
Storing the Cookies (If They Last, Ha!)
They’ll keep in a tin or airtight box 3 to 4 days. But if I’m honest, they’ve only ever stuck around for a day and a half max in my house (college students are relentless). If you actually want to keep some for breakfast, tuck a few away before everyone else discovers them. You can freeze the dough balls and bake straight form the freezer—add an extra minute or two.
How Do I Enjoy Them? Serving Suggestions From My Chaos
With cold milk, always. Or, a scoop of vanilla ice cream on top if it’s someone’s birthday (or, you know, just Tuesday). My mum likes to nibble them with her afternoon tea, insists it’s ‘civilized.’ I like to stack two with a little cream cheese frosting in the middle for a DIY sandwich—sticky, a bit OTT, but so good.
Pro Tips, AKA Ways I’ve Messed Up
- Don’t skimp on letting the cookies cool, as tempting as they smell—take it from me, trying to move them too soon leads to squashed cookie carnage.
- I once forgot the salt—don’t do that. Salt makes the chocolate pop, it’s genuinely not the same without it.
- If you use less sugar than listed, the cookies look beautifully red but lose that rich chewy texture. It’s tempting, but don’t (unless you like them dry, you rebel).
FAQ: Real Questions from Real Folks (Mostly Family)
- Q: Can I use beet juice for the red colour?
Er, technically, yes, but it doesn’t come out as vibrant. Tried it once and they tasted like earthy red velvet, not quite what I wanted. If you’re feeling all-natural, give it a go! - Q: Can I make these without eggs?
Yup! Sub in 1/4 cup applesauce or some flaxseed ‘egg’ (1 tbsp flax with 2.5 tbsp water, leave to get gloopy). Texture is a little softer, but still tasty. - Q: Why did my cookies go flat?
Probably too-warm butter or overbeating the dough. Or maybe you skipped chilling on a hot day. Happened to me last July; still got eaten though. - Q: Can I halve the recipe?
Sure thing. Just use a small egg or about half an egg—(honestly, eyeball it). The maths isn’t exact but it always works out in the end. - Q: Wait… can I double the white choc chips?
I mean… yes? I do, sometimes. No such thing as too many, just maybe they end up more like chocolate clusters with a hint of cookie. But yum either way!
One last totally unrelated thing—has anyone else noticed how red food colouring stains linger for days? If anyone cracks the code for getting it out of countertops, please let me know.
Ingredients
- 1 3/4 cups all-purpose flour
- 1/4 cup unsweetened cocoa powder
- 1 teaspoon baking soda
- 1/2 teaspoon salt
- 1/2 cup unsalted butter, softened
- 3/4 cup granulated sugar
- 1/2 cup brown sugar, packed
- 1 large egg
- 1 tablespoon milk
- 1 1/2 teaspoons vanilla extract
- 1 tablespoon red food coloring
- 1 cup white chocolate chips
Instructions
-
1Preheat oven to 350°F (175°C). Line two baking sheets with parchment paper.
-
2In a medium bowl, whisk together the flour, cocoa powder, baking soda, and salt. Set aside.
-
3In a large bowl, beat the butter, granulated sugar, and brown sugar together until light and fluffy.
-
4Add the egg, milk, vanilla extract, and red food coloring to the butter mixture and beat until well combined.
-
5Gradually add the dry ingredients to the wet mixture and mix until just combined. Fold in the white chocolate chips.
-
6Scoop tablespoon-sized amounts of dough onto the prepared baking sheets, spacing them about 2 inches apart. Bake for 10-12 minutes until the edges are set. Cool on pans for a few minutes, then transfer to a wire rack to cool completely.
CLICK FOR NUTRITION INFO
↑
Approximate Information for One Serving
Serving Size:
1 serving
Calories:
150 caloriescal
Protein:
2gg
Fat:
7gg
Saturated Fat:
0g
Trans Fat:
0g
Cholesterol:
0mg
Sodium:
0mg
Potassium:
0mg
Total Carbs:
21gg
Fiber:
0g
Sugar:
0g
Net Carbs:
0g
Vitamin A:
0
Vitamin C:
0mg
Calcium:
0mg
Iron:
0mg
Nutrition Disclaimers
Number of total servings shown is approximate. Actual number of servings will depend on your preferred portion sizes.
Nutritional values shown are general guidelines and reflect information for 1 serving using the ingredients listed, not including any optional ingredients. Actual macros may vary slightly depending on specific brands and types of ingredients used.
To determine the weight of one serving, prepare the recipe as instructed. Weigh the finished recipe, then divide the weight of the finished recipe (not including the weight of the container the food is in) by the desired number of servings. Result will be the weight of one serving.
Did you make this recipe?
Please consider Pinning it!!