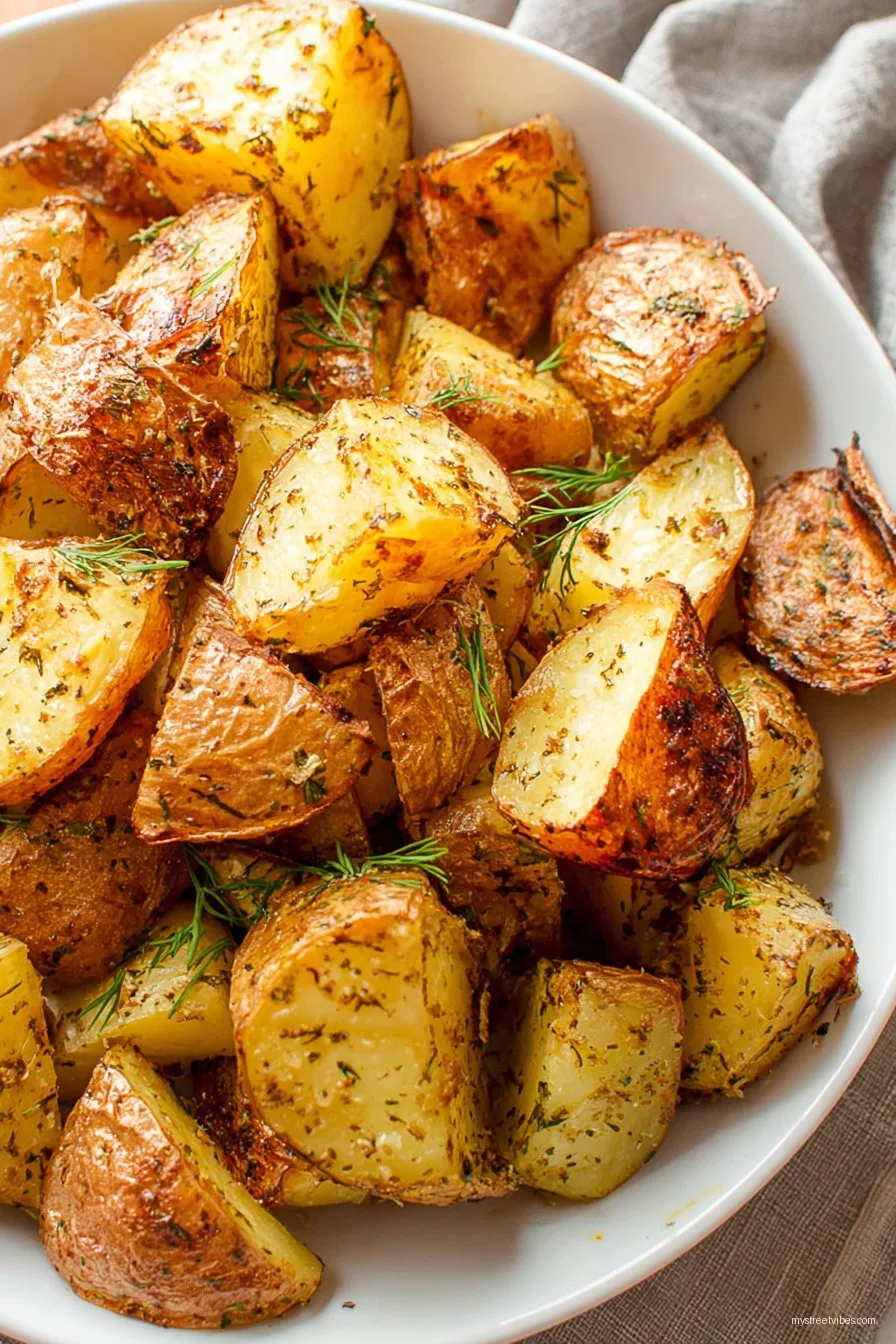
If we are being honest, I started making these on a rainy Sunday when everyone was a bit hangry and the chicken was taking its sweet time. I tossed some Yukon Golds with olive oil, flung them onto a hot sheet pan, and hoped for the best. They turned out so crisp that my brother stood at the counter and ate them straight off the pan. No plate. I did not even scold him, which tells you everything. And now, every time I smell that toasty potato scent, I remember that cozy afternoon when the windows fogged up and the dog hovered like a tiny potato thief.
Why youll love this, at least I think you will
I make this when I need a reliable side that feels a bit fancy without fuss. My family goes a little wild for the crunchy edges and that creamy middle, and I do too. The potatoes are forgiving, which is good because I am not always. If you have ever fought with a pan of pale potatoes that refuse to brown, I have been there and muttered at them. This method fixed it for me, mostly because we use high heat and give them space to breathe. Also, salty, roasty bits are just cheerful food, right
(Small confession I used to drown them in too much oil because more must be better, yes No. Actually, I find it works better if you use just enough to gloss them.)
What you need, plus the swaps I actually use
- Yukon Gold potatoes 1.5 pounds about 700 g. I love their buttery vibe. If you only have russets, peel them and it still works. Red potatoes work too, they just get a different kind of crisp.
- Olive oil 3 tablespoons. If you are out, melted butter or avocado oil are grand. My grandmother always insisted on a certain olive oil brand, but honestly any decent one is fine.
- Kosher salt 1.25 teaspoons. Table salt works, use a bit less. Flaky salt at the end is dreamy.
- Black pepper a generous few grinds. White pepper if you like it more mellow.
- Garlic 2 cloves minced, optional. I sometimes use 1 teaspoon garlic powder when I am in a hurry.
- Fresh herbs a handful of chopped parsley or rosemary. Dried thyme is handy too.
- Vinegar a splash of apple cider or malt at the end optional but nice.
Okay lets cook these potatoes
- Heat the oven to 450 F 230 C and put a sturdy sheet pan inside to preheat. The hot pan helps with that instant sizzle. I know I just said sturdy, but if you only have a thinner pan it will still work just watch for quicker browning.
- Scrub the potatoes. Peel if you like. I usually leave skins on for texture and because I cannot be bothered on weeknights.
- Cut into chunky, even pieces about 1.5 inch. Not fussy, just roughly the same so they cook together.
- Parboil optional but recommended. Cover potatoes with cold water in a pot, add 1 teaspoon salt, boil 6 to 7 minutes until edges look a bit fuzzy. Drain well and let steam off for 2 minutes. This is where I usually sneak a taste.
- Rough them up. Toss the hot potatoes in a bowl and shake gently so the surfaces get a little starchy. Not mashed, just scuffed. Do not worry if it looks a bit weird at this stage it always does.
- Add 3 tablespoons olive oil, the kosher salt, and pepper. If using garlic, add it now for mellow flavor or toss it in halfway through for more punch.
- Carefully pull the hot sheet pan from the oven, drizzle a teaspoon of oil on it, then tip the potatoes onto the pan. Listen for the tiny applause.
- Roast 20 minutes. Flip with a thin spatula to reveal the browning, then roast 15 to 20 minutes more until deeply golden and crisp on the edges.
- Toss with herbs and a tiny splash of vinegar if you like that bright finish. Taste, then add a pinch more salt if needed. On second thought, add a pinch anyway.
Serve straight away, maybe with a lick of mayo or a dollop of sour cream and chives, which is a bit extra and completely worth it.
Notes from the messy middle
- If your potatoes will not brown, the pan might be crowded. Give them space like little sunbathers.
- Oil matters but not that much. I tested extra virgin, light olive, and avocado. All worked. Butter alone browned fastest but needed a splash of oil to prevent scorching.
- I thought convection would dry them out, but actually it makes them even crisper. Reduce time a smidge and keep an eye.
- Weird digression I once measured a handful of parsley out of curiosity. It was 7 grams, which tells you the level of fun I am at on a Friday night.
Variations I have tried so you do not have to
- Lemony herb version add lemon zest and parsley at the end. Zippy and bright.
- Smoky paprika version add 1 teaspoon sweet paprika and a pinch of cayenne with the oil. Lovely with grilled fish.
- Cheesy finish toss hot potatoes with 30 g finely grated Parm so it melts into frico like lace. Yes please.
- The one that did not work cold butter tossed on at the start. It clumped, melted weirdly, and the bottoms burned. Pass.
Equipment that helps but you can improvise
- Heavy sheet pan or cast iron skillet for best browning. I call it essential, though I have used a glass baking dish in a pinch and it was fine, just slower.
- Thin metal spatula to flip without tearing. A table knife works if you are careful. Ask me how I know.
- Rimmed cooling rack if you want to rest potatoes briefly so steam escapes. Not required.
If you like going down rabbit holes, this deep dive on roast potatoes is great reading Serious Eats method. For oven basics, I often point friends to The Kitchn oven guide. And if your pans are warping a bit, this piece helped me choose a sturdier one King Arthur pan tips.
Storage, reheating, leftovers
Fridge keep leftovers in a sealed container for up to 3 days, though honestly, in my house it never lasts more than a day. I think the flavor is even better the next day, texture slightly different but in a good way.
Reheat in a hot oven 425 F for 8 to 10 minutes until re crisp. Air fryer 400 F for about 5 minutes. Microwave works if you must, they will be soft but still tasty.
How I like to serve them
With roast chicken and a green salad is the classic. Also excellent with fried eggs for a cozy breakfast for dinner. My family tradition is a little bowl of malt vinegar on the table and everyone has a cheeky dunk. If you have gravy hanging about, well, say no more.
Little pro tips I learned the hard way
- I once tried rushing the parboil and regretted it because the centers stayed a bit waxy. Give them that 6 to 7 minutes.
- I once skipped preheating the pan and everything stuck like glue. Warm pan, then potatoes. Not the other way round.
- Salt early and late. Early seasons the inside, late wakes up the outside. When I only salted at the end, the flavor tasted shy.
FAQ from my inbox and the group chat
Do I have to parboil
No, you can go straight to roasting, and they will still be good. But parboiling gives you that fluffy interior and the starchy rub that crisps beautifully. On busy nights I skip it, then roast a bit longer and flip twice.
Can I use sweet potatoes
You can, but they behave differently. Lower heat 425 F and expect more caramel than crisp. Still tasty.
What if I only have table salt
Use about half the amount listed, then taste and adjust. It dissolves faster, so go gently.
Help, mine stuck to the pan
Give them another minute before flipping they probably needed more browning time. Also, preheat the pan and do not move them too soon. Pat the potatoes dry after draining so moisture does not glue them down.
Can I prep these ahead
Yes. Parboil, drain, and let them cool on a tray. Toss with oil and roast later. I keep them in the fridge up to 24 hours. If they look a little dry, add a teaspoon of oil before roasting.
Why Yukon Golds
They strike that sweet spot between creamy and structured. They brown nicely and do not fall apart as easily. Plus, they taste buttery all on their own, which is a win.
Is parchment okay
It is fine, though bare metal browns better in my kitchen. If using parchment, go for the last half of cooking so it does not darken too much.
One last note because someone will ask yes, you can add onions. Toss in thick slices for the last 20 minutes and they turn sweet and jammy. I learned that trick form my neighbor who always wafts delicious smells down the hall.

Ingredients
- 2 pounds Yukon Gold potatoes, scrubbed and cut into 1-inch cubes
- 3 tablespoons olive oil
- 1 1/2 teaspoons kosher salt
- 1/2 teaspoon freshly ground black pepper
- 1 teaspoon garlic powder
- 1 teaspoon dried rosemary
- 1 teaspoon dried thyme
- 2 tablespoons fresh parsley, chopped (optional, for garnish)
Instructions
-
1Preheat the oven to 425°F (220°C). Line a large baking sheet with parchment paper or foil.
-
2Place the cubed Yukon Gold potatoes in a large bowl. Drizzle with olive oil and toss to coat evenly.
-
3Add kosher salt, black pepper, garlic powder, rosemary, and thyme to the potatoes. Toss again until potatoes are well coated with seasonings.
-
4Spread the potatoes in a single layer on the prepared baking sheet, making sure they are not crowded.
-
5Roast in the preheated oven for 30-35 minutes, flipping potatoes halfway through, until golden brown and crispy on the edges.
-
6Remove from the oven and sprinkle with fresh parsley, if desired. Serve hot.
CLICK FOR NUTRITION INFO
↑
Approximate Information for One Serving
Serving Size:
1 serving
Calories:
210cal
Protein:
4 gg
Fat:
7 gg
Saturated Fat:
0g
Trans Fat:
0g
Cholesterol:
0mg
Sodium:
0mg
Potassium:
0mg
Total Carbs:
34 gg
Fiber:
0g
Sugar:
0g
Net Carbs:
0g
Vitamin A:
0
Vitamin C:
0mg
Calcium:
0mg
Iron:
0mg
Nutrition Disclaimers
Number of total servings shown is approximate. Actual number of servings will depend on your preferred portion sizes.
Nutritional values shown are general guidelines and reflect information for 1 serving using the ingredients listed, not including any optional ingredients. Actual macros may vary slightly depending on specific brands and types of ingredients used.
To determine the weight of one serving, prepare the recipe as instructed. Weigh the finished recipe, then divide the weight of the finished recipe (not including the weight of the container the food is in) by the desired number of servings. Result will be the weight of one serving.
Did you make this recipe?
Please consider Pinning it!!