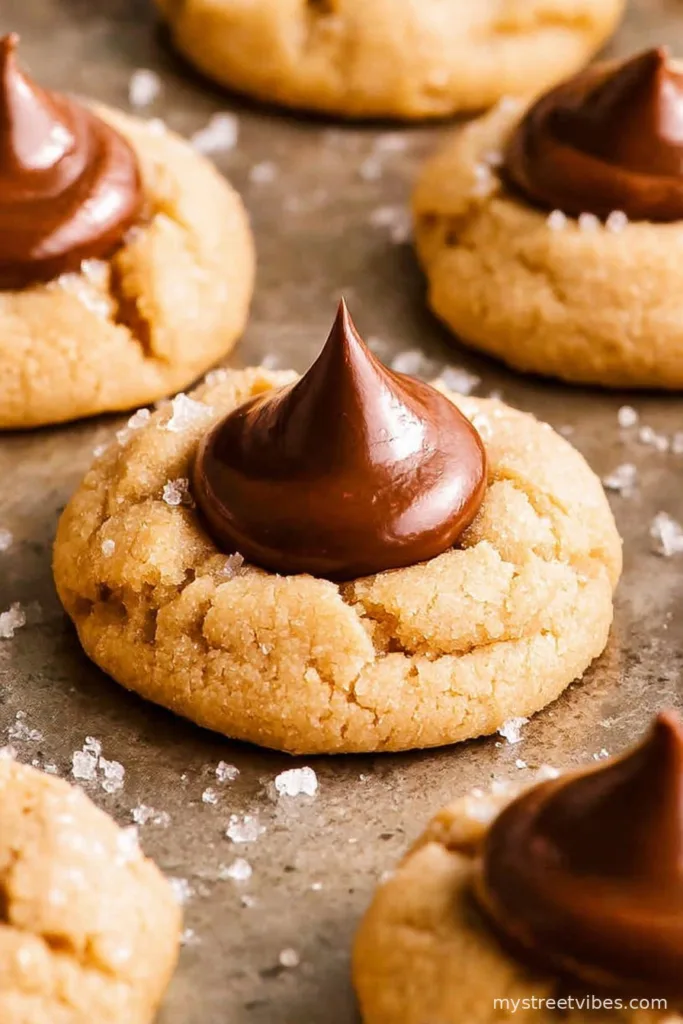
If You’ve Never Made Peanut Butter Blossoms, You’re In for a Treat
I remember the first time I made these little beauties—it was for a potluck at Aunt Pat’s place, and honestly, I just wanted to bring something that looked impressive (but, you know, wasn’t going to turn into a kitchen disaster). These Peanut Butter Blossoms did the trick. Plus, that moment when you press a chocolate kiss into a warm peanut butter cookie? Magical. It gets a little melty and, well, you know you’ve done something right. I’ve probably made these forty times since, and I still sometimes burn a tray. Happens to the best of us, right?
Why I Always Come Back to This Recipe
I make these blossoms when I need a surefire crowd-pleaser. My family goes bonkers for them—especially my little brother, who claims (loudly, as usual) he could eat a whole batch in one sitting. To be fair, so could I if he’d just leave some for the rest of us. These have rescued me from countless last-minute dessert emergencies, and—just between us—they’re the only cookie my friend Tara never manages to mess up. I used to be a bit annoyed about rolling them in sugar (it sticks everywhere!), but now I let the kids do it, then just sweep up later.
What You’ll Need (Plus, the Stuff I Swap In a Pinch)
- 1/2 cup (or a generous scoop) unsalted butter—softened. I’ve used salted in a pinch and just nixed the extra salt.
- 1/2 cup creamy peanut butter. My grandma swore by Skippy, but honestly, Aldi brand works fine too.
- 1/2 cup brown sugar (packed) and 1/4 cup white sugar, though sometimes I just use whatever’s in the jar if I’m low.
- 1 large egg (room temp… in theory, but I never remember to set it out early).
- 1 teaspoon vanilla—don’t stress if you’re a smidge over, that’s never hurt anyone.
- 1 3/4 cups all-purpose flour. I’ve gone as low as 1 1/2 cups and everything still *mostly* worked out.
- 1 teaspoon baking soda, 1/2 teaspoon salt.
- About 2 tablespoons extra sugar, for rolling. I’ve skipped it a couple times if I’m out and, eh, no one complained til I pointed it out.
- About 24 milk chocolate Hershey’s Kisses (unwrapped! Did I once bake them in foil wrappers? Maybe.)
How I Actually Make These (Not Always As Written!)
- Preheat the oven to 350°F (or 175°C if you’re going proper metric). Line a cookie sheet with parchment—greasing works too but, ugh, more washing up.
- In a big bowl, cream together the butter, both sugars, and peanut butter till it’s light and kinda fluffy. You can use a stand mixer, but honestly, I usually grab the hand-held. Once I tried a wooden spoon; my arm wasn’t too happy about that.
- Beat in the egg and vanilla. The mixture gets a bit weird looking here. That’s normal, just keep going.
- Dump in the flour, baking soda, and salt. Give it a gentle mix (start slow or flour will go everywhere—yep, learned the hard way). Don’t overdo it; stop right when it pulls together.
- Roll the dough into walnut-sized balls or, if you’re like me, just about the size of a ping pong ball (I’m not winning any awards for uniformity here). Roll each ball in sugar. Honestly, this is when the dough is just begging you to sneak a taste. Try it. You’re the chef.
- Bake for 9 to 11 minutes, till the edges are set but the centers still seem a little soft. Actually, I find 10 minutes is my sweet spot. If they start browning—too long!
- Take them out and immediately press a chocolate kiss into the middle of each. It’ll crack a bit; that’s part of the charm. Then, let them cool a good five minutes before moving to a rack—if you try too soon, they’re going to fall apart like a bad soufflé.
Some Notes I’ve Discovered (Usually the Hard Way)
- If your dough feels dry and crumbly—add a tablespoon of milk. Don’t ask me how I found out (OK, the hard way, once at 11pm).
- You can freeze the unbaked dough balls, but sometimes they crack weirdly in the oven. No big deal. Just say they’re “rustic”.
- Don’t stress about perfect circles. Life’s too short; cookies taste the same.
So I Tried These Variations (Mixed Results, Honestly)
- Swapped in dark chocolate kisses—so good. Like, I might actually prefer this. Don’t quote me.
- GF flour? Actually, not bad—just use a 1-to-1 baking blend. Texture’s a bit different but I’ll take it.
- One time I tried sticking a mini peanut butter cup on top. Tasted amazing… but looked a bit like a spaceship crash landing. Not my prettiest batch.
- Crunchy peanut butter—kind of fun, but my cousin said it “felt weird”.
Tools You’ll Need (Or Not…)
- Baking sheet (or whatever flat tray you’ve got, even a pizza pan will do in a pinch)
- Mixing bowl, obviously
- Electric mixer makes life easier, but I’ve survived without—elbow grease works. Arm day!
- Parchment paper—or, ha, grab some butter and flour for the pan

How to Store Them (If You Even Need To)
Keep your blossoms in an airtight container at room temp. They’re best in the first couple days, but I think the chocolate-center gets fudgier on day two (if they last that long, which in my house is… rare). I’ve tossed them in the freezer for “future me,” and they survive well—just let them thaw before snacking, unless you love cracking a tooth!
Serving ‘Em Up, My Way
Honestly? I like them with a giant mug of coffee (don’t tell anyone it’s decaf—some battles aren’t worth fighting). Or with milk for the classic combo. At Christmas my aunt sets them on those old-fashioned cookie plates with about six other kinds, but I always go for the blossoms first. Once, we used them as cupcake toppers, and that was…a bit much, frankly, but it made my nephew grin like a loon.
Things I’ve Learned (Usually the Hard Way, Oops)
- Chilling the dough helps keep them from spreading too much, but I forget half the time and they’re still good.
- If you try to move them while hot, they kind of… collapse. Been there!
- Press the kisses in right away. I got distracted once, and the chocolate didn’t stick properly. Lesson learned.
- Don’t substitute with natural peanut butter unless you like super crumbly cookies (but if you do, power to ya).
Questions People Actually Ask Me (Or Text Me At Odd Hours)
- Can I use any kind of chocolate?—Sure, experiment! I’ve tried dark, white, even caramel-filled. The only one I didn’t totally love was mint, but maybe that’s just me.
- Do I really have to chill the dough?—Ah, only if you want a firmer cookie. Most days, I skip it and nobody complains.
- Can I make these vegan?—You probably could! Try swapping in a flax egg and vegan butter. Haven’t done it myself, but my neighbor did and raved. (If you’re looking for a guide, Minimalist Baker has a solid vegan peanut butter cookie recipe: here). Kisses may need to be swapped out.
- How do you keep them soft?—Toss a slice of bread in the container. No joke, it works. (And if you want science on that, the folks at King Arthur Baking have an explainer: here.)
- What if I don’t have a proper mixer?—Get in there with a sturdy spoon, take a few breaks, and reward yourself with an extra cookie later!
- Why do my cookies crack weirdly?—Could be overbaking, or the dough’s too dry. Honestly, I think the cracks just make them look more homemade (which is code for “I didn’t fuss”).
Alright, that’s (probably) everything I know about Peanut Butter Blossoms. Next time you make ‘em and someone asks for the recipe, let ‘em know you got it form some random friend on the internet with too much peanut butter in the cupboard. Happy baking!

Ingredients
- 1/2 cup unsalted butter, softened
- 3/4 cup creamy peanut butter
- 1/3 cup granulated sugar, plus more for rolling
- 1/3 cup packed light brown sugar
- 1 large egg
- 2 tablespoons milk
- 1 teaspoon vanilla extract
- 1 1/2 cups all-purpose flour
- 1 teaspoon baking soda
- 1/2 teaspoon salt
- 24 milk chocolate kiss candies, unwrapped
Instructions
-
1Preheat oven to 375°F (190°C). Line a baking sheet with parchment paper.
-
2In a large bowl, cream together the butter, peanut butter, granulated sugar, and brown sugar until light and fluffy.
-
3Beat in the egg, milk, and vanilla extract until well combined.
-
4In a separate bowl, whisk together the flour, baking soda, and salt. Gradually add to the peanut butter mixture and mix until just combined.
-
5Shape dough into 1-inch balls and roll in additional granulated sugar. Place on the prepared baking sheet about 2 inches apart.
-
6Bake for 8-10 minutes, or until edges are lightly browned. Immediately press a chocolate kiss into the center of each cookie. Cool on the baking sheet for 2 minutes, then transfer to a wire rack to cool completely.
CLICK FOR NUTRITION INFO
↑
Approximate Information for One Serving
Serving Size:
1 serving
Calories:
130 caloriescal
Protein:
3gg
Fat:
7gg
Saturated Fat:
0g
Trans Fat:
0g
Cholesterol:
0mg
Sodium:
0mg
Potassium:
0mg
Total Carbs:
15gg
Fiber:
0g
Sugar:
0g
Net Carbs:
0g
Vitamin A:
0
Vitamin C:
0mg
Calcium:
0mg
Iron:
0mg
Nutrition Disclaimers
Number of total servings shown is approximate. Actual number of servings will depend on your preferred portion sizes.
Nutritional values shown are general guidelines and reflect information for 1 serving using the ingredients listed, not including any optional ingredients. Actual macros may vary slightly depending on specific brands and types of ingredients used.
To determine the weight of one serving, prepare the recipe as instructed. Weigh the finished recipe, then divide the weight of the finished recipe (not including the weight of the container the food is in) by the desired number of servings. Result will be the weight of one serving.
Did you make this recipe?
Please consider Pinning it!!