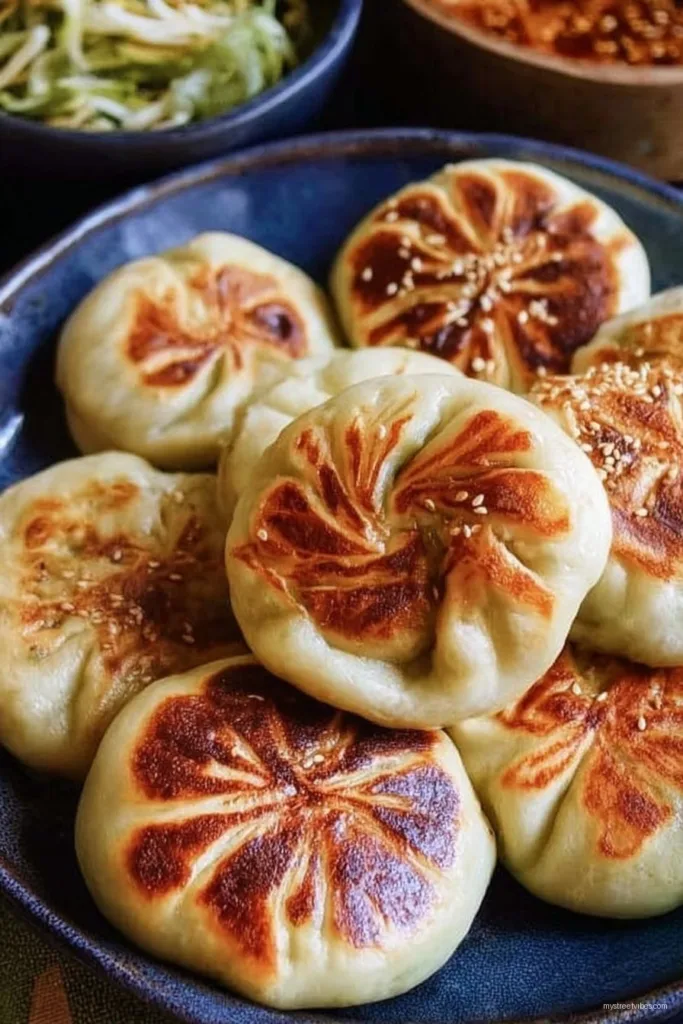
Let Me Tell You About My Obsession With Cabbage and Noodle Buns
Okay, story time. The first time I made these pan-fried cabbage and noodle buns, I was trying to impress my then-roommate (who could smell burnt toast a mile away). She walked in halfway through, looked at my rather questionable dough blobs and said, “Looks… chewy.” But you know what? They turned out golden, crispy, and stuffed with all the good stuff. Now, whenever I’ve got leftover cabbage or sad noodles from last night’s stir fry, I think, “Why not wrap it up and fry it?” Still one of those recipes where you think, “Did I just make a little magic out of fridge scraps?” (Yes, you did!)
Why You’ll Totally Dig This Recipe
I make these whenever it’s chilly out, or I can’t face another basic salad. My family goes absolutely bonkers for them (except for my uncle, but he doesn’t like fun). If you hate scraping burnt gunk off pans—me too—these are friendly to beginner cooks or anyone who’s ever accidentally set a tea towel on fire. For the record, I used to always overstuff my buns and they’d burst open dramatically (tasty, but not the prettiest). Now I just gently squish the filling in. Must be maturity, or at least that’s what I tell myself.
Here’s What You’ll Need (Give or Take)
- 2 cups thinly sliced green cabbage (sometimes I use napa, but honestly whatever’s loitering at the bottom of the crisper is fair game)
- 1 cup cooked noodles (egg noodles are classic, but ramen or even spaghetti works—my grandmother swore by just the broken bits!)
- 2 green onions, finely chopped (or half a yellow onion in a pinch, though you’ll lose some zing)
- 1 tablespoon soy sauce (add more if you’re feeling salty)
- 1 teaspoon sesame oil (skip it if you don’t have any, or add a splash of olive oil instead)
- 1 teaspoon grated ginger (raw or from the jar; I won’t tell)
- Pinch of pepper (white or black, no one’s judging)
- For the dough: 2 cups all-purpose flour, 2/3 cup warm water, and a pinch of salt
- Oil for frying—vegetable or canola, but I’ve even used ghee once (bit fancy, but worked surprisingly well)
How I Usually Throw This Together
- Start with the dough: Dump flour and salt in a big bowl, pour in most of the warm water, and start stirring. When it gets unruly, just use your hands. If it’s too sticky, add a tiny bit more flour (this is where I usually get flour on my nose, somehow). Knead for roughly five minutes until it feels smooth-ish. Not perfect? Doesn’t matter. Rest it under a tea towel for 30 minutes so it chills out.
- Veggie time: While dough rests, cook the cabbage in a skillet (medium heat) with a splash of oil, just until it softens. Toss in green onions, stir for a minute, then dump in the noodles, soy sauce, sesame oil, ginger, and a good grind of pepper. Give it all a toss. Steal a forkful—it’s required (otherwise how do you know if it tastes right?). Remove from heat.
- Make the buns: Divide dough into 8 pieces. Roll out each piece to a circle (a bit smaller than a side plate). Spoon some filling in the middle—more than you’d think, but less than you want. Gather up the sides to seal; pinch together at the top. Don’t stress if one is lumpier than the others. They’re affectionate, not tidy.
- Pan fry!: Heat a slick of oil in a skillet over medium. Place buns seam side down, press them just a tad, and fry 3-4 minutes. (If you peek and they’re more pale than you like, leave ’em another minute.) Flip gently, add a few spoonfuls of water, and slap on a lid—steam for 5 minutes so the inside’s all dreamy. Then take the lid off and let them crisp back up another minute. Done!
Notes You Probably Won’t Find in a Fancy Cookbook
- If you get holes in your dough from overstuffing, just patch them with a bit of dough scrap. Works way better than you’d think.
- The filling is pretty forgiving—I’ve used day-old chow mein, chopped-up leftover pork, or a handful of mushrooms when I was feeling rebellious.
- Not a fan of ginger? Lemon zest is surprisingly nice (I was skeptical, then pleasantly surprised).
What Happens If You Tinker (Like I Did)
- I once tried a sweet-and-spicy version with a drizzle of hoisin and chili crisp—it was outrageous (in a good way).
- Curry powder in the filling = a win. But don’t go wild, like I did the first time. It’s strong. A little is just right.
- One time I tried using gluten-free flour for the dough because my neighbor popped by. It kinda fell apart, but maybe you’ll have better luck or better flour. (Or just grab ready-made wrappers!)
Stuff You Need (And Maybe Don’t)
- A rolling pin (or a wine bottle, or the side of a water glass—I won’t call the kitchen police)
- A non-stick skillet is helpful, but cast iron gets the crispiest bottoms (if you don’t have either, regular pan + a smidge more oil will do in a pinch)
- A lid for your skillet—foil is fine if you’re living that bachelor life
How To Keep ‘Em (But Will You Really Have Leftovers?)
You can store these in the fridge, snug in an airtight container, for up to 3 days—but honestly, in my house, they’re gone after, like, ten minutes. If you ever do have leftovers, they’re pretty good cold. I might even prefer them that way for a midnight snack (don’t judge me). You can also freeze them for later, though they tend to get a bit chewy on the reheat if you aren’t careful.
Serving These the Way I (Probably) Shouldn’t
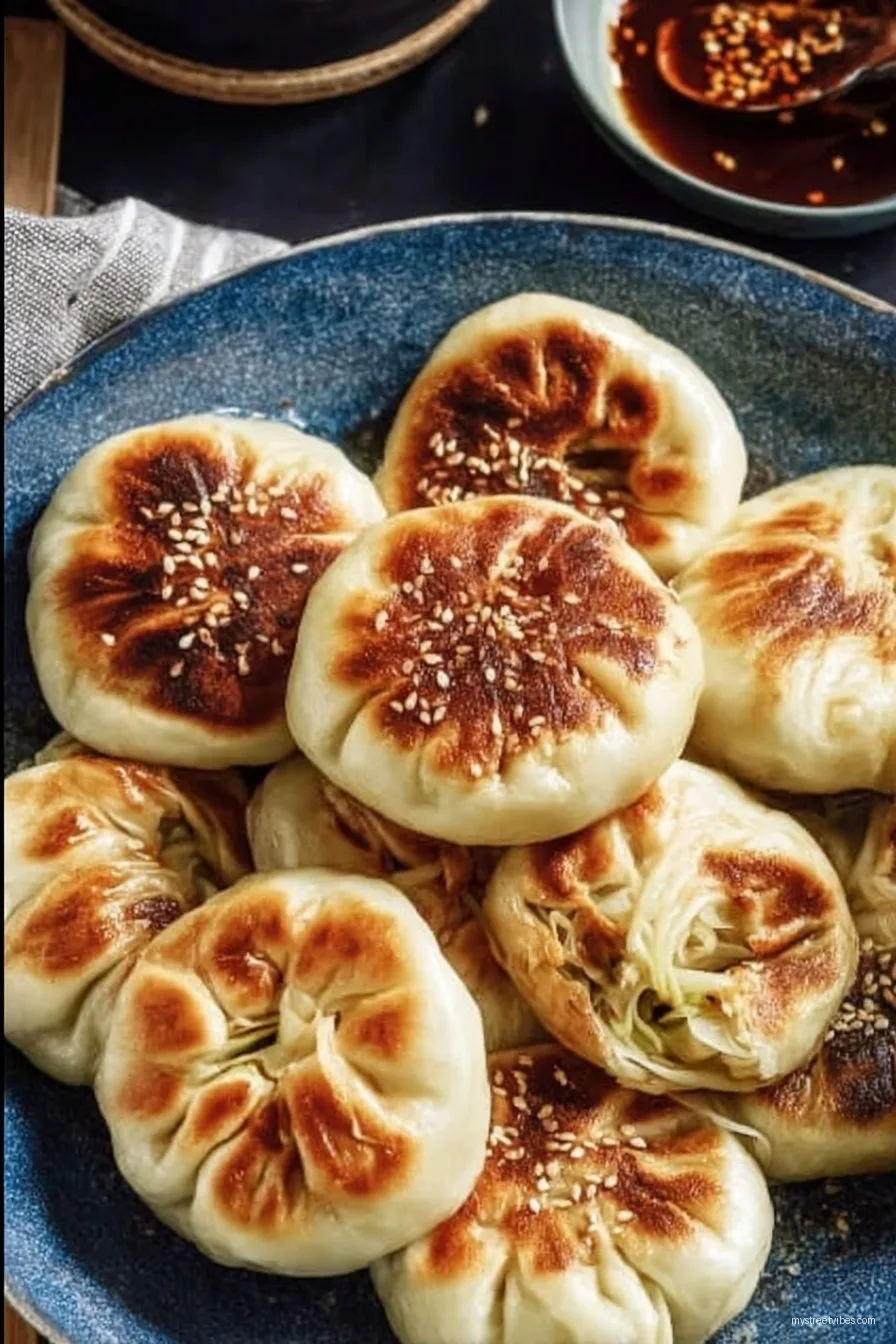
I like to serve these with a tiny saucer of chili oil (I love this homemade version from The Woks of Life) and a sprinkle of scallions. My friend dips them in ketchup. I don’t pretend to understand, but I respect it. Now and then, I throw together a quick cucumber salad (here’s an easy one I use)—very refreshing. If you’re celebrating, I say set them in a circle and fill the middle with pickles, just for dramatic effect.
Pro Tips I Paid For With My Ego
- I once tried cranking the heat to finish faster. Big mistake; the bottoms burn before the tops cook. Medium heat, patience, maybe a podcast.
- Add just enough water when steaming—too much, and you get sad, soggy buns. (Ask me how I know.)
- Actually, I find it works better if you let the buns cool on a rack for a few minutes after frying so they stay crisp. I forget about half the time.
FAQs (Because People Actually Asked Me These!)
Can I make these vegan?
You bet! Just use vegan noodles—some egg noodles aren’t strictly vegan—and check your wrappers if you swap in something store-bought. The filling itself is already planty.
What if I don’t have any cabbage?
I’ve tossed in all sorts of greens: kale, collards, even spinach. Spinach goes a bit mushy, but doesn’t make it inedible. Go with whatever’s on hand.
Do they freeze?
Yup, you can freeze after frying. Reheat in a hot pan, uncovered. The texture isn’t exactly like fresh, but still delish—especially with enough sauce.
Can I bake these instead?
Technically… yes, but they’re not the same. They’re a little dry out of the oven. I once tried air frying—kind of worked, but they needed brushing with oil.
These seem tricky, worth the effort?
I’d say yes, but I’m stubborn. It’s one of those things where the first time is a production; after that, it’s honestly easier than it looks. Plus, people are always impressed—worth it for the bragging rights alone!
Now if you actually made it this far, you deserve a bun (and probably a cup of tea). Happy cooking!

Ingredients
- 2 cups finely shredded cabbage
- 100 g cooked vermicelli noodles, chopped
- 2 green onions, sliced
- 2 cloves garlic, minced
- 1 tablespoon soy sauce
- 1 teaspoon sesame oil
- 1/2 teaspoon ground white pepper
- 8 pieces pre-made bun dough or dumpling wrappers
- 2 tablespoons vegetable oil for frying
- 1/4 teaspoon salt
Instructions
-
1In a large bowl, combine cabbage, chopped noodles, green onions, and garlic. Mix well.
-
2Add soy sauce, sesame oil, white pepper, and salt to the mixture. Stir until evenly seasoned.
-
3Place a spoonful of the filling in the center of each bun dough or wrapper. Pinch to seal and shape into buns.
-
4Heat vegetable oil in a large nonstick skillet over medium heat. Arrange buns seam-side down and fry until golden brown, about 3–4 minutes.
-
5Add a splash of water to the pan, cover, and steam for 5–7 minutes or until buns are cooked through. Remove lid and continue frying until bottoms are crisp.
-
6Serve hot with your favorite dipping sauce.
CLICK FOR NUTRITION INFO
↑
Approximate Information for One Serving
Serving Size:
1 serving
Calories:
180cal
Protein:
5 gg
Fat:
6 gg
Saturated Fat:
0g
Trans Fat:
0g
Cholesterol:
0mg
Sodium:
0mg
Potassium:
0mg
Total Carbs:
28 gg
Fiber:
0g
Sugar:
0g
Net Carbs:
0g
Vitamin A:
0
Vitamin C:
0mg
Calcium:
0mg
Iron:
0mg
Nutrition Disclaimers
Number of total servings shown is approximate. Actual number of servings will depend on your preferred portion sizes.
Nutritional values shown are general guidelines and reflect information for 1 serving using the ingredients listed, not including any optional ingredients. Actual macros may vary slightly depending on specific brands and types of ingredients used.
To determine the weight of one serving, prepare the recipe as instructed. Weigh the finished recipe, then divide the weight of the finished recipe (not including the weight of the container the food is in) by the desired number of servings. Result will be the weight of one serving.
Did you make this recipe?
Please consider Pinning it!!