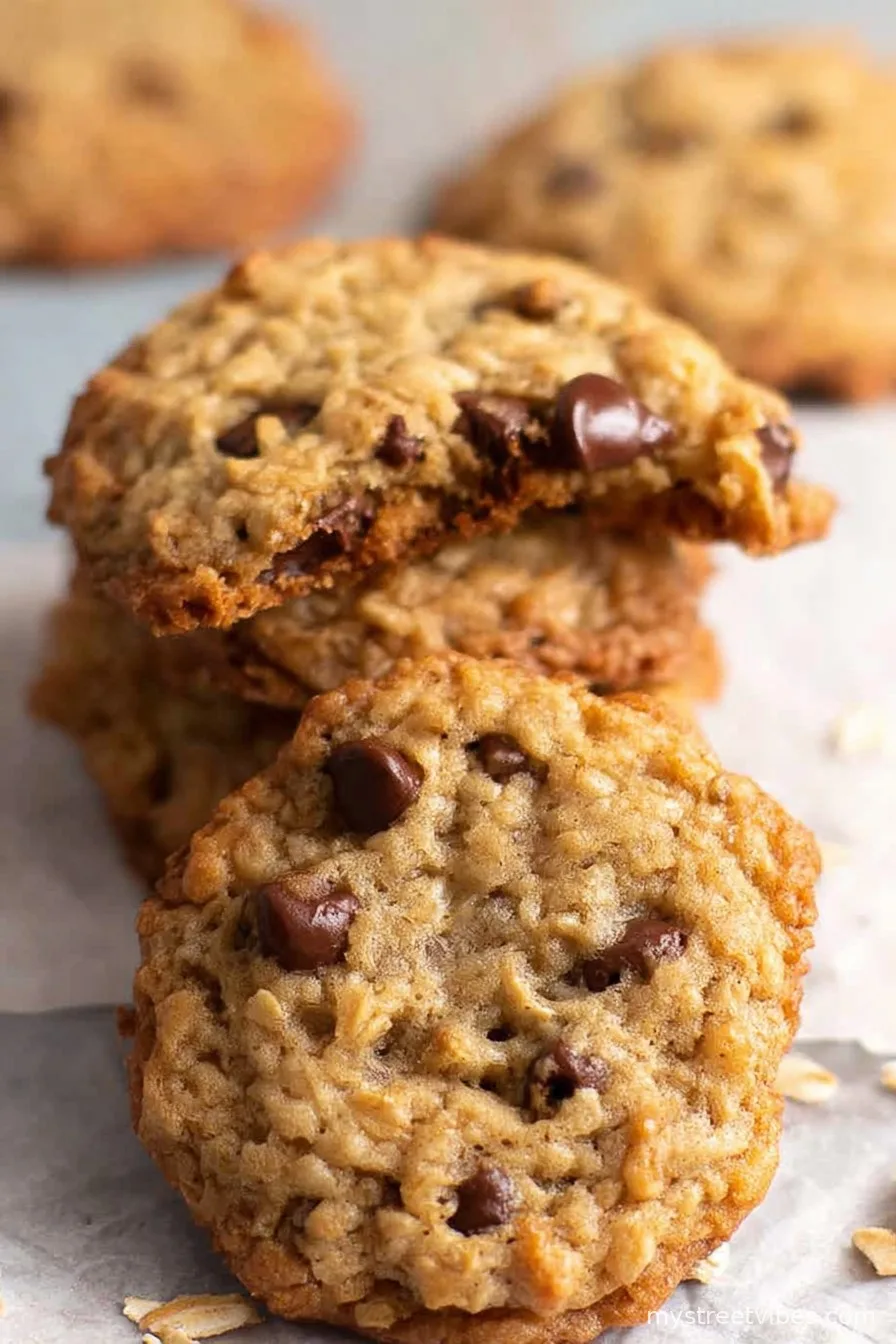
Let Me Tell You About These Cookies (Grab a Cup!)
Alright, so every time I bake oatmeal chocolate chip cookies, I think of that time my cousin tried to swap the chocolate chips for raisins at a family thing. My uncle still brings it up years later; bit of a cookie trauma, you know? But honestly, these are the cookies that remind me of movie nights growing up—except now I’m the grown-up sneaking spoonfuls of dough. Does that make me the cookie monster or just efficient?
Why I Keep Making These (Even When There’s Dishes Piling Up)
I make these when I’ve had a long day or just need to smell something baking (which, weirdly, calms the chaos). My family goes bananas for them—especially my kid, who will literally stand by the oven counting down minutes. And seriously, they’re the only cookies my neighbor actually returns the plate for, so that’s saying something. The occasional frustration? Well, sometimes the dough seems way too sticky, but if you just trust the process… it works out. Usually. (Once I added extra flour and ended up with sad little rocks, so don’t do that.)
The Stuff You’ll Need (Substitutions, Digs at Grandma, Etcetera)
- 1 cup (225g) unsalted butter, at room temp (I sometimes microwave it for a sec or two. Not too long, or you get soup.)
- 3/4 cup brown sugar. Dark or light, doesn’t matter much. My grandmother swore by Muscovado, but I’ve only had it once!
- 1/2 cup granulated sugar (heck, I’ve used coconut sugar instead and it was still good)
- 2 medium eggs
- 2 tsp vanilla extract (The artificial stuff works if you’re in a pinch…don’t overthink it!)
- 1 1/2 cups plain flour (all-purpose)
- 1 tsp baking soda
- 1/2 tsp salt (I sometimes use a big pinch—sea salt if I’m feeling fancy)
- 3 cups rolled oats (Quick oats also work, but you lose a bit of chewiness)
- 1 1/2 cups chocolate chips (or, let’s be honest, whatever chocolate is in the cupboard. Chop up a regular bar? Sure.)
- Optional: handful of chopped pecans or walnuts (toasted is magic, but raw is fine)
How to Go About It (With Honest Interruptions)
- Preheat your oven to 350F (175C). Line a baking sheet with parchment, unless you ran out, then just grease it.
- Cream the butter and sugars together in a big bowl. I use a mixer if it’s clean, but a sturdy wooden spoon works (and counts as arm day?).
- Add the eggs and vanilla; keep mixing. This is usually where my kid tries to taste the batter—can’t say I blame him. If it splits a bit, don’t sweat, it comes together later.
- In a smaller bowl, chuck in the flour, baking soda, and salt. Give it a rough stir (or just sprinkle on top of the wet stuff, I’ve done both).
- Combine your dry ingredients with the wet; I do this in two goes, don’t dump it all at once unless you want a face-full of flour.
- Stir in the oats. The dough gets thick now—if you’re doing it by hand, consider a tea break. Then toss in your chocolate chips and nuts if you fancy.
- Scoop out blobs onto your sheet. I go for golf ball sized, but you do you.
- Bake for about 11-13 minutes. The edges should look golden but the middle might look a tad underdone—it finishes setting as it cools!
- Let them rest on the tray for a bit (I always try to move them too soon, and they fall apart everywhere. Learn from my chaos.)
- Eat one slightly warm. Non-negotiable step, in my book.
Notes Form Experience (And, Er, Errors)
- If you overbake even a smidge, these can get real crispy. Not bad, just not as chewy. Actually, I find it works better if you pull them out a minute early.
- Don’t stress if the dough seems sticky. It’ll hold together, promise. Chill for an hour if you really want perfect rounds, though I rarely plan ahead that far.
- Adding nuts makes them more “grown up” but sometimes I skip it if all I want is nostalgic, kid-style cookies.
Things I’ve Tried (And Not All Were Delish)
- Peanut Butter: I swapped out part of the butter for peanut butter once—pretty darn tasty (though denser). Or, well, maybe a touch too rich if you ask my sister.
- Coconut: A handful of desiccated coconut is nice, adds something summery.
- Raisins: I know some people love them, but for me? Nope. You may like it though (no judgment, promise!)
Do You Actually Need Fancy Equipment?
I mean, a good mixer makes things faster, but half the time I just use a wooden spoon and elbow grease. No cookie scoop? Two spoons work. Parchment paper’s great (I’ve even reused it), but foil plus butter doesn’t totally ruin things, either.

How I (Try to) Store Them
Supposedly, they keep well in a cookie tin or airtight container for about five days. Honestly, in my house it never lasts more than a day—two if I hide them behind the cereal boxes. If you want them super fresh, you can freeze the dough in balls and bake from frozen; just tack on a minute or two to the bake time. King Arthur’s got a good how-to if you want real details.
How We Serve Them Around Here
Personally, nothing beats a warm cookie with cold milk (classic, right?). But—odd digression—my aunt likes to crumble hers over ice cream, which sounds fancy but is actually genius. Sometimes I tuck one in a packed lunch, though by lunch it’s just crumbs. Oh well.
How Not to Mess It Up (A.K.A. Tough Lessons)
- I once tried to speed up by raising the oven temp—don’t. The cookies burn at the edges and stay gooey inside (and not the good kind of gooey).
- If you skip softening the butter, the sugar never creams right. Just nuke it gently if you forget—just not to melting point.
- Don’t double the salt ‘for more flavor’. Did it once, regretted it. Trust the process.
FAQ: Stuff I Keep Getting Asked (And My Two Cents)
- Can I make these gluten free?
Yup! I’ve used 1:1 gluten free flour and GF oats. Just don’t expect quite the same chewy vibe. - Can I halve or double the recipe?
Totally. Halving works fine, except eggs—I usually just whisk then eyeball half. For doubling, well, just make sure your bowl’s big enough (voice of experience!). - My cookies spread too much. Am I doomed?
Nope. Chill the dough for a bit or add a spoonful more flour. Or, just embrace the giant cookie pancake—it happens. - What’s the best chocolate to use?
Honestly, sometimes I chop up a dark chocolate bar. If you want brand specifics, check this pretty nerdy chocolate chip review—but supermarket brands do nicely, too. - Is the raw dough safe to eat?
So, health experts frown on raw eggs. But I sometimes sneak a bit anyway. Don’t tell anyone.
And just a little side note—if you’re ever short a few chocolate chips (it happens), a handful of broken pretzels or a swirl of caramel makes for a happy accident. I’ve tried both and survived.
If you need more oat inspiration, BBC Good Food has a killer collection of oat recipes that might save the day when your cookie craving runs out.
So that’s my oatmeal chocolate chip cookie routine—messy, flexible, and always a hit (unless you forget the sugar, which happened exactly once). Let me know what you try, or if you invent some combo that blows this out of the water—I’ll probably give it a go, unless it’s raisins. Deal?
Ingredients
- 1 cup unsalted butter, softened
- 1 cup brown sugar, packed
- 1/2 cup granulated sugar
- 2 large eggs
- 1 teaspoon vanilla extract
- 1 1/2 cups all-purpose flour
- 1 teaspoon baking soda
- 1/2 teaspoon salt
- 3 cups old-fashioned rolled oats
- 1 1/2 cups chocolate chips
Instructions
-
1Preheat the oven to 350°F (175°C) and line baking sheets with parchment paper.
-
2In a large bowl, cream together the butter, brown sugar, and granulated sugar until light and fluffy.
-
3Beat in the eggs one at a time, then stir in the vanilla extract.
-
4In a separate bowl, whisk together the flour, baking soda, and salt. Gradually add the dry ingredients to the creamed mixture.
-
5Stir in the oats and chocolate chips until evenly combined.
-
6Drop spoonfuls of dough onto prepared baking sheets and bake for 10-12 minutes, or until golden brown. Allow cookies to cool on the sheet for a few minutes before transferring to a wire rack.
CLICK FOR NUTRITION INFO
↑
Approximate Information for One Serving
Serving Size:
1 serving
Calories:
160cal
Protein:
2 gg
Fat:
7 gg
Saturated Fat:
0g
Trans Fat:
0g
Cholesterol:
0mg
Sodium:
0mg
Potassium:
0mg
Total Carbs:
23 gg
Fiber:
0g
Sugar:
0g
Net Carbs:
0g
Vitamin A:
0
Vitamin C:
0mg
Calcium:
0mg
Iron:
0mg
Nutrition Disclaimers
Number of total servings shown is approximate. Actual number of servings will depend on your preferred portion sizes.
Nutritional values shown are general guidelines and reflect information for 1 serving using the ingredients listed, not including any optional ingredients. Actual macros may vary slightly depending on specific brands and types of ingredients used.
To determine the weight of one serving, prepare the recipe as instructed. Weigh the finished recipe, then divide the weight of the finished recipe (not including the weight of the container the food is in) by the desired number of servings. Result will be the weight of one serving.
Did you make this recipe?
Please consider Pinning it!!