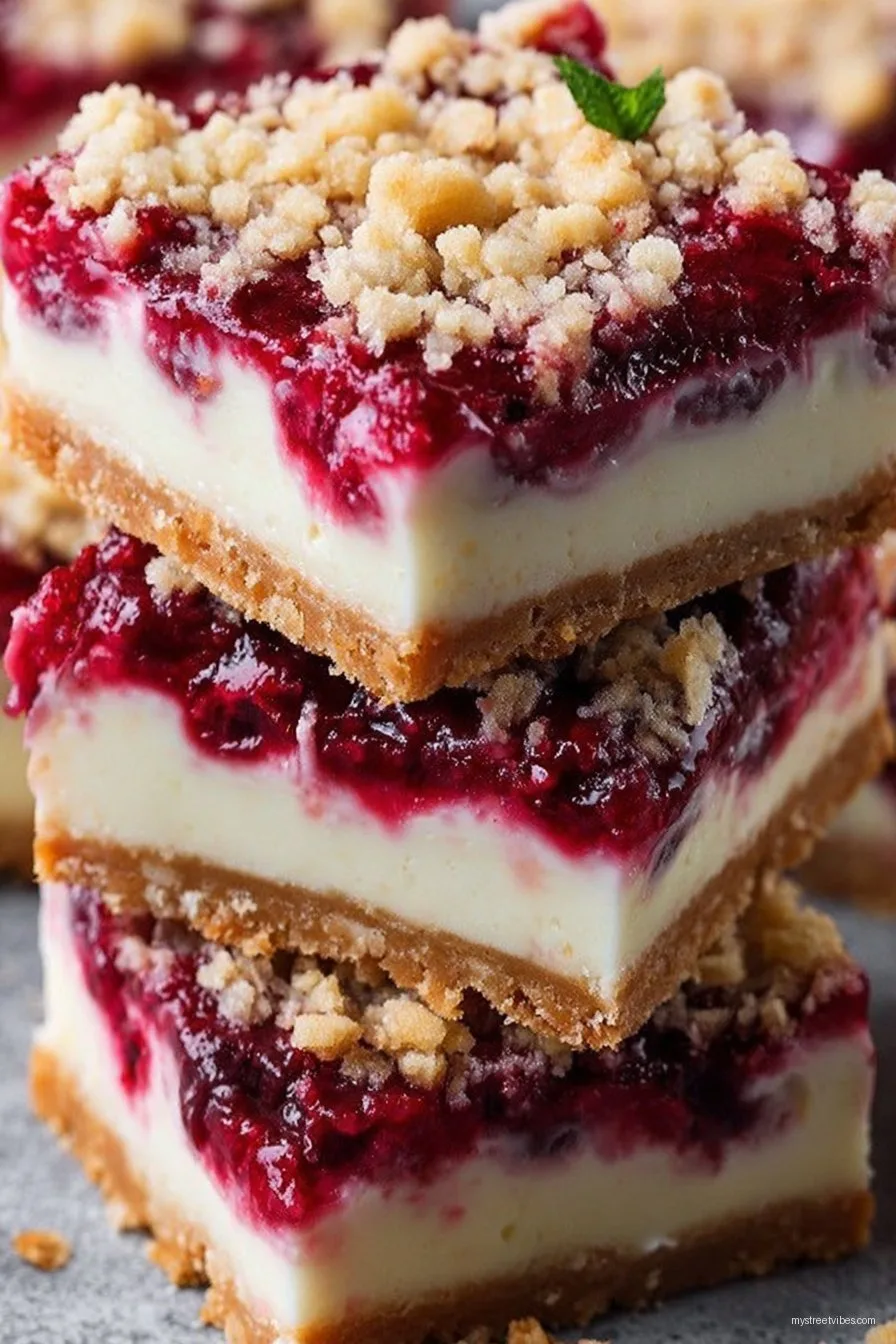
Let Me Tell You About These Cheesecake Bars…
Okay, so I have to confess something up front: I’ve baked a whole lotta desserts, but nothing gets requested faster than these Raspberry Cheesecake Bars. The first time I made them was—gosh—eight years ago for my cousin Amy’s surprise birthday bash. Back then, I didn’t even own a proper square pan (mum, if you’re reading this, sorry about borrowing yours and never returning it). Anyway, someone ended up hiding a few bars behind the veggie tray for later, which pretty much says it all. And yeah, I still do that sometimes; old habits die hard.
You know what else? My little one calls these ‘cheesecake squares of happiness’; I’m not making that up. The name stuck, though I still call them bars—call it whatever you fancy, nobody will care once they taste ’em.
Why I Keep Coming Back to This Recipe
I make this when the weather’s iffy and I don’t wanna fuss with a water bath or deal with cracks on top of a classic cheesecake (life’s too short for cheesecake stress, right?). My family goes bonkers for these because they’re somehow fancy and homey at the same time. Plus, you don’t have to wait ages for them to cool—well, you should, but honestly I’ve cut into them before they’re properly set and lived to tell the tale (just… maybe use a fork, not your fingers, unless you want a mess).
They’re also just super adaptable—a godsend on days when I’m missing a thing or two from the pantry. Raspberry is my go-to (it’s tangy and bright), but if you sneak in blackberries or even a swirl of homemade blueberry jam? Still vanishes. I tried using frozen raspberries straight from the freezer once—and okay, it got a little watery, but nothing a bit of kitchen paper and optimism couldn’t handle.
What You’ll Need (But Don’t Stress About It)
- 1 1/2 cups (about 200g) graham cracker crumbs (I sometimes use digestive biscuits—call it the British side of me, or maybe just what’s in the cupboard)
- 1/4 cup (about 55g) melted butter (honestly, margarine works in a pinch —shh, don’t tell the food snobs)
- 1/3 cup (around 65g) sugar
- 2 x 8oz (so 450g total) blocks cream cheese, room temperature (my grandmother swore by Philadelphia, but I just get what’s on sale or use the store brand—no one’s noticed the difference)
- 1 large egg
- 1/2 cup (around 120g) sour cream (Greek yogurt if that’s what’s left in the fridge, works a treat)
- 1/2 cup (100g) sugar (this is for the filling)
- 1 tsp vanilla extract (the cheap stuff, honestly, though if you’ve got fancy paste, yeah use it)
- 1 cup (maybe a generous handful) fresh raspberries (I suppose frozen could work, see above, but be ready for a little extra juiciness)
How I Throw These Together (Step by Step, Ish)
- Preheat your oven to 325°F (160°C). Line an 8×8 inch square pan with parchment. I never used to bother, but then I tried prying bars out of an unlined pan—so, up to you, but you’ve been warned.
- Mix graham cracker crumbs, melted butter, and sugar in a bowl till it looks like damp sand. Press that into the base of your pan (use clean hands; I do, nobody’s complained so far). Flatten it out—you want a solid foundation. Bake that for about 10 minutes. It’ll smell, well, toasty.
- Meanwhile, in a medium bowl, beat cream cheese until it’s smooth (no lumps if you can help it—sometimes I get impatient). Add sugar, sour cream, egg, and vanilla. Beat until creamy. I taste it at this point—someone has to, right?
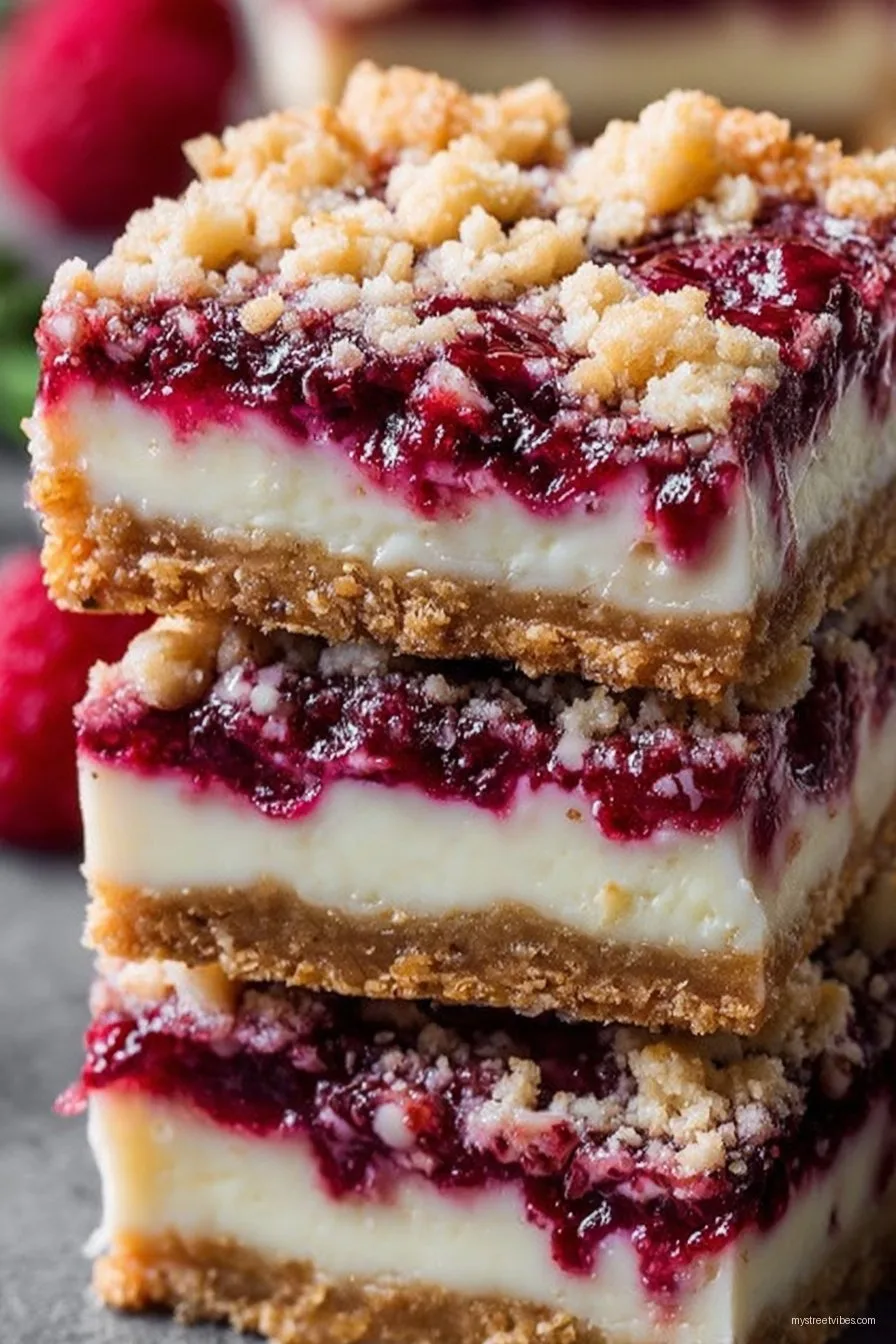
- Pour filling over the warm crust. Scatter raspberries on top, gently pressing them in a bit so they’re not just rolling around. Sometimes I swirl the raspberries into the filling with a knife—makes cool patterns, not gonna lie.
- Bake for 30-35 minutes, until the edges look just set but the middle still has a little wobble (think Jell-O on a Sunday picnic). Don’t overbake—these firm up as they cool.
- Let them cool in the pan, then chill in the fridge for at least 2 hours. Or honestly, overnight is even better (yes, I know, patience, ugh). Slice into squares or bars. Prepare for applause.
Stuff I’ve Learned The Hard Way (Notes)
- That no-stick parchment trick? I used to skip it. Regret every time. Peeling sticky bits of crust off the pan is… well, not fun.
- If your cream cheese is too cold you get lumps, even if you beat it like mad. Actually, if it’s cold, just zap it in the microwave for a few seconds. I used to think this was cheating, but it’s fine.
- Sometimes my raspberries sink, other times they float. Doesn’t seem to matter; tastes great either way.
Tried-and-Sometimes-Weird Variations
- Swapped the raspberries for blackberries—yum, but seeds get a bit much for some.
- Did a swirl of lemon curd for a zingy twist. Highly recommend for citrus lovers (but don’t overdo or it gets soupy).
- Tried chocolate chips instead of fruit once. Regretted it—kinda too rich. Maybe white chocolate chips and raspberries though? Next experiment!
What Gear You Need (And What Works If You Don’t Have It)
- An 8×8 baking pan. I’ve used a 9×9—just comes out thinner. Or, in a total pinch, I once used a pie dish. Wonky shape, but who cares?
- Hand mixer (my old trusty, but honest, some days I just use a whisk and extra elbow grease)
- Parchment paper. Or foil if you’re desperate—though it does tear. Guess who forgot parchment last Easter?
How to Store ‘Em (If They Even Make It That Long)
They’ll last in the fridge for about 4 days in an airtight container, but—truth time—in my house they disappear by Day 2, tops. If you want to freeze them, wrap tight in cling film then pop in a freezer bag; they do okay frozen, but the crust softens a bit. Good for late-night cravings though. Found this handy guide from Serious Eats if you like being thorough.
How We Serve These at Home (Maybe You’ll Steal My Move?)
I love them plain, cold from the fridge, but my partner insists on a little dollop of whipped cream and a sprinkle of lemon zest (fancy). My son once put a scoop of vanilla ice cream on his. Who am I to judge? If it’s a gathering, I plop them on a mismatched plate and let people help themselves with whatever utensil is closest (no judgment zone here).
Learn From My Mistakes—Real Life Pro Tips
- Don’t rush the cooling. I once cut into these while still warm and, yeah, it was a creamy puddle. Still tasted epic, but stick to chilling.
- Use room-temp dairy; otherwise, the filling is lumpy. Trust me, beating cold cream cheese is like trying to mix bricks into butter.
- Don’t overbake. I once ignored that jiggle-in-the-center rule. They still tasted fine, just a bit dry and not that creamy melt-in-your-mouth thing you want.
FAQ’s Because People Actually Ask Me These
Can I use frozen raspberries? Kinda depends. I do, but thaw and lightly pat them dry; otherwise you wind up with pink rivers running through your cheesecake. Then again, maybe you want that look?
Is the sour cream really necessary? I think so. But I’ve swapped for full-fat yogurt when the store’s out—it works. Greek yogurt is thicker, makes the filling a tiny bit tangier, which I like.
Can I double this recipe? Oh for sure. Just use a 9×13 pan. Add a few more minutes baking time, though I start checking early. (I once forgot it for, uh, 20 minutes too long—don’t be me.)
Help, my bars stuck! First: it’s probably just the edge pieces. Scoop them out, and see if the rest follows. And line your pan next time, promise it’s worth the bother.
Where do you get your vanilla? Okay, quick digression—if you’re in the US, Trader Joe’s vanilla is good and affordable. In the UK, I like this Nielsen-Massey one from Lakeland. Both have bailed me out of boring cake situations.
One Last Thing…
Honestly, I think these cheesecake bars are even tastier the next day—if you can wait that long. You’ll probably want to stash one or two aside if you have a sweet-toothed crowd; just saying. If you try ’em, drop me a note! Or don’t—just enjoy every last crumb like I do.
Ingredients
- 1 and 1/2 cups graham cracker crumbs
- 1/4 cup granulated sugar
- 1/2 cup unsalted butter, melted
- 16 oz (450g) cream cheese, softened
- 3/4 cup granulated sugar
- 2 large eggs
- 1 tsp vanilla extract
- 1 cup fresh raspberries
- 2 tbsp raspberry jam
Instructions
-
1Preheat the oven to 325°F (163°C). Line an 8×8-inch baking pan with parchment paper, leaving an overhang for easy removal.
-
2Mix graham cracker crumbs, 1/4 cup sugar, and melted butter in a bowl until combined. Press mixture evenly into the bottom of the prepared pan to form the crust.
-
3In a large bowl, beat softened cream cheese and 3/4 cup sugar together until smooth and creamy. Add eggs one at a time, beating well after each. Mix in vanilla extract.
-
4Pour cheesecake batter over the crust and smooth the surface. Gently swirl raspberry jam into the batter and scatter fresh raspberries on top.
-
5Bake for 40–45 minutes until the edges are set and the center is slightly jiggly. Cool completely, then refrigerate for at least 3 hours before slicing into bars.
CLICK FOR NUTRITION INFO
↑
Approximate Information for One Serving
Serving Size:
1 serving
Calories:
265 caloriescal
Protein:
4gg
Fat:
17gg
Saturated Fat:
0g
Trans Fat:
0g
Cholesterol:
0mg
Sodium:
0mg
Potassium:
0mg
Total Carbs:
25gg
Fiber:
0g
Sugar:
0g
Net Carbs:
0g
Vitamin A:
0
Vitamin C:
0mg
Calcium:
0mg
Iron:
0mg
Nutrition Disclaimers
Number of total servings shown is approximate. Actual number of servings will depend on your preferred portion sizes.
Nutritional values shown are general guidelines and reflect information for 1 serving using the ingredients listed, not including any optional ingredients. Actual macros may vary slightly depending on specific brands and types of ingredients used.
To determine the weight of one serving, prepare the recipe as instructed. Weigh the finished recipe, then divide the weight of the finished recipe (not including the weight of the container the food is in) by the desired number of servings. Result will be the weight of one serving.
Did you make this recipe?
Please consider Pinning it!!