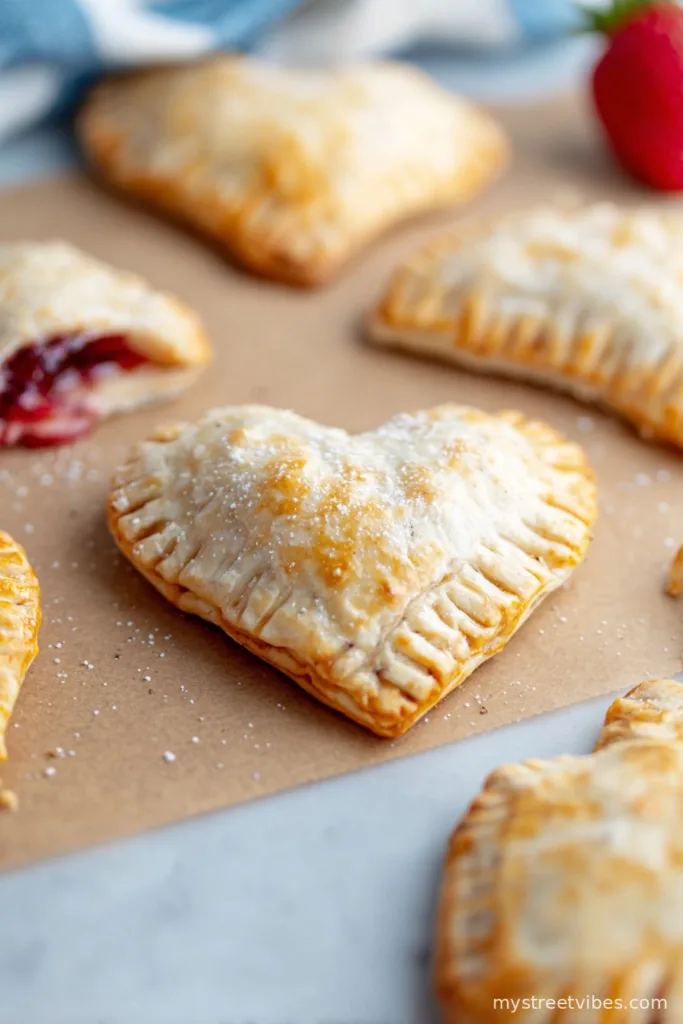
Let Me Tell You About Heart Hand Pies (and My Brave Battle with Pastry Dough)
I have to be honest—every time I make these Heart Hand Pies, I can’t help but think of that one Valentine’s Day when my daughter tried to help me shape the pies and every single one turned out more wonky than heart-shaped (we called them ‘abstract passion pies’ and ate them anyway, of course). These are my emergency “I need to bake but don’t want to tackle a 12-step layer cake” treat. Also: they make your kitchen smell like a bakery right at closing time. Good stuff.

Why You’ll Totally Love These
I make these when I want something sweet that’s not fussy (well, unless you try to do fancy latticework, which I respect, but have given up on more than once). My family goes a bit wild for them because they’re easy to carry (sometimes we take them for a picnic, but usually it’s just to the couch). Plus, it’s honestly hard to stop at one. The filling sort of bubbles out—sometimes a lot—which used to annoy me, but I’ve made peace with it (now I call it the ‘rustic look’).
What You’ll Need (No Panicking If You Don’t Have Everything)
- 2 sheets of store-bought pie dough
(I’ve made my own, but let’s be real, Pillsbury is just fine on a weekday; my granny would use the fanciest all-butter crust, but she also had no kids hanging off her leg) - About 1 cup of your favorite jam or pie filling (strawberry or cherry, but apricot works if you want something tangy, and once I used Nutella… worked fine, just gooier)
- 1 egg, beaten (unless you forgot eggs, in which case, a splash of milk does the job)
- 1 tbsp coarse sugar for sprinkling (Totally optional! Sometimes I forget it. Regular sugar works too)
- Flour for dusting — a handful will do
How To Make These Heart Hand Pies (Trust the Wobble)
- Preheat your oven to 375°F (190°C). Line a baking sheet with parchment. I just use the cheap stuff, but you do you.
- Roll out the dough on a floured countertop. Not too thin or they tear. Definitely don’t stress if the edges look, well, “unique”.
- Cut out hearts with a cookie cutter or just freehand it with a paring knife (I’ve done this, and the hearts were admittedly ‘interpretive art’).
- Plop (yes, plop—it’s not rocket science) a good teaspoon of jam in the center of half the hearts. Don’t overdo it unless you like a lava flow; trust me on this.
- Brush the edges with egg wash. Top with another heart and press the edges together with your fingers. I like squishing them with a fork too, gives ‘em that little bakery finish.
- Brush the tops with more egg wash, sprinkle with sugar, and cut a little slit or poke a hole (remember: lets the steam out so you don’t get a heart hand pie balloon).
- Bake for 13–16 minutes, until golden. I usually check at 14. Don’t panic if some jam oozes out—it’s basically their charm.
- Cool for as long as your willpower lasts. Or until you burn your tongue and remember why cooling matters.

Notes from the Battlefield (aka My Kitchen)
- If the dough gets too warm and sticky, chuck it in the freezer for a few minutes—actually, I find it works better if it’s colder when you work with it.
- Tried to be ‘healthier’ once and skipped the sugar topping—immediately regretted it.
- If you’re feeling wild, add a little lemon zest to the jam. Sometimes I forget, but when I remember, it’s just that little something extra.
Variations I’ve Tried (Not All Were Winners…)
- Nutella and banana slices: crazy good, but they leak and look messy. Still worth it though.
- Chopped apple with a sprinkle of cinnamon sugar: these are kinda like mini apple pies. Big thumbs up.
- Peanut butter and jelly ones? Disaster—turned into lava monsters. I don’t recommend for neat freaks.

Handy Equipment (But Don’t Sweat It)
I use a heart-shaped cookie cutter for the ‘gram, but you can totally use a glass or even a butter knife (done this loads). If you don’t have a pastry brush, just use your fingers or a balled-up bit of paper towel. Ain’t nobody judging.
How to Store Them (Not That They Ever Last)
Store in an airtight container at room temperature for a day or two. Or in the fridge if you’re more disciplined than me. Honestly, they’re usually gone by breakfast the next day, so can’t say how long they really last!
How I Serve These (Or Fight Over the Last One)
Warm from the oven with a scoop of vanilla ice cream—heaven. Sometimes I dust with powdered sugar if I’m trying to look fancy. We’ve had them as breakfast or dessert… or just random Tuesday snacks (life’s short, eh?).
Pro Tips (AKA Learn form My Woes)
- Don’t rush the sealing! I once tried pressing them closed in a hurry and, I kid you not, the filling made a break for freedom.
- Baking them on parchment is way less annoying than scraping jam off the tray. I keep learning this lesson, apparently.
- Let them cool—seriously—unless you like molten jam mouth (not recommended).
FAQ Because People Ask (Or Text Me in a Panic)
- Can I freeze these?
Yep! Freeze unbaked pies on a tray, then throw in a bag once solid. Bake direct from frozen, just add a few minutes. Trust me, tastes just as good, maybe even better honestly. - Do I have to use fruit filling?
Nope. Once I did caramel and apple slices—delicious but messy. Or try whatever you’re craving; life’s too short to follow rules all the time. - What if I don’t have a cookie cutter?
Eh, just cut chunky hearts with a knife. Or don’t bother with hearts at all—make stars, circles, blobs. It all gets eaten! - How thick should the dough be?
About 1/8 inch, but honestly? If it’s a bit thicker or thinner, who cares? They’ll taste good anyway. Just avoid paper-thin or you’ll have jam confetti everywhere. - Can I make these gluten free?
Probably! Use your favorite gluten free pie dough, I’ve done it once and they turned out fine, but they are a little more crumbly. Maybe avoid filling them to the brim though (learned that the messy way).
Oh! Random side note: once tried making these after a long day at work and forgot to preheat the oven. The pies just sat around looking sad until I got it together. So, remember to turn that oven on—ideally before you shape all your pies. Have fun, and let the jam be wild!
Ingredients
- 2 sheets refrigerated pie dough
- 1/2 cup strawberry or raspberry jam
- 1 egg
- 1 tablespoon water
- 2 tablespoons granulated sugar
- 1 tablespoon unsalted butter, melted
- 1/4 teaspoon vanilla extract
- Pinch of salt
Instructions
-
1Preheat the oven to 375°F (190°C) and line a baking sheet with parchment paper.
-
2Roll out the pie dough sheets on a lightly floured surface. Use a heart-shaped cookie cutter to cut out 16 hearts.
-
3Place 8 of the hearts onto the prepared baking sheet. Spoon about 1 tablespoon of jam onto the center of each.
-
4Brush the edges with a mixture of egg and water. Top each with a second dough heart and press edges to seal. Crimp with a fork.
-
5Brush the tops with melted butter and sprinkle with sugar. Use a small knife to cut a tiny vent in each pie.
-
6Bake for 16–18 minutes or until golden brown. Let cool slightly before serving.
CLICK FOR NUTRITION INFO
↑
Approximate Information for One Serving
Serving Size:
1 serving
Calories:
180 caloriescal
Protein:
2g proteing
Fat:
6g fatg
Saturated Fat:
0g
Trans Fat:
0g
Cholesterol:
0mg
Sodium:
0mg
Potassium:
0mg
Total Carbs:
29g carbohydratesg
Fiber:
0g
Sugar:
0g
Net Carbs:
0g
Vitamin A:
0
Vitamin C:
0mg
Calcium:
0mg
Iron:
0mg
Nutrition Disclaimers
Number of total servings shown is approximate. Actual number of servings will depend on your preferred portion sizes.
Nutritional values shown are general guidelines and reflect information for 1 serving using the ingredients listed, not including any optional ingredients. Actual macros may vary slightly depending on specific brands and types of ingredients used.
To determine the weight of one serving, prepare the recipe as instructed. Weigh the finished recipe, then divide the weight of the finished recipe (not including the weight of the container the food is in) by the desired number of servings. Result will be the weight of one serving.
Did you make this recipe?
Please consider Pinning it!!