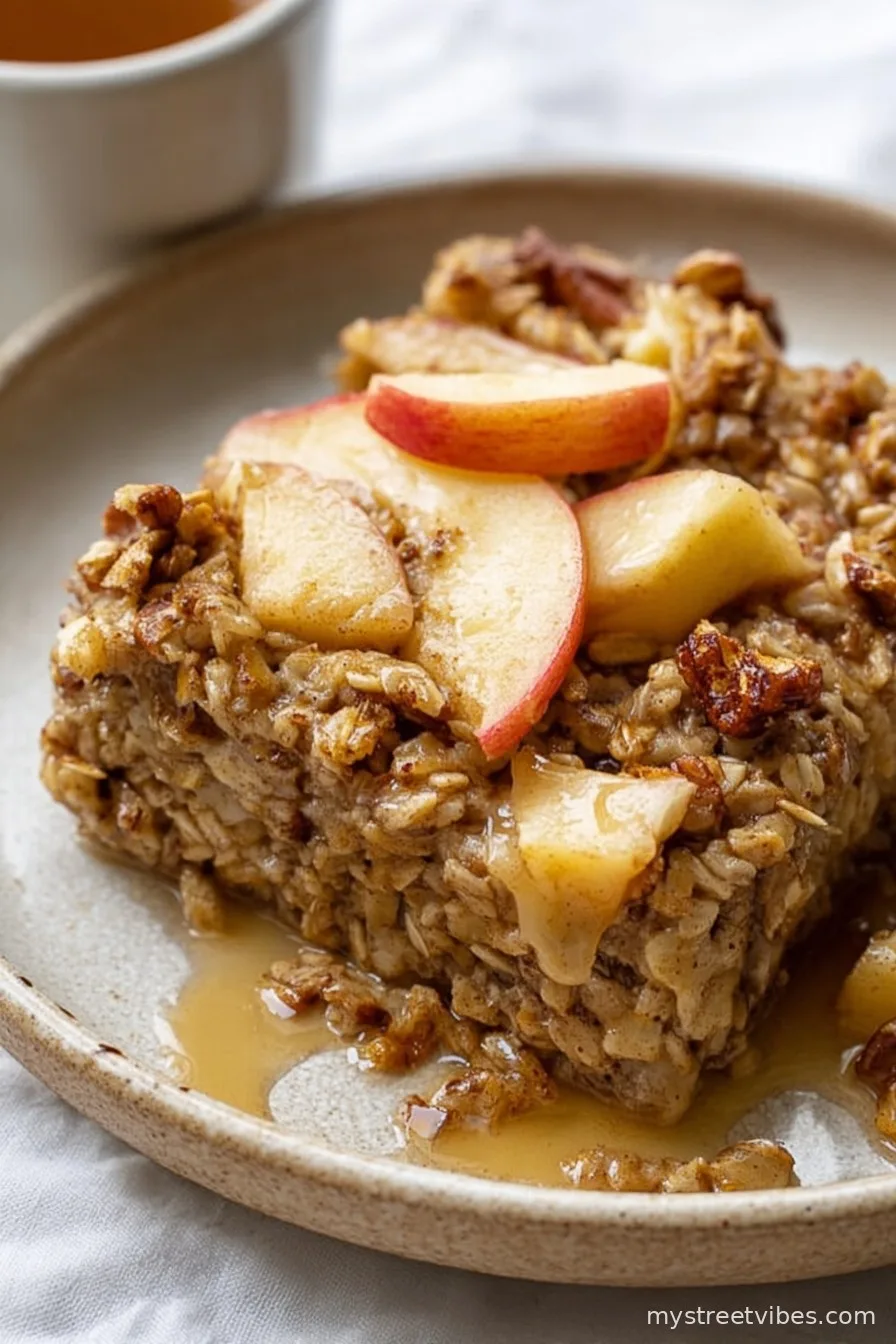
So… Why Baked Apple Oatmeal? A Cozy Confession
Alright, picture this: It’s Saturday morning, the cat’s yelling because apparently I never feed him enough, and I’m wandering around the kitchen craving something warm that doesn’t involve standing at the stove for ages (because frankly, I’m still in my pajamas and not quite awake yet). That’s when I remember—baked apple oatmeal! It started as a way to use up a couple of wrinkly apples I rescued from the bottom of the fruit bowl, but now I make it on purpose, especially when autumn rolls around (and sometimes in July, because hey, who’s judging?). Plus, nothing beats the smell wafting out of the oven; it’s basically a hug in food form.
Why You’ll Love This (Or, Why I Keep Making It…)
I make this when I’m feeling lazy but want something that tastes like effort was involved. My family goes crazy for it because, well, it’s basically dessert for breakfast—but somehow still healthy? (Don’t ask me how I pulled this one off; I just roll with it.) It’s great for making ahead, especially since Monday mornings tend to hit like a freight train. And if you’re a fan of recipes that forgive your attention span lapses—I once forgot it in the oven for an extra 10 minutes and it was still delicious—you’ll probably like it too.
Gathering Your Stuff: The Ingredient List
- 2 medium apples, chopped (I like Granny Smith, but really, any apple in your fridge will work. I’ve even tossed in a pear once when I was short an apple, and it was… interesting!)
- 2 cups old-fashioned rolled oats (Quick oats work in a pinch, but you’ll end up with a slightly mushier situation—some people like that, I just don’t want to start any oat debates here.)
- 2 cups milk (I use almond milk most days; my partner swears by oat milk; my neighbor uses whole milk. You get the idea.)
- 2 eggs (I tried flax eggs once for a vegan friend—pretty good, although the texture was just a tad different)
- 1/3 cup maple syrup or honey (Sometimes I use a mix because, who has enough maple syrup lying around every time?)
- 1 tsp vanilla extract (My grandmother always insisted on pure vanilla, but honestly, the budget imitation stuff is totally fine in my book.)
- 1.5 tsp cinnamon
- 1/2 tsp nutmeg (optional, but I love the little extra oomph)
- 1/2 tsp salt
- 2 tbsp melted butter or coconut oil (Actually, I’ve left this out before by accident and it still turned out fine—maybe a bit less rich, but you do you)
- Optional: 1/2 cup chopped walnuts or pecans, handful of raisins or dried cranberries, sprinkle of brown sugar on top for a treat
How To Make It: Step by Step, Sort Of
- Preheat your oven to 180C (350F). If you forget and realize it halfway through mixing, it’s honestly fine—oatmeal is forgiving.
- Grab a 9×9 inch (or roughly that size, sometimes I use a rectangular dish because it’s clean) baking dish and give it a quick swipe of butter or nonstick spray.
- In a big bowl, toss in the oats, cinnamon, nutmeg, and salt. Stir ’em up—this is where I usually sneak a taste just to feel like I’m doing something gourmet, but it’s literally dry oats and spice, so… your call.
- Add the apples, mix again. (Sometimes I peel them, sometimes I don’t. It’s one of those “depends how much patience I have” moments.)
- In a separate bowl, whisk together the eggs, milk, maple syrup, vanilla, and the melted butter or coconut oil. If you’re in a hurry, it all ends up in the same place, just don’t tell my high school Home Ec teacher.
- Pour the wet stuff into the big bowl of oat mixture. Add any extra bits like walnuts, raisins, etc. Stir till everything looks friendly and combined. If it looks a bit runny, that’s good—oats soak it up as it bakes.
- Dump it all into your prepared pan and scatter a touch of brown sugar or some extra cinnamon on top if you’re feeling fancy.
- Bake for about 35–40 minutes. Don’t worry if it’s a little jiggly in the middle—it sets up as it cools. I always poke a fork in the corner just to be sure, though.
Notes From My (Slightly Messy) Kitchen
- It looks way wetter before baking than you’d expect. The first time I made it, I thought I’d ruined it. Turns out, oats are magical that way.
- If you let it cool a bit before slicing, it stays together better—but honestly, I never wait that long.
- Sometimes I add a smidge more milk if my apples are a bit dry (you know, the ones that have seen better days).
Twists, Experiments, and One Epic Fail
- I’ve tried swapping in pears—actually liked it. Pineapple? Not so much (weird mood, I know).
- A friend adds a swirl of peanut butter; I haven’t tried it, but maybe one day.
- Mix in shredded coconut if you’re feeling tropical (I did this once when it was snowing—it was ironic, but good).

No Fancy Gear? No Drama
I bake mine in a glass dish, but I’ve used a metal cake tin when that’s all I had clean. And if you only have a muffin pan—just divide the mixture up for individual portions (they bake a little faster, too). Skip mixers and stick with a trusty wooden spoon—it’s part of the charm.
Storing Your Oatmeal (But We Rarely Have Leftovers)
This keeps pretty well in the fridge for up to 4 days—though honestly, in my house it never lasts more than a day! I usually reheat a square in the microwave, or just eat it cold while standing in front of the fridge door (don’t judge me, it’s efficient).
Serving: Do What Makes You Happy
We love it with a scoop of Greek yogurt, a splash more milk, or a little spoonful of extra maple syrup (my kid prefers chocolate chips on top—I’m outnumbered, what can I say?). If it’s a proper chilly morning, I’ll heat up some frozen berries and pour them over. Cheers me right up.
From One Home Cook to Another: Things I Learned
- I once tried rushing the baking by bumping up the oven heat—regretted it because the edges burned but the middle was soup. Patience wins here.
- Actually, I find it works better if you let it rest after baking, at least 10 minutes (unless you were like me last week and poked a fork right in after pulling it out—messy, but still good).
FAQ, Based on Actual Texts (Mostly From My Sister)
- Can I make this without eggs? Yep! Try flax eggs or just leave them out—the texture’s just a touch different, but it’ll hold together.
- Is it gluten-free? Only if your oats are, so check the bag (I’ve accidentally used the wrong kind before).
- Can I use steel-cut oats? Hmm, not really—the bake time’s way off and the texture gets weird. I tried it once and ended up with chewy oat pebbles. Stick with rolled or quick oats here.
- Can you freeze it? Technically yes, but I find it gets a bit soggy after thawing. Maybe that’s just me, though?
- Do I have to peel the apples? Not at all! I usually leave the skins on because it’s less work and more fiber. Sometimes I get fancy, but only if my mum is visiting.
Alright, that’s my Healthy Baked Apple Oatmeal in all its cozy, slightly chaotic glory. If you ever need a distraction-ready breakfast—or, you know, something to save those sad apples—give it a try. Now, if only I could figure out why my cat prefers his breakfast at 5am…
Ingredients
- 2 cups old-fashioned rolled oats
- 2 large apples, peeled, cored, and chopped
- 1 1/2 cups unsweetened almond milk
- 2 large eggs
- 1/4 cup maple syrup
- 1 teaspoon ground cinnamon
- 1/2 teaspoon vanilla extract
- 1 teaspoon baking powder
- 1/4 teaspoon salt
- 1/3 cup chopped walnuts (optional)
Instructions
-
1Preheat your oven to 350°F (175°C) and lightly grease an 8×8-inch baking dish.
-
2In a large bowl, whisk together the almond milk, eggs, maple syrup, and vanilla extract.
-
3Add the rolled oats, chopped apples, baking powder, cinnamon, and salt to the bowl. Stir until well combined. Fold in the walnuts if using.
-
4Pour the mixture into the prepared baking dish and spread evenly.
-
5Bake for 35 minutes, or until the oatmeal is set and golden brown on top.
-
6Allow to cool slightly before serving. Enjoy warm, optionally topped with extra apples or a drizzle of maple syrup.
CLICK FOR NUTRITION INFO
↑
Approximate Information for One Serving
Serving Size:
1 serving
Calories:
210cal
Protein:
6 gg
Fat:
5 gg
Saturated Fat:
0g
Trans Fat:
0g
Cholesterol:
0mg
Sodium:
0mg
Potassium:
0mg
Total Carbs:
36 gg
Fiber:
0g
Sugar:
0g
Net Carbs:
0g
Vitamin A:
0
Vitamin C:
0mg
Calcium:
0mg
Iron:
0mg
Nutrition Disclaimers
Number of total servings shown is approximate. Actual number of servings will depend on your preferred portion sizes.
Nutritional values shown are general guidelines and reflect information for 1 serving using the ingredients listed, not including any optional ingredients. Actual macros may vary slightly depending on specific brands and types of ingredients used.
To determine the weight of one serving, prepare the recipe as instructed. Weigh the finished recipe, then divide the weight of the finished recipe (not including the weight of the container the food is in) by the desired number of servings. Result will be the weight of one serving.
Did you make this recipe?
Please consider Pinning it!!