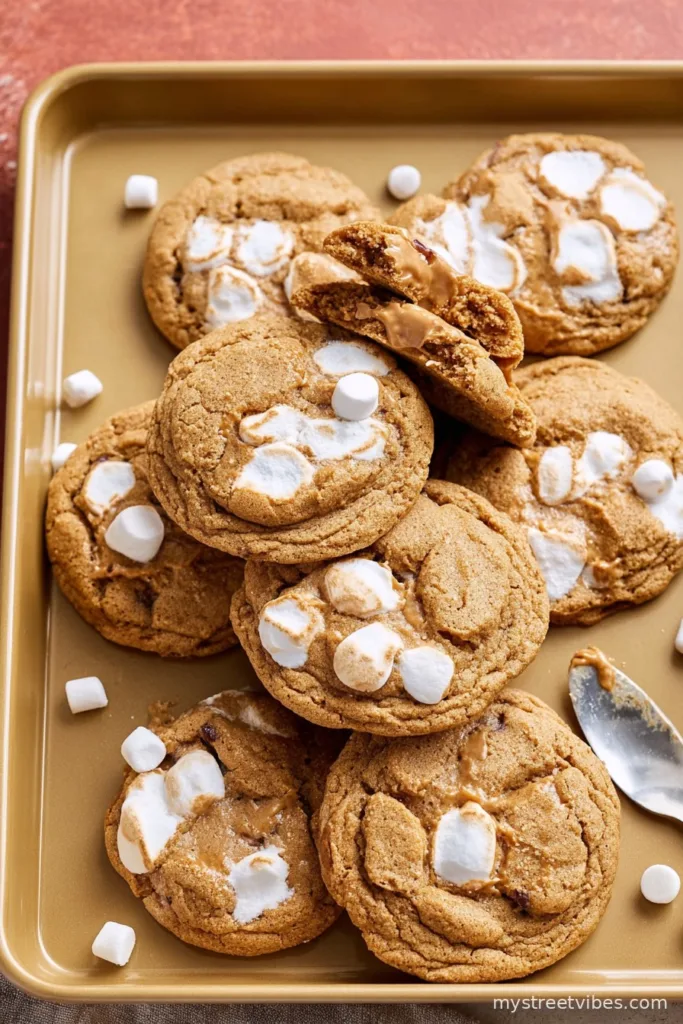
The Story (Or: Why My Kitchen Always Smells Like Cookies)
Okay, first things first: if you’ve ever had one of those days where you just need a cookie that requires zero fuss—and doesn’t ask you to find that one flour you only use once a year—pull up a chair. This gluten-free peanut butter marshmallow cookie recipe is my go-to whenever life gets a bit, well, crunchy (pun somewhat intended). Last time I tried making these, my niece declared them “a marshmallow hug in cookie form,” though you should probably know she says that about pancakes, too. Either way, this is one of those recipes that feels just as right in pajamas as it does in your ‘trying to impress the neighbors’ apron. Oh, and once, I knocked over a bag of mini marshmallows while making these… the cat hasn’t trusted me in the kitchen since.

Why You’ll Love This (Or At Least End Up Eating Three)
I make this when I want something sweet but can’t stand the thought of washing a million bowls (honestly, does anyone enjoy that?). My family goes a bit wild for these because—well, besides being naturally gluten-free—they have that salty-sweet, chewy-gooey thing, especially fresh from the oven. And real talk: I struggled for ages trying to mix marshmallows in without destroying them. Turns out, patience is a virtue… who knew?
What You’ll Need (Plus Some Substitutes—Let’s Be Real)
- 1 cup creamy peanut butter (or crunchy, if you’re feeling rebellious; my brother swears by the chunky stuff)
- 3/4 cup light brown sugar (granulated works in a pinch, but brown sugar gives that caramelly vibe)
- 1 large egg (I’ve used flaxseed + water for vegan friends, and it’s… fine. Still, if you can use an actual egg, do it)
- 1/2 teaspoon baking soda (even though my grandmother tried to convince me baking powder would also work—spoiler: it doesn’t hold the rise the same way)
- 1/4 teaspoon salt (or just a generous pinch – I’m not the salt police)
- 1 cup mini marshmallows (sometimes I cut big ones into bits because, who has mini marshmallows all the time? It’s a sticky mess but worth it)
- 1/2 teaspoon vanilla extract (optional, honestly, some days I forget it and no one notices)
How You Actually Make These (With Mild Distracted Tangents)
- Preheat your oven to 350°F (about 175°C). Or thereabouts. If it’s off by ten degrees, don’t panic; the cookies will still bake.
- Grab a mixing bowl—doesn’t need to be fancy. Dump in the peanut butter and brown sugar. Mix them together. You want it kind of creamy, kind of fluffy. This is where I usually sneak a taste (quality control, right?).
- Crack in the egg, toss in the baking soda, salt, and vanilla (if you bother). Stir it all up till it looks shiny — sometimes I get impatient and let the kiddo take over for a bit.
- Now, this is the part where things usually get sticky (literally): gently fold in the mini marshmallows. Don’t over-mix or you’ll have marshmallow strands everywhere, and if that happens—eh, that’s life. Still tastes great.
- Scoop out the dough (I use my old ice cream scoop, but spoons or even slightly damp hands work if that’s what you’ve got). Plop ‘em onto a parchment-lined baking sheet. Leave room – they do a tiny bit of spreading.
- Bake for 9 to 11 minutes, honestly closer to 10 in my oven, until the edges are golden and the marshmallows have started to go all toasty. They might look a tad underbaked but resist the urge to go longer, or they’ll get hard. I made that mistake once, never again.
- Let them cool on the sheet for 5 minutes, then transfer to a wire rack. Or just slide the whole parchment paper over if your rack is buried under yesterday’s dishes (no judgment here).
Real Notes (Not the Fancy Kind)
- If the dough seems super sticky, a quick chill in the fridge helps. But usually I’m too impatient and they turn out fine anyway.
- Once, I tried doubling the marshmallows. It looked like a sugar swamp. Don’t do it, unless you love a mess.
- The cookies set up more as they cool, so don’t panic if they feel too soft straight out of the oven.
Variations I’ve Actually Tried (And One I Regret)
- Add a handful of chocolate chips—sometimes I use white chocolate for that ‘strawberry sundae’ effect.
- Swap peanut butter for almond butter. Worked, but it’s a bit milder. Kids didn’t notice, though.
- Tried adding shredded coconut once. Tasted okay, but the cookies fell apart like a house of cards in a gust of wind. Not my best experiment.

Equipment You’ll Need (Or Improvise, Like I Do)
- Mixing bowl (if you don’t have a big one, use a soup pot. I’ve done it!)
- Spoon, spatula, or vigorously cleaned hands for mixing
- Baking sheet (I sometimes flip over a roasting tray if my favorite pan is missing)
- Parchment paper (if you’re out, just well-oil the tray – clean up is a bit stickier, though)
How to Store (But Who Are We Kidding?)
Technically, keep them in an airtight container at room temp for up to 3 days. But honestly, in my house, they barely make it till the next afternoon. If you somehow have leftovers after day 2, pop ‘em in the microwave for 5 seconds to relive the just-baked gooiness.
How I Serve These (Family Debates Included)
I love them with cold milk (that’s me being an old soul), but my daughter likes to make little ice cream sandwiches with the cookies—messy but oh so good. Once, we brought a tin of these on a road trip, and let’s just say, no one else was getting any.
The Pro Tips I Wasn’t Born Knowing
- I once tried rushing the cooling step—danger zone! The marshmallows can weld to the tray if you don’t wait. Promise, patience pays off.
- Don’t walk away mid-mixing—otherwise, the peanut butter and sugar just clump and you end up chasing lumps around the bowl. Speaking from experience here.
The Usual Questions (And Some Odd Ones)
- Can I make this nut-free? Yep, try sunflower seed butter instead. A bit earthier, but not bad. Though, be ready for the color to shift (kind of green, like something out of a kids’ cartoon, but it tastes fine!)
- Can I make them dairy-free? As long as your marshmallows are dairy-free, you’re golden. Most are, but double-check the bag. Oh, and skip the ice cream sandwich idea if you want to keep it totally dairy-free—unless you have vegan ice cream handy, I guess.
- The dough is sticking everywhere! What do I do? Chill it for 10-15 minutes. Or just live with sticky fingers and bonus dough nibbles. (Not the worst.)
- Do they freeze well? Actually, yes! Freeze after baking. But, on second thought, they taste better fresh, if you ask me.
- My cookies spread into one giant blob! Happens to the best of us. Could be the peanut butter was extra runny, or just a hot oven moment. Tastes like a cookie slab—cut it up and call it rustic!
And hey, if you make these, let me know how they go. Or if you figure out how to keep the marshmallows from sticking to everything but the cookies, do share. Happy baking (or, you know, happy spoon licking)!
Ingredients
- 1 cup creamy peanut butter (or crunchy, if you’re feeling rebellious; my brother swears by the chunky stuff)
- 3/4 cup light brown sugar (granulated works in a pinch, but brown sugar gives that caramelly vibe)
- 1 large egg (I’ve used flaxseed + water for vegan friends, and it’s… fine. Still, if you can use an actual egg, do it)
- 1/2 teaspoon baking soda (even though my grandmother tried to convince me baking powder would also work—spoiler: it doesn’t hold the rise the same way)
- 1/4 teaspoon salt (or just a generous pinch – I’m not the salt police)
- 1 cup mini marshmallows (sometimes I cut big ones into bits because, who has mini marshmallows all the time? It’s a sticky mess but worth it)
- 1/2 teaspoon vanilla extract (optional, honestly, some days I forget it and no one notices)
Instructions
-
1Preheat your oven to 350°F (about 175°C). Or thereabouts. If it’s off by ten degrees, don’t panic; the cookies will still bake.
-
2Grab a mixing bowl—doesn’t need to be fancy. Dump in the peanut butter and brown sugar. Mix them together. You want it kind of creamy, kind of fluffy. This is where I usually sneak a taste (quality control, right?).
-
3Crack in the egg, toss in the baking soda, salt, and vanilla (if you bother). Stir it all up till it looks shiny — sometimes I get impatient and let the kiddo take over for a bit.
-
4Now, this is the part where things usually get sticky (literally): gently fold in the mini marshmallows. Don’t over-mix or you’ll have marshmallow strands everywhere, and if that happens—eh, that’s life. Still tastes great.
-
5Scoop out the dough (I use my old ice cream scoop, but spoons or even slightly damp hands work if that’s what you’ve got). Plop ‘em onto a parchment-lined baking sheet. Leave room – they do a tiny bit of spreading.
-
6Bake for 9 to 11 minutes, honestly closer to 10 in my oven, until the edges are golden and the marshmallows have started to go all toasty. They might look a tad underbaked but resist the urge to go longer, or they’ll get hard. I made that mistake once, never again.
-
7Let them cool on the sheet for 5 minutes, then transfer to a wire rack. Or just slide the whole parchment paper over if your rack is buried under yesterday’s dishes (no judgment here).
CLICK FOR NUTRITION INFO
↑
Approximate Information for One Serving
Serving Size:
1 serving
Calories:
148cal
Protein:
4 gg
Fat:
8 gg
Saturated Fat:
0g
Trans Fat:
0g
Cholesterol:
0mg
Sodium:
0mg
Potassium:
0mg
Total Carbs:
17 gg
Fiber:
0g
Sugar:
0g
Net Carbs:
0g
Vitamin A:
0
Vitamin C:
0mg
Calcium:
0mg
Iron:
0mg
Nutrition Disclaimers
Number of total servings shown is approximate. Actual number of servings will depend on your preferred portion sizes.
Nutritional values shown are general guidelines and reflect information for 1 serving using the ingredients listed, not including any optional ingredients. Actual macros may vary slightly depending on specific brands and types of ingredients used.
To determine the weight of one serving, prepare the recipe as instructed. Weigh the finished recipe, then divide the weight of the finished recipe (not including the weight of the container the food is in) by the desired number of servings. Result will be the weight of one serving.
Did you make this recipe?
Please consider Pinning it!