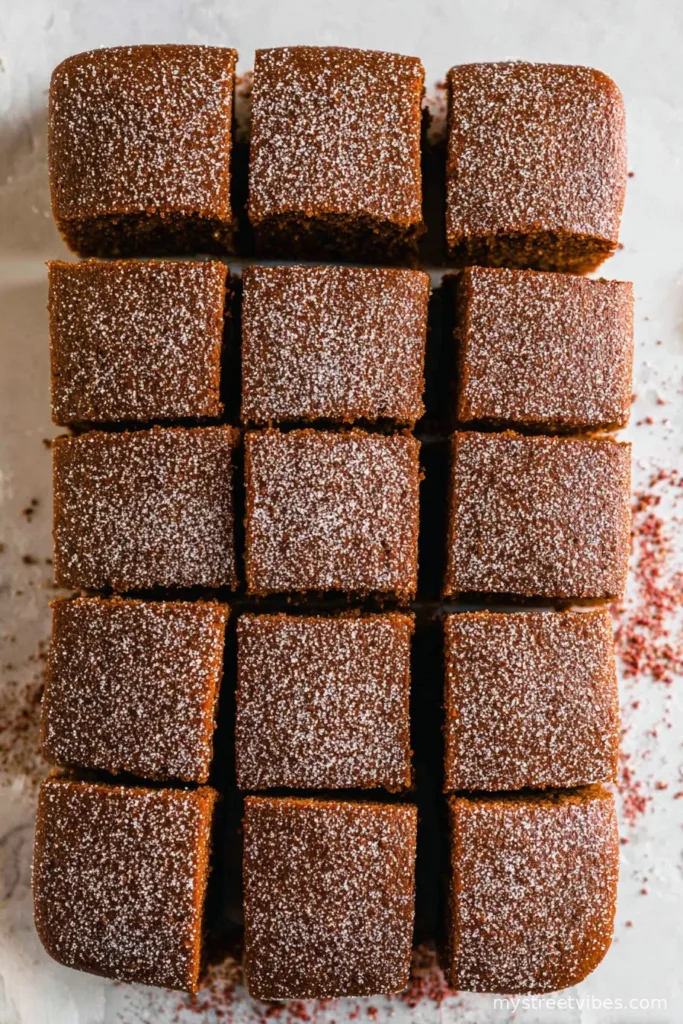
You Won’t Believe How Cozy This Gingerbread Cake Is
Okay, so let me just start by saying that Gingerbread Cake and I go way back. Like, back to the ’90s, VHS-tape Christmas specials, and my nan letting me “help” by licking the spoon (don’t tell the health inspectors). The first time I ever tried baking this cake solo, I accidentally used salt instead of sugar. Bit of a shock, honestly, but nobody could say it wasn’t memorable. Now, every time I make this cake, it smells like home—spices, laughter, and that kind of nostalgia you only get when your slippers are three years old (and slightly mismatched, but who cares?).
Why You’ll Love This Gingerbread Cake (or at Least Why I Do)
I pull this recipe out every time the weather gets grumpy, or when my brother’s visiting because, for whatever reason, he thinks it’s the magic cure for bad moods. Oh, and my kids usually start hovering the minute they smell anything ginger. Sometimes I’ll sneak in an extra pinch of cinnamon, though my partner says I’m heavy-handed with it (he’s probably right). But honestly, this is the sort of cake you eat in thick, warm slices, hands wrapped around a mug. And on cold mornings, it’s actually delicious for breakfast—toast it up, maybe add a blob of cream cheese if you’re feeling fancy. Not saying it brings world peace, but it does stop people arguing for a good ten minutes.
The Stuff You’ll Need (and What I Sometimes Swap)
- 2 cups (250g-ish) all-purpose/plain flour (I use whole wheat flour sometimes when I’m pretending to be healthy—makes it a bit rustic)
- 1/2 cup (110g) packed brown sugar (my friend swears by dark muscovado, but regular light brown is perfectly good)
- 1/2 cup (125g) unsalted butter, softened (or margarine, Aunt May uses that & says no-one can tell)
- 2 eggs (room temp if you remember, but honestly, mine are often cold from the fridge)
- 3/4 cup (180ml) molasses or treacle (blackstrap is too strong for me, but maybe that’s just me)
- 1 cup (240ml) hot water (don’t use boiling, just hot from the tap is fine)
- 1 tablespoon fresh grated ginger (or a heaping teaspoon ground ginger if you’re in a rush—both work, but fresh has a bit more bite)
- 1 teaspoon cinnamon (I measure with my heart, but you do you)
- 1/2 teaspoon ground cloves (optional, but adds a nice depth—just don’t overdo or it’ll taste like cough syrup, trust me)
- 1/2 teaspoon salt (seriously, make sure it’s not sugar this time)
- 1 teaspoon baking soda
- Powdered sugar or whipped cream, for serving (that’s not strictly necessary, but my youngest will revolt otherwise)
How To (Some Steps Precise, Others Fuzzy)
- Preheat that oven: 350°F (175°C). Line a 9-inch square tin with parchment or use a bit of butter. Or just spray—nobody’s judging.
- Cream the butter and sugar: Beat together in a bowl until it’s pale and fluffy-ish. I just use a hand mixer because I don’t have fancy stand mixers at home. This is usually where I sneak a taste (quality control?)
- Add eggs, one at a time: Mix well after each. Don’t worry if it looks a little curdled—always freaks me out, but it sorts itself soon enough.
- Stir in the molasses: It’ll go a sort of mud-brown, thick paste. That’s normal. Use a spatula to scrape every last sticky bit form the jar… (sticky fingers are part of the process, in my opinion).
- Mix the dry stuff: Flour, baking soda, spices, and salt. Give ’em a whisk to combine (fork works if you can’t find your whisk—that’s been me plenty of times).
- Add dry to wet: Do this in batches, alternating with hot water. I know that’s what Grandma always said—”a little flour, a little water”—it helps prevent lumps. I don’t stress about a few though.
- Spread it in your pan: The batter is gloopy but pourable—don’t worry if you’ve gotta nudge it into the corners.
- Bake! Whack it in the oven for about 35-40 mins. Check with a toothpick: a few crumbs are fine, but no wet batter, yeah? Let it cool a bit before slicing or you’ll end up with a hot mess (tasty but messy).
Lived-and-Learned Notes
- This cake tastes even gingerier after a night in the tin, so if you can resist, wait till tomorrow!
- Molasses can be a faff to measure, so I usually oil the measuring cup—slides right out.
- Sometimes I forget to buy ground cloves. Allspice does the trick (not exactly the same, but… eh).
- Don’t overmix—once it’s together, it’s done. I learned this after baking a brick once (not my finest hour).
Things I’ve Tried (and One Flop)
- Lemon drizzle on top—brightens it up and actually works really nicely!
- Swapping hot water for strong coffee—ohhhh, that imparts a sneaky richness; highly recommend for adults.
- Adding raisins—not my favorite. Got vetoed by the kids, actually.
If You Don’t Have This, Don’t Panic (Equipment)
- I use a 9-inch square tin, but honestly, any medium cake tin will do. Loaf tins? Just watch the bake time, sometimes I overbake in those.
- No stand mixer? A good wooden spoon and elbow grease is grand. (I’ve done it after our ancient hand mixer finally packed it in.)
- Can’t find parchment? Butter and flour the tin generously. It’ll still come out… most of the time.

How Long Will It Keep (Or Will It?)
Look, I read somewhere gingerbread cake can last up to five days in an airtight tin. That’s adorable. It’s never, ever made it past day 2 in this flat. But if you have superhuman willpower, just keep it covered and at room temp. Or freeze slices for emergencies (yes, cake emergencies are a thing). Here’s a good article on storing cake properly, if you need proof I’m not making this up.
How We Serve It
I’m a classicist—a dollop of whipped cream, or even better, maple crème fraîche if I’m feeling bougie, does the trick. My mum likes it with hot custard (very British!) and sometimes the kids just eat it plain, straight from the baking paper. Actually, on second thought, warm from the oven with a mug of builder’s tea might be my top pick.
My (Not-So-Professional) Pro Tips
- I once thought I could start mixing before the butter softened. Nope. Wait—or microwave carefully (trust me on this one!).
- Baking soda needs hot water to activate; don’t use cold (I forgot once, cake didn’t rise—sad times).
- If the batter looks gnarly after the molasses, just keep going—it’ll fix itself.
People Actually Ask Me…
- Can I use honey or golden syrup instead of molasses?—Yep, you’ll get a lighter flavor. I think molasses is richer, but… rules are made to be bent!
- Is it spicy?—Not like chili spicy, but warm and cozy. Add more ginger if you’re braver than me.
- Can I make it dairy-free?—Margarine and a splash of almond milk work (done it a few times for my vegan mates).
- Why did my cake sink in the middle?—Happens to the best of us. Usually means it needed a few more mins or the oven was too hot. (Sometimes I just pile extra whipped cream to cover it up!)
- Do I really need to let it cool before slicing?—Honestly, I should say yes… But if you can’t wait, just go for it. Just expect crumbs everywhere.
For a treasure trove of spice info I always recommend Serious Eats’ guide to baking spices—handy if you’re curious about swapping flavors or just want an excuse to nerd out on ginger (guilty).
All right, now I’m off for another slice—yours should be cooling on the counter about now. Save me a piece if you think of it!

Ingredients
- 2 cups all-purpose flour
- 1/2 cup unsalted butter, softened
- 1/2 cup packed brown sugar
- 2/3 cup molasses
- 1 cup hot water
- 1 large egg
- 1 1/2 teaspoons baking soda
- 2 teaspoons ground ginger
- 1 teaspoon ground cinnamon
- 1/4 teaspoon ground cloves
- 1/4 teaspoon salt
Instructions
-
1Preheat your oven to 350°F (175°C). Grease and flour an 8-inch square baking pan.
-
2In a large bowl, cream together the butter and brown sugar until light and fluffy.
-
3Beat in the egg, then stir in the molasses until well combined.
-
4In a separate bowl, whisk together the flour, baking soda, ginger, cinnamon, cloves, and salt.
-
5Add the dry ingredients to the wet mixture alternately with hot water, beginning and ending with dry ingredients. Mix until smooth.
-
6Pour the batter into the prepared pan and bake for 35 minutes, or until a toothpick inserted in the center comes out clean. Cool before serving.
CLICK FOR NUTRITION INFO
↑
Approximate Information for One Serving
Serving Size:
1 serving
Calories:
290cal
Protein:
3 gg
Fat:
8 gg
Saturated Fat:
0g
Trans Fat:
0g
Cholesterol:
0mg
Sodium:
0mg
Potassium:
0mg
Total Carbs:
52 gg
Fiber:
0g
Sugar:
0g
Net Carbs:
0g
Vitamin A:
0
Vitamin C:
0mg
Calcium:
0mg
Iron:
0mg
Nutrition Disclaimers
Number of total servings shown is approximate. Actual number of servings will depend on your preferred portion sizes.
Nutritional values shown are general guidelines and reflect information for 1 serving using the ingredients listed, not including any optional ingredients. Actual macros may vary slightly depending on specific brands and types of ingredients used.
To determine the weight of one serving, prepare the recipe as instructed. Weigh the finished recipe, then divide the weight of the finished recipe (not including the weight of the container the food is in) by the desired number of servings. Result will be the weight of one serving.
Did you make this recipe?
Please consider Pinning it!!