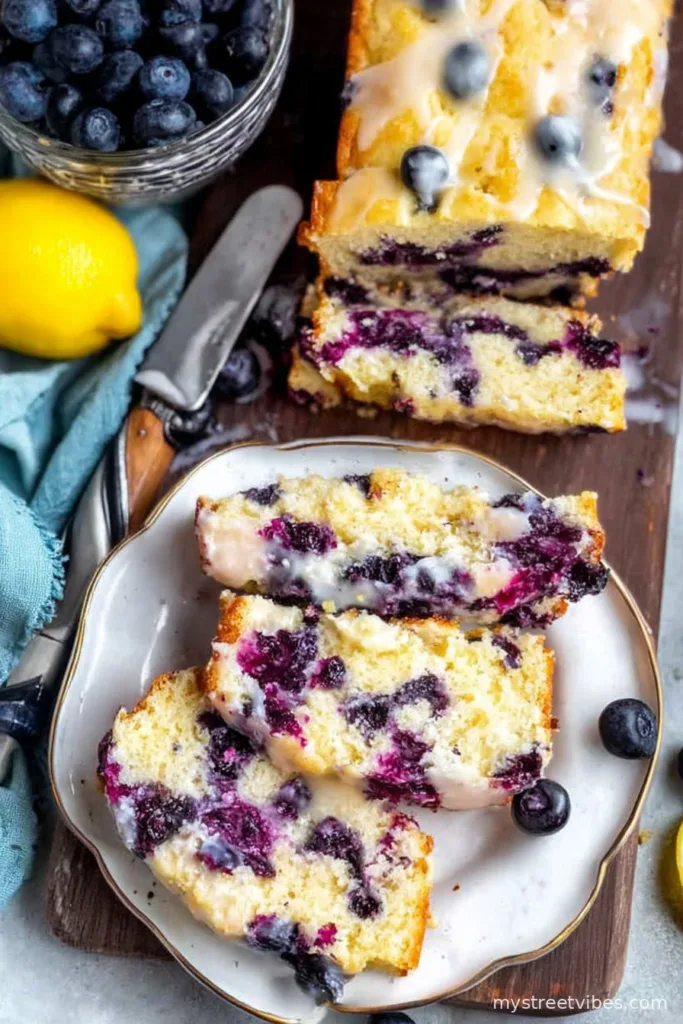
If you ever peeked into my kitchen first thing on a Saturday—ignore the mess—you’d probably spot a loaf of this easy lemon blueberry breakfast bread cooling off near the window (well, unless my youngest got to it first). The first time I made this recipe was after I’d run out of cereal (standard disaster), but it was a happy accident, I swear. The smell alone is better than any fancy candle. And honestly, there’s something about blueberry-stained fingers that just makes the day start off right—unless someone wipes them on your shirt, which, believe me, happens more than you’d hope.
Why You’ll Love This (or at least not hate it)
I make this when nobody feels like eggs, there’s a pile of blueberries on the counter, and I genuinely want the kitchen to smell like a bakery (well, a bakery that occasionally burns toast too). My family goes crazy for it because it’s just tart enough without making you wince, and jam-packed with juicy berries—plus, you only dirty one bowl if you play your cards right. Oh, and no yeast. I am not messing with yeast before noon.
Here’s What You’ll Need (and Some Substitutions)
- 2 cups all-purpose flour (sometimes I swap half for whole wheat, but it gets a bit heavy—use at your own risk!)
- 1 tsp baking powder
- 1/2 tsp baking soda
- 1/2 tsp salt (sea salt if you’re feeling fancy)
- 2/3 cup sugar (I’ve used brown sugar when I run out; not bad, just a tad caramel-y)
- 2 large eggs
- 1/2 cup plain yogurt (aka whatever’s left in the tub, sometimes I’ve used sour cream—works a treat)
- 1/4 cup melted butter (or neutral oil, honestly—my gran always said Land O’Lakes or nothing, but any will do)
- Zest of 1 lemon (or two if you like it zippy—I sometimes do both)
- Juice of 1 lemon
- 1 tsp vanilla extract (the real stuff if you’ve got it, otherwise imitation is just fine for me)
- 1 and 1/2 cups fresh blueberries (frozen also work—do not thaw though. They get weird and mushy otherwise)
- Optional: a handful of chopped nuts (I rarely do this, but my brother swears by walnuts)
How to Make It (casual style)
- Preheat your oven to 350°F (that’s about 180°C—I had to Google it, too). Grease up a 9×5 loaf pan with butter or spray, but if you forget just go ahead and use parchment paper. Works every time.
- In a big bowl, whisk together flour, baking powder, baking soda, salt, and sugar. I usually use a fork, because who can ever find a whisk around here?
- Push that dry stuff to the side of the bowl (or just make a well in the middle). Add eggs, yogurt, melted butter, lemon zest and juice, and vanilla. Mix it up; it’ll look a bit lumpy, but don’t stress. This is where I usually sneak a taste—so sue me.
- Gently fold in the blueberries (and nuts if you’re feeling wild). Actually, toss the berries with a spoonful of flour first to stop them all sinking to the bottom—sometimes I forget and it turns into blueberry-bottom bread but it’s fine honestly.
- Spoon batter into your prepared pan. Level it out a bit, unless you like the rustic look (which I claim is intentional when I don’t bother smoothing).
- Bake for around 50-60 mins. Check at 45 if your oven runs hot—mine’s moody, so your mileage may vary. If a skewer comes out clean (well, except for blueberry goo), it’s done. Otherwise, give it another 5 mins and try again. Oh, and if it starts to brown too much, cover with foil, but half the time I forget and it’s just crustier. Not the worst thing.
- Let it cool in the pan for 15 or so minutes. Then tip it out and cool on a rack, unless you want to eat it warm and messy (which I totally do, but then regret it when it crumbles a bit).
Notes from the Trench (I mean, Kitchen)
- If your berries are huge, cut them in half. Nobody wants a loaf with giant blueberry sinkholes. Or maybe you do?
- Actually, I find this bread even better the next day. The flavors settle in—you know, like soup. But in reality, someone always slices off a hunk before it really cools.
- If it looks pale, you probably forgot to zest the lemon. I did that once. Still tasted good, just less photogenic.
Some Variations I’ve Tried (and One Flop)
- Swapped out blueberries for raspberries once. Good, but way messier.
- Added a little almond extract – kind of fancy, but just a drop! Otherwise it totally dominates everything.
- One time I tried chocolate chips instead of berries. Honestly, kind of weird with the lemon. Maybe someone else can make it work, but I can’t recommend it.
Equipment—Or Whatever Gets the Job Done
You’ll need a loaf pan. But honestly, in a pinch, I’ve used a square brownie tin; you just get more of a cake than bread, which doesn’t bother me. Mixer? Nice, but a fork works. Zester is handy, but a fine cheese grater does the trick.

Storage Info (like it ever lasts)
Store in an airtight container at room temp for up to two days—theoretically. If you actually have leftovers, pop slices in the toaster the next day. Freezer-friendly too, just wrap well. Actually, in my house it never lasts more than a day—I’m not kidding.
How We Serve It (Sometimes with a Twist)
Best with a big mug of tea. Sometimes I do a quick glaze—mix up a little powdered sugar and lemon juice and just sort of drizzle it on while it’s warm. Or, on Sundays, we’ve been known to serve it with a dollop of vanilla yogurt and a few extra blueberries. My cousin insists it’s breakfast, but honestly, I’d eat this for dessert, too.
Pro Tips (Learned the Hard Way)
- I once tried skipping the flour dusting step for blueberries; they sank like stones. Just do it. Trust me.
- Don’t rush letting it cool, unless you want crumbly slices that sort of fall apart—you can see from my photos, I never learn.
- Actually, if you slam the oven door mid-bake, it can collapse. Ask me how I know. (Please don’t.)
FAQ (Stuff Friends Actually Ask)
- Can I use frozen blueberries?
- Yep—don’t thaw them, though. They’ll streak the batter and turn everything purple, like a weird Smurf bread (not as charming as you’d think).
- Is it super sweet?
- Nope, but if you like it sweeter, sprinkle a little sugar on top before baking. Gives a nice crunchy lid. Or just spread on jam later.
- What if I don’t have yogurt?
- Sour cream is just fine. Buttermilk, or even plain milk plus a squeeze of lemon in a pinch. This is one flexible bread.
- How do I get it out of the pan without sticking?
- Grease it well or use parchment. If it sticks, run a butterknife around the edge. And next time, more spray—my motto.
- Where do you get your vanilla? It actually tastes different?
- Pretty much anywhere, but I like King Arthur Baking’s—a bit fancier, maybe, but you do taste it. And their site has neat baking tips, too. Also, the Serious Eats homemade extract guide is fun if you want to DIY!
Completely unrelated, but if anyone else has tips for getting blueberry stains out of tea towels, do share. It’s a mystery that eludes me, but maybe it’s just part of the charm—makes them look lived-in, you know?

Ingredients
- 2 cups all-purpose flour
- 3/4 cup granulated sugar
- 2 tsp baking powder
- 1/2 tsp salt
- 1 cup fresh blueberries
- 2 large eggs
- 1/2 cup milk
- 1/2 cup unsalted butter, melted
- 1 tbsp lemon zest
- 2 tbsp fresh lemon juice
- 1 tsp vanilla extract
Instructions
-
1Preheat the oven to 350°F (175°C) and grease a 9×5-inch loaf pan.
-
2In a large bowl, whisk together flour, sugar, baking powder, and salt.
-
3In a separate bowl, combine eggs, milk, melted butter, lemon zest, lemon juice, and vanilla extract; mix well.
-
4Add the wet ingredients to the dry ingredients, stirring gently until just combined. Fold in the blueberries.
-
5Pour the batter into the prepared loaf pan and smooth the top.
-
6Bake for 50 minutes or until a toothpick inserted into the center comes out clean. Let cool before slicing and serving.
CLICK FOR NUTRITION INFO
↑
Approximate Information for One Serving
Serving Size:
1 serving
Calories:
240 caloriescal
Protein:
4gg
Fat:
7gg
Saturated Fat:
0g
Trans Fat:
0g
Cholesterol:
0mg
Sodium:
0mg
Potassium:
0mg
Total Carbs:
38gg
Fiber:
0g
Sugar:
0g
Net Carbs:
0g
Vitamin A:
0
Vitamin C:
0mg
Calcium:
0mg
Iron:
0mg
Nutrition Disclaimers
Number of total servings shown is approximate. Actual number of servings will depend on your preferred portion sizes.
Nutritional values shown are general guidelines and reflect information for 1 serving using the ingredients listed, not including any optional ingredients. Actual macros may vary slightly depending on specific brands and types of ingredients used.
To determine the weight of one serving, prepare the recipe as instructed. Weigh the finished recipe, then divide the weight of the finished recipe (not including the weight of the container the food is in) by the desired number of servings. Result will be the weight of one serving.
Did you make this recipe?
Please consider Pinning it!!