The Apple Crisp That’s Always Gone Too Soon
I can’t count the number of times I’ve whipped up this easy Apple crisp recipe at, like, the absolute last minute. One minute, there’s a bag of apples sulking on my counter, and boom, dessert appears (full disclosure, sometimes it vanishes before it even cools properly). The first time I made this, I underestimated how much my brother could eat—lesson learned! Also, if you’ve ever tried peeling apples with a child, you know it’s like chasing a wild sheep through a muddy field—fun but, wow, sticky hands galore.
Here’s Why You’ll Seriously Love This (I Promise)
I make this when I suddenly realize I want something ‘homemade’ but don’t want to be chained to the stove. My family goes absolutely bonkers for this—like, last slice gets hidden behind the yogurt in the fridge level of bonkers. The topping gets really crispy if you use proper old-fashioned oats (trust me on that). But hey, sometimes I get lazy and just toss in whatever oats I find—rolled, quick, you name it—and it still pretty much works. Oh, and every time I think I’ll cut the sugar to make it healthier, I regret it. Moral of the story: dessert is meant to be dessert.
What You’ll Need (And My Occasional Swaps)
- 6-7 medium apples (Granny Smith is my pick, but honestly, any apple except Red Delicious—those just get weird)
- 3/4 cup brown sugar (I once used half white sugar when I ran out. Still tasted good)
- 1 cup old-fashioned oats (Quick oats if that’s all you’ve got; it’s happened!)
- 3/4 cup all-purpose flour (My grandma insisted on King Arthur. I use whatever isn’t clumpy.)
- 1/2 cup cold butter, cubed (Or margarine in a pinch—don’t tell grandma)
- 1 tsp ground cinnamon (I go heavy handed, can’t help it)
- 1/4 tsp salt
- Juice of 1/2 lemon (Optional but it wakes up the apples. Or, splash in some orange juice; I did that once, by accident, but it worked!)
How to Make It (With a Little Wiggle Room)
- Preheat your oven to 350°F (about 180°C). I always forget this and then try to use the oven’s quick preheat. Not recommended.
- Peel and slice the apples. Get rid of the cores. I like them a bit chunky, but you do you. Toss them into a greased 8×8 baking dish. Squeeze the lemon over the apples and sprinkle a little cinnamon (not strictly necessary, but it really smells like autumn in here—trust me).
- Mix up the topping. In a bowl, combine flour, oats, brown sugar, another hit of cinnamon, and the salt. Then add the cold butter cubes. You can use a pastry blender if you’re fancy, but I just squish it all with my fingers until it’s sort of pebbly and clumpy. Don’t overthink it; just don’t melt the butter. (This is the part where I sneak a nibble. It’s not totally safe but, well, temptation!)
- Scatter the topping evenly over the apples. Or mostly evenly. Some rogue lumps here and there are fine.
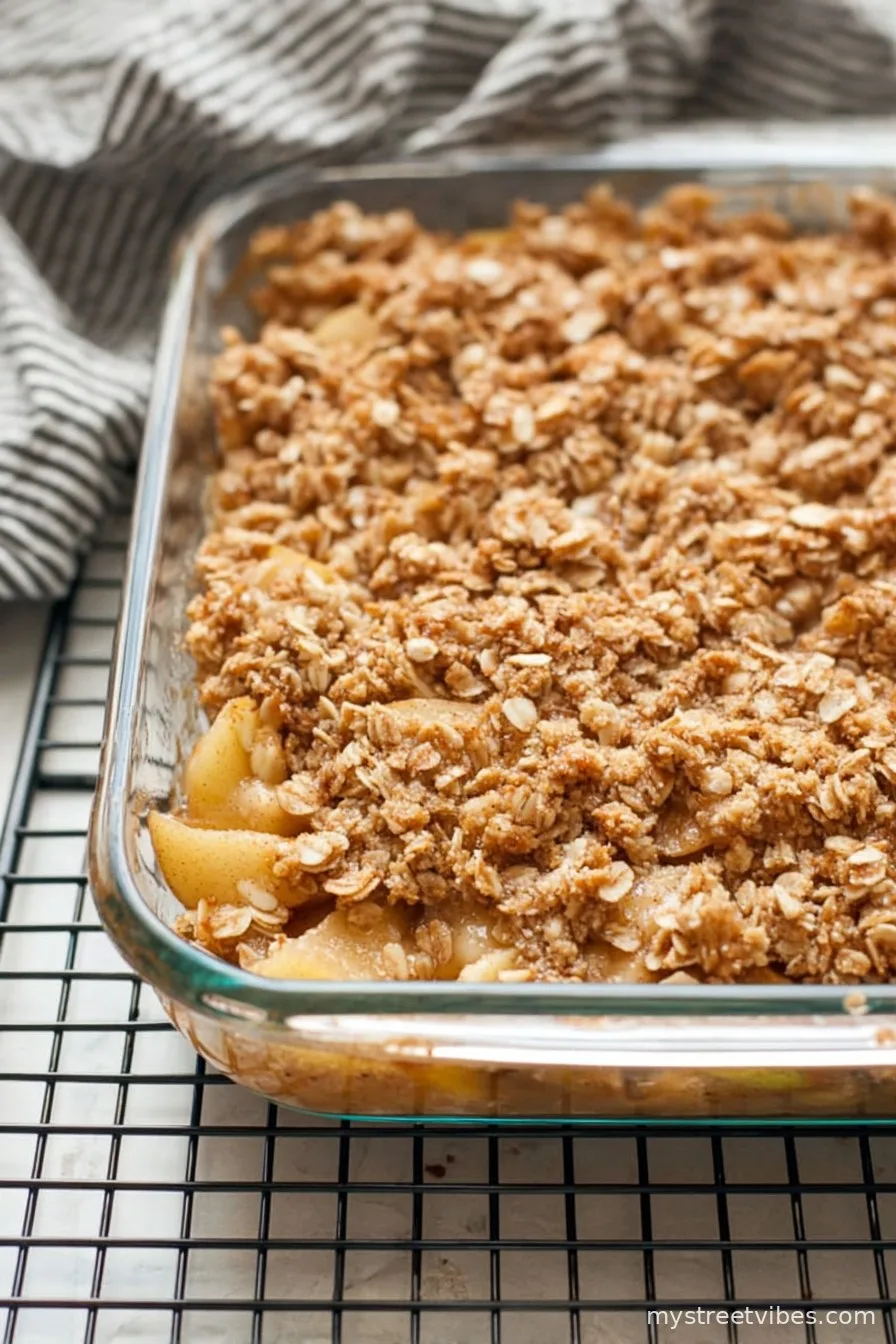
- Bake for 40-50 minutes. You want the bubbling edges and that crispy golden brown top. Sometimes mine bubbles over—place a tray underneath to catch splatters if you’re feeling clever. If not, that’s what soaking your oven tray is for.
- Let it cool a tiny bit before scooping (if you can wait). Fair warning, your house will smell incredible.
Extra Notes (A.K.A. What I’ve Messed Up Before)
- If you use apples that are too sweet (like Fuji), you might want to cut back the sugar a tad. Otherwise, it gets a bit tooth-achingly sweet—though maybe you’re into that?
- I used cake flour once by accident instead of all-purpose. Turned out fine, if a little more cakey. So, don’t stress over flour type too much.
- Totally optional: add a handful of chopped nuts on top. I like pecans, but once tried sunflower seeds and, eh, not my favorite.
Variations I’ve Tried (For Better or Worse)
- Pear and Apple: Half pears, half apples—juicier, and maybe even better than just apples, depending who you ask (my cousin swears by it)
- Cranberries: Throw in a handful of fresh cranberries if you want tartness. Maybe, don’t try dried cherries—mine just went chewy and oddly medicinal
- Maple Syrup: Swapped out half the sugar for maple syrup once. It was a bit runny but the flavor? Chef’s kiss.

If You Don’t Have a Proper Baking Dish…
Look: any oven-safe thing is fine. I once baked this in a cast iron skillet. Or you can use a deep pie plate—or two little ones if you’re aiming for ‘personal crisp’ (not that it helps with portion control, shockingly).
Stashing the Leftovers (If You’re Lucky Enough to Have Any)
Pop leftovers in the fridge, covered, for up to three days. That said, in my house it never lasts more than a day—possibly a few hours—because someone always takes a ‘midnight sample’ (usually me). You can reheat it in the oven or, if you’re impatient like me, just blast it in the microwave briefly (still good, but the topping won’t be as crisp).
How I Like to Serve It
Honestly? Warm with a big scoop of vanilla ice cream. At holidays, my mum insists on whipped cream, and my uncle even adds a slice of sharp cheddar on top (I know, sounds weird but it’s a New England thing—try it if you’re brave!). Follow your bliss.
Things I Wish Someone Had Told Me Earlier
- I once tried to use hot butter instead of cold because I was in a hurry… and regretted it. The topping went weirdly mushy and just sat there like a confused hat.
- Don’t skimp on the apple—if you think it looks like too many slices, you’re probably right. And that’s exactly how much you want.
- Let it sit at least 10 minutes before serving. Once, I scooped it out piping hot and the apples just sort of flopped everywhere. Tasted fine, but presentation? Oof.
Your (Actual) Apple Crisp Questions, Answered
- Can I make this ahead? Yep! I actually think it tastes even better the next day (probably because the flavors settle, or maybe because I’m hungrier?).
- Gluten free? Absolutely—just swap the flour for almond flour, or your fave GF blend, and make sure your oats are certified gluten-free (‘cos, you know, cross-contamination and all that jazz).
- What’s the best apple? People get super passionate about this! I like Granny Smith because they hold up and add some tartness, but Honeycrisp is lovely if you want less tang. But avoid Red Delicious—I mean, unless you like bland and mushy… just saying.
- Can I double this for a crowd? Sure thing. Use a 9×13 dish, add a smidge more baking time (maybe 5-10 minutes). If you have an extra pair of hands to help with apple slicing, even better.
- Can I skip peeling the apples? I’ve done it when I was feeling lazy, and it’s actually fine; just know the texture will be a bit chewier! Some folks actually prefer it that way.
And there you have it. My not-so-secret, throw-it-together, sweet-and-crispy apple crisp. If you ever come by for tea, there’s a 90% chance this’ll be what I serve (unless the bananas are turning brown, then all bets are off and it’s banana bread time). Cheers to cozy bakes and sneakily eating dessert for breakfast. You didn’t hear it from me.
Ingredients
- 6 cups peeled and sliced apples (about 5-6 medium apples)
- 2/3 cup granulated sugar
- 1 teaspoon ground cinnamon
- 1 tablespoon lemon juice
- 3/4 cup all-purpose flour
- 3/4 cup old-fashioned oats
- 1/2 cup packed light brown sugar
- 1/2 cup unsalted butter, cold and cubed
- 1/4 teaspoon salt
Instructions
-
1Preheat your oven to 350°F (175°C). Lightly grease a 9×13 inch baking dish.
-
2In a large bowl, toss the sliced apples with 1/3 cup granulated sugar, cinnamon, and lemon juice. Spread the apples evenly in the prepared baking dish.
-
3In another bowl, combine the flour, oats, brown sugar, remaining 1/3 cup granulated sugar, and salt.
-
4Add the cold cubed butter to the oat mixture. Use a pastry cutter or your fingers to blend until the mixture is crumbly.
-
5Sprinkle the oat topping evenly over the apples.
-
6Bake for 35-40 minutes, or until the topping is golden brown and the apples are tender. Serve warm, optionally with vanilla ice cream.
CLICK FOR NUTRITION INFO
↑
Approximate Information for One Serving
Serving Size:
1 serving
Calories:
320 caloriescal
Protein:
2 gg
Fat:
11 gg
Saturated Fat:
0g
Trans Fat:
0g
Cholesterol:
0mg
Sodium:
0mg
Potassium:
0mg
Total Carbs:
54 gg
Fiber:
0g
Sugar:
0g
Net Carbs:
0g
Vitamin A:
0
Vitamin C:
0mg
Calcium:
0mg
Iron:
0mg
Nutrition Disclaimers
Number of total servings shown is approximate. Actual number of servings will depend on your preferred portion sizes.
Nutritional values shown are general guidelines and reflect information for 1 serving using the ingredients listed, not including any optional ingredients. Actual macros may vary slightly depending on specific brands and types of ingredients used.
To determine the weight of one serving, prepare the recipe as instructed. Weigh the finished recipe, then divide the weight of the finished recipe (not including the weight of the container the food is in) by the desired number of servings. Result will be the weight of one serving.
Did you make this recipe?
Please consider Pinning it!!