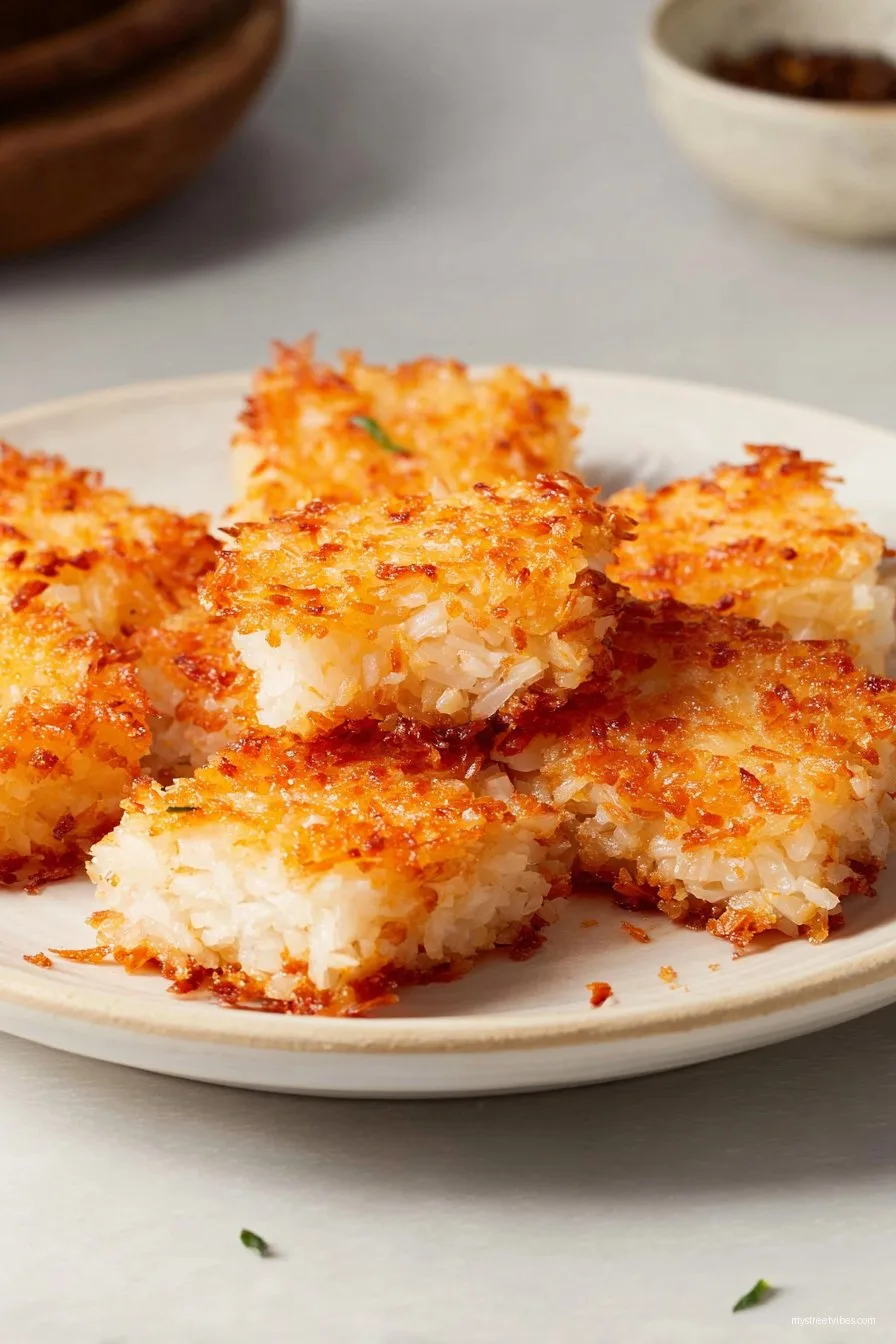
Let Me Tell You About Crispy Rice (And My Weird Kitchen Fails)
Hey there, friend! So crispy rice—wow, this dish takes me back. I started making it after burning one too many pots of regular rice (yeah, the struggle), then realizing the crispy edges are actually the best part. Once, I actually called my mum for advice and she just laughed: “You finally get it!” (She’s a crispy edge fiend, too.)
But I digress. Whether you’ve spotted those golden squares on Instagram or just wanna use up leftover takeout rice, crispy rice is that one snack or side that everybody fights over. I mean, nobody in my house ever argues over salad, but THIS? Total chaos.
Why I Keep Coming Back to This Recipe
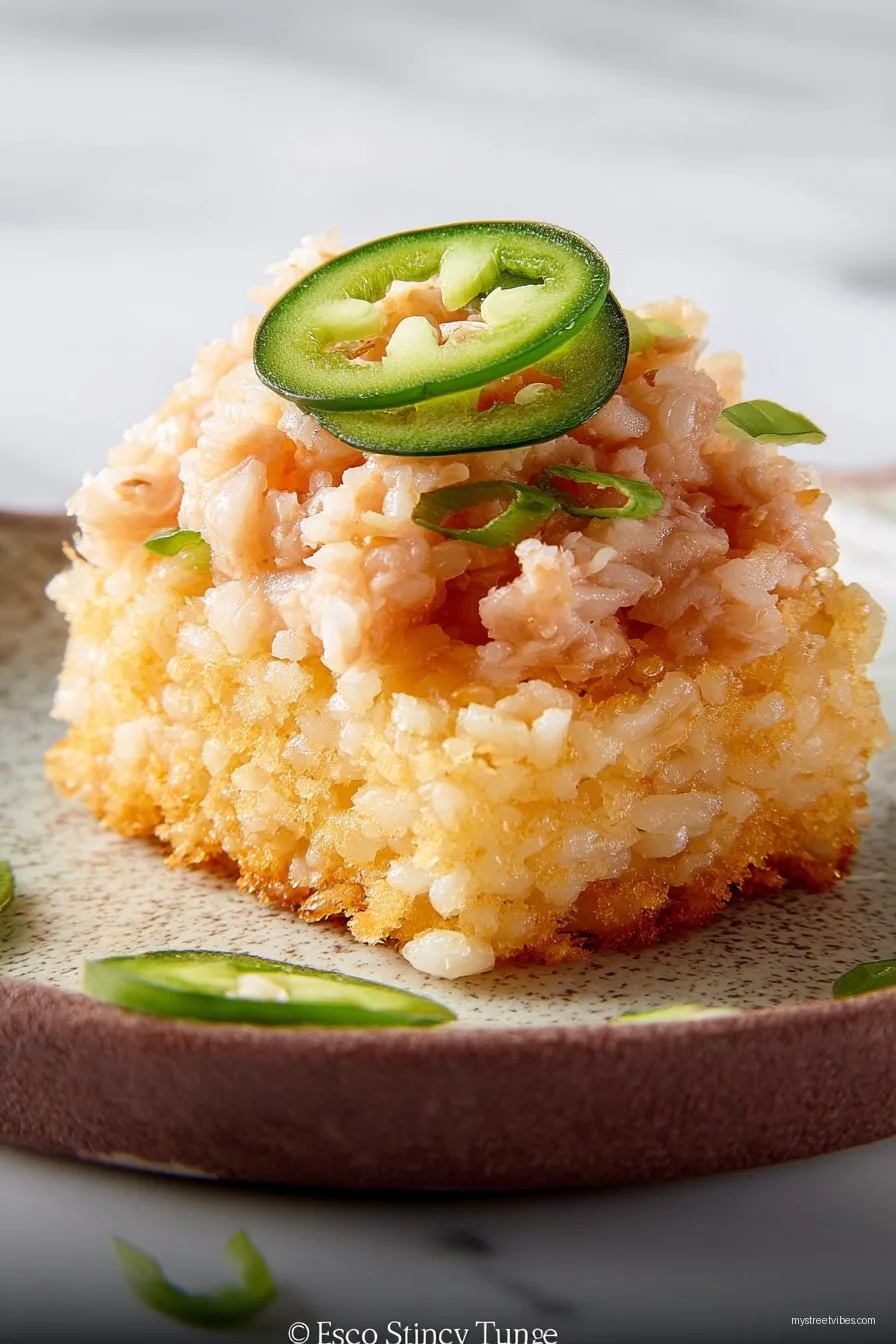
I make crispy rice when the rice on its own just won’t cut it—sometimes with spicy tuna on top if I’m feeling fancy, but often I just eat it straight from the pan, standing in the kitchen, pretending I don’t see the dog begging. My family goes completely bonkers for it (no joke—my brother once set an alarm to snag the first batch). But honestly? I just love that it’s quick, it uses leftovers, and you don’t have to be some zen rice-cooking wizard. Oh, and if you like the slightly nutty, toasty flavor of browned everything… you’ll get it. The only mildly annoying thing? I used to flip the rice too soon and got weirdly mushy bits. Patience. Or, I just pick at the crispy parts and leave the rest. Whoops.
What Goes In (aka Ingredients List—but Looser)
- About 2 to 3 cups cooked white rice (day-old works best; I use jasmine but basmati is chill, too—sometimes I even use leftover sushi rice, which isn’t “correct,” but works. Don’t tell mum.)
- 2 tablespoons neutral oil (I go for sunflower oil because it’s cheap, but honestly olive does the job. My grandmother swears by peanut oil; up to you.)
- Salt (just a fat pinch, though, not too much if you’re topping with saucy things later)
- Optional: 1 teaspoon sesame oil for flavor (it’s not traditional but trust me on this if you like a nutty taste)
- Optional: Scallions or spring onions to scatter at the end (or even cilantro, if you’re the green-sprinkle type)
How I Actually Make Crispy Rice
- First things first: If the rice has been chilling in the fridge all day, break it up with your hands or a fork so it’s not one big cold lump. Oh, and if it’s really rock-hard—give it a zap in the microwave for 20 seconds, seriously.
- Grab a nonstick skillet (my ancient one does the trick, no fancy brands here) and splash in your oil—medium heat to start. Let it shimmer, don’t walk away! This is not the time to decide now’s great for a cuppa.
- Scatter the rice into the pan. You want an even-ish layer, about a half inch thick. It’s alright if it’s patchy (those bits get even crispier). Press it down with a spatula, but don’t squash the life out of it.
- Don’t touch it. For 5 to 8 minutes, just let it live. The bottom should go golden brown. It WILL smell nutty. This is where I usually sneak a taste from the edge, because patience is not really my thing—and also, don’t worry if it looks a bit weird at this stage—it always does.
- Now, the fun part—flip. Some people do the big pan flip thing; I just cut it into sections and gently turn with a spatula, losing a few bits to the floor (the dog wins again). Brown the other side for 2 to 4 minutes.
- Sprinkle salt (and maybe sesame oil) over the top, then toss on scallions if you got ‘em. Or don’t. At this point, I’m already eating.
No-Fancy-Cheffy Notes
- Actually, I find it works better if you use less oil than recipes say—otherwise, it gets greasy, and nobody likes soggy rice.
- If you want *really* even browning and you can wait, cover the pan for the first couple of minutes of cooking, then uncover so the steam dries out.
- Honestly, day-old rice is way easier to work with. Fresh rice just gets sticky and kind of annoying—but I still eat it.
Variations I’ve Attempted (Some Worked, Some Didn’t)
- Using brown rice—turns out OK, but takes longer to get crispy. Less fun, more “healthful.”
- Adding finely chopped kimchi to the rice before crisping is amazing. Highly recommend.
- I once tried using quinoa. Don’t. It went everywhere and just… no crunch. Sad.
- If you want sushi-bar style, top the crispy squares with spicy tuna or even avocado and sriracha. Food52 actually has a nice version of this: see their tips here.
Do You Really Need Special Equipment?
So, technically you want a nonstick skillet—life’s easier. But, I once made crispy rice in a battered old cast iron pan and it worked (ish) with enough oil. If you only have a basic frying pan, you’ll need more oil and maybe a bit less heat. Oh, and if you want to get fancy, Serious Eats talks cast iron tricks you might find interesting if you nerd out on kitchen kit.
How Does It Store? (Spoiler: It Won’t Last)
Alright, here’s the deal: you can store leftovers in the fridge for up to 2 days, reheated in a pan or oven to get the crisp back. But, in my house, it basically disappears right off the stove. I honestly wouldn’t know about super long storage—hasn’t gotten that far. If you do manage to save some, maybe tell me your secret?
What Goes With It? Here’s How I Serve It
I love crispy rice with a fried egg and chili oil for breakfast, or next to a curry for the ultimate “two textures, one bite” situation. My gran used to serve it with pickled cucumbers, which sounds odd but is kind of genius. If you’re going for sushi-style, spicy mayo is a must (I throw in extra lime juice, because why not?).
What Not to Do (Pro Tips AKA My Mishaps)
- I once tried rushing by turning up the heat. Burnt rice city, felt like a kitchen crime scene.
- Don’t overload the pan. The rice needs contact with hot oil, or you just get lukewarm mush. Learned that one the messy way.
- Honestly, don’t skip the pan rest—let the rice sit for a couple of minutes so those crispy edges set before digging in. I know it’s hard. Worth it.
Real Questions I’ve Actually Gotten (and My Kinda Flaky Answers)
- Can I use freshly cooked rice? Sure, you can, but it’s sort of a sticky situation—use less water, let it cool a bit first.
- Is it supposed to stick?! Sort of! Some sticking is good, but not burny-stuck. Nonstick pans help, but hey, “crisp” is the whole idea.
- What oil is best? I use whatever’s handy—sunflower, canola, even avocado oil once. Sesame oil is just for finishing, not for frying, trust me.
- Can you freeze crispy rice? I mean, maybe, but I did it once and it came out less crispy and more… odd. Better to start fresh.
- Can you make this with cauliflower rice? Actually, I tried! It does get crispy in patches, but don’t expect golden squares. Not exactly a classic outcome, but hey, live and learn.
So yeah, that’s crispy rice. Kind of messy, lots of personality, a little bit addictive. Give it a go—and send me a pic if you don’t eat it all immediately (I never manage it). Cheers!
Ingredients
- 2 cups cooked jasmine rice, cooled
- 2 tablespoons vegetable oil
- 1 tablespoon soy sauce
- 1 teaspoon sesame oil
- 1 tablespoon green onions, finely chopped
- 1 teaspoon garlic powder
- 1/2 teaspoon salt
- 1/4 teaspoon black pepper
Instructions
-
1Spread the cooked rice on a tray and let it dry for about 10 minutes to remove excess moisture.
-
2Heat vegetable oil in a large non-stick skillet over medium-high heat.
-
3Evenly spread the rice in the skillet and press it down gently with a spatula.
-
4Cook without stirring for about 10 minutes, or until the bottom is golden and crispy.
-
5Drizzle soy sauce and sesame oil over the rice. Season with garlic powder, salt, and pepper.
-
6Flip the rice or break it into pieces and cook for another 5-7 minutes until crispy all over. Garnish with green onions before serving.
CLICK FOR NUTRITION INFO
↑
Approximate Information for One Serving
Serving Size:
1 serving
Calories:
220cal
Protein:
4 gg
Fat:
8 gg
Saturated Fat:
0g
Trans Fat:
0g
Cholesterol:
0mg
Sodium:
0mg
Potassium:
0mg
Total Carbs:
32 gg
Fiber:
0g
Sugar:
0g
Net Carbs:
0g
Vitamin A:
0
Vitamin C:
0mg
Calcium:
0mg
Iron:
0mg
Nutrition Disclaimers
Number of total servings shown is approximate. Actual number of servings will depend on your preferred portion sizes.
Nutritional values shown are general guidelines and reflect information for 1 serving using the ingredients listed, not including any optional ingredients. Actual macros may vary slightly depending on specific brands and types of ingredients used.
To determine the weight of one serving, prepare the recipe as instructed. Weigh the finished recipe, then divide the weight of the finished recipe (not including the weight of the container the food is in) by the desired number of servings. Result will be the weight of one serving.
Did you make this recipe?
Please consider Pinning it!!