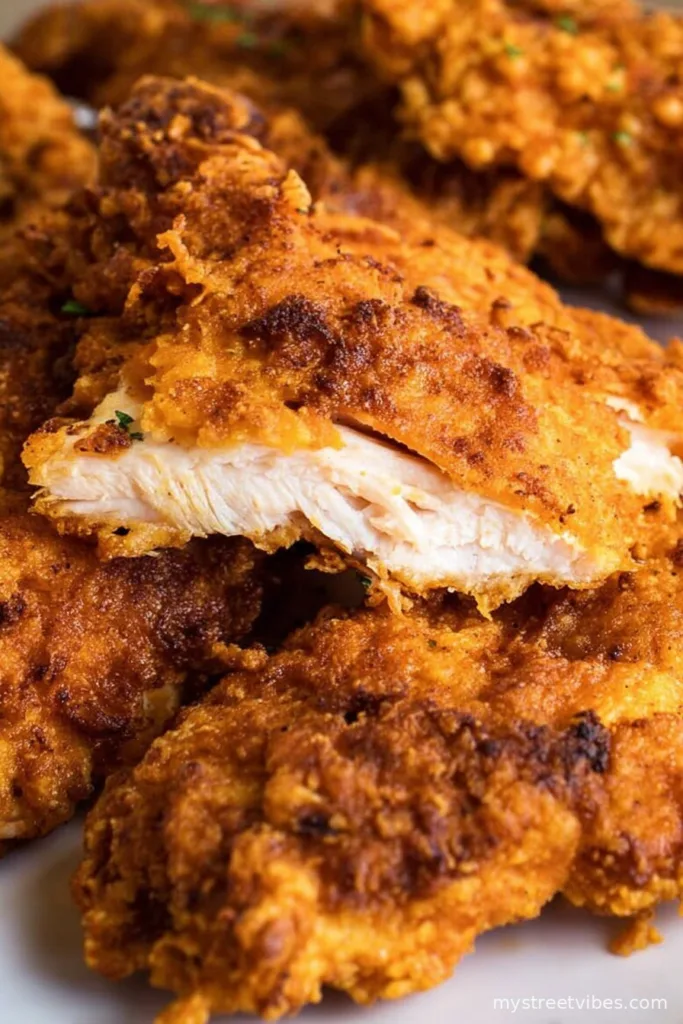
Let Me Tell You About This Crispy Oven Fried Chicken
Alright, before you scroll down looking for the magic crisp—I get it, I do the same thing sometimes—let me just say: this oven fried chicken recipe is one of the rare gems that’s become a bit of a life raft for me on busy weeknights. My first attempt was halfway accidental, really. I ran out of oil for real frying (classic me), and had to make friends with my oven and some creative crunching. And you know what? I still make it this way, even when I’ve got plenty of oil. Only once did I set off the smoke alarm, but, let’s not get into that story.

Why You’ll Love This Chicken (I Mean, I Do!)
I make this when I want fried chicken but definitely don’t want to deep clean my stovetop. My son asks for it at least once a week (which is a miracle, considering he claimed chicken was “weird” for years). The coating actually stays put (I used to have the issue where half the breading fell off—so annoying, right?). This one’s great hot and, honestly, sometimes even better cold, eaten right out of the fridge while pretending to do something productive. It doesn’t leave your whole place smelling like a fried food stand, which is just…the best.
Grab These Ingredients (and Improvise if Needed!)
- About 1 kg (2 lbs or so, doesn’t have to be exact) chicken pieces, skin-on or boneless. Sometimes I just use thighs—they’re forgiving.
- 1 cup buttermilk, or half yogurt/half milk if I forgot to buy buttermilk (which happens a lot). In a pinch, a big splash of lemon in plain milk and let it sit for a minute does fine.
- 2 cups panko breadcrumbs (the big, crunchy ones), but regular breadcrumbs work—my gran used crushed cornflakes once, and, honestly, it was pretty tasty.
- 1 cup plain flour (all-purpose). Sometimes I use a bit of whole wheat if I’m feeling wild.
- 2 teaspoons smoked paprika (or just regular sweet—if it’s all you have, no stress)
- 1 teaspoon garlic powder (or a couple of crushed garlic cloves, but they might burn a bit—learned that the hard way!)
- 1 teaspoon onion powder
- 1 tsp salt, more to taste
- ½ tsp cracked black pepper
- 1 teaspoon baking powder (this was my mum’s trick; it gives extra crunch, I swear)
- Olive oil or melted butter for drizzling (about 2 to 3 tablespoons). I sometimes use spray oil if I’m feeling lazy.
How I Make Crispy Oven Fried Chicken
- Marinate the chicken: Toss the chicken pieces in the buttermilk (or whatever dairy situation you’ve got going on), salt, and half of the garlic/onion powder. Cover and pop it in the fridge for at least 30 min—overnight if you remember (I almost never do).
Long story short, once I left it in for a full 48 hours by accident and I think it was even better. Or maybe I was just very hungry that day.
- Preheat and prep: Set the oven to 220°C (around 425°F), and line a big ol’ baking tray with parchment paper. If you’ve got a wire rack, put that on the tray—it lets the heat get under the chicken too (but don’t stress if you don’t have one, just flip the chicken halfway later).
- Shake up your coating: In a big bowl (I use a mixing bowl my dog once tried to eat—only a slight dent remains), throw in your flour, panko, all the spices, baking powder, and a pinch more salt and pepper. Mix it up. This is where I’d usually sneak a taste, except, you know, raw flour is a bad idea—so maybe just sniff it instead?
- Coat, coat, coat: Grab the chicken (let most of the marinade drip off, but don’t get fussy about it), then press each piece firmly into the crumb mixture till it’s properly covered. Really press it—this helps the crust cling on. Line them up on the tray/rack.
- Add oil magic: Drizzle or spray the chicken all over with olive oil or melted butter; not a swimming pool, just enough for shine—don’t skip this, that’s the crunch’s secret handshake.
- Bake!: Halway through the cooking (about 20 min), flip the chicken gently (I use tongs, but fingers work too—just don’t burn yourself, I’ve done that, not fun). If it looks a bit pale, give it a touch more oil and let it go another 15-25 min till golden, crispy, and your kitchen smells like heaven.
- Rest for a couple minutes before eating (unless you want a burnt tongue, which, apparently, I do because I never wait long enough).
Stuff I’ve Learned (Usually the Hard Way)
- Don’t skip lining the tray; I thought I was being eco-friendly and then spent an hour scrubbing cemented breadcrumbs off my poor pan.
- It doesn’t need to look perfect going in; my first batch looked like sad little lumps but crisped up fine.
- Panko is best but if you’re cleaning out your pantry, try crisp rice cereal, even crushed crackers (but not, as I learned with regret, tortilla chips—turns out odd).
Other Ways to Wing It (Some Better Than Others)
- Add some grated Parmesan to the crumb mix—makes it extra savory. But don’t use too much or it burns. Been there.
- Feeling spicy? Dab in some cayenne or hot sauce to the marinade. Or, if you’re a sweet tooth, a little honey in the buttermilk is weirdly good.
- I once tried brining the chicken first. Honestly, it just tasted like chicken. So I skip it now (unless you fancy a science experiment).
- If you’re out of buttermilk, yogurt works well. Plain milk will do if you’re desperate; the crumb might be a smidge less clingy but it still gets crisp.

Equipment Stuff (and Shortcuts)
- If you have a wire rack, use it. If not, just flop your chicken onto the parchment and flip halfway—it’s fine!
- Baking trays are best, but I’ve used a lasagna pan in a pinch. The closer the chicken sits together, the less crisp all over, just saying.
- You don’t need a mixing bowl; a clean food container will do, and honestly, sometimes less mess is good.
How I Store (For the Five Minutes It Lasts)
I’m told you can keep leftovers covered in the fridge for 2-3 days, but honestly, in my house it never lasts more than a day! If you must, eat it cold or nuke in a toaster oven. Microwaves take the crunch away—but cold chicken has its own charm, trust me.
How I Serve It (Your Call, Really)
Personally, I love it with a heap of mashed potatoes and some crunchy slaw—the kind you buy in a bag and pretend you made yourself. My cousin dunks it in honey-mustard. At picnics, I just let everyone eat with their hands. (Less washing up, ha!)
What I Wish I Knew (AKA: Don’t Rush These Bits)
- I once tried rushing the bake by cranking up the temp to max. The outside got crunchy, sure, but basically raw in the middle…lesson learned.
- Let the chicken marinate—even just 30 min—makes it more forgiving if you overbake.
- Flip gently; the crisp coating can sometimes cling for dear life, or just fall off and break your little heart.
People Actually Ask Me These (Maybe You Will Too)
- “Can I make this gluten-free?” Oh, for sure! Use gluten-free flour and GF panko or crushed rice crackers. Tastes almost the same (don’t overthink it).
- “Breasts or thighs?” Both work, but thighs are juicier and less prone to going dry (I never remember to brine). Thin breast strips will go crisp real quick, but dry out easier—just keep an eye on em.
- “Is it really crispy?” Actually, yes, if you follow the oil step! Once I skipped it and got more like roasted chicken with some stuck-on crumbs—not the same.
- “Can I reheat it?” I always think I’ll have leftovers, but rarely do! Reheat in the oven, not the microwave, or just eat cold (a personal favorite on busy Mondays, no shame).
- “Do kids eat this?” Mine does—and he’s a very, very picky human. So, probably yes?
So, that’s my crispy oven fried chicken story—and if you actually read this far, you deserve a second helping. (Or dessert. Or a nap?) Let me know if you try your own weird variation and it actually works—I’m always game for a kitchen adventure, as long as nobody’s setting off the smoke alarm. This time.
Ingredients
- 8 chicken drumsticks (about 2 lbs)
- 1 cup buttermilk
- 1 1/2 cups panko bread crumbs
- 1 cup all-purpose flour
- 2 teaspoons paprika
- 1 teaspoon garlic powder
- 1 teaspoon salt
- 1/2 teaspoon black pepper
- 3 tablespoons olive oil
- 1 teaspoon dried thyme (optional)
Instructions
-
1Preheat your oven to 425°F (220°C). Line a baking sheet with parchment paper and set a wire rack on top. Brush the rack lightly with olive oil.
-
2In a large bowl, marinate the chicken drumsticks in buttermilk for at least 15 minutes (or up to overnight in the refrigerator).
-
3In a large shallow dish, combine panko bread crumbs, flour, paprika, garlic powder, salt, black pepper, and dried thyme. Mix well.
-
4Remove the chicken from the buttermilk, letting the excess drip off. Dredge each piece in the breadcrumb mixture, pressing gently to adhere the coating.
-
5Arrange the coated chicken pieces on the prepared rack. Drizzle or spray the tops lightly with olive oil to help crisping.
-
6Bake for 40–45 minutes until the coating is golden brown and the chicken is cooked through (internal temperature should reach 165°F/74°C). Let rest for a few minutes before serving.
CLICK FOR NUTRITION INFO
↑
Approximate Information for One Serving
Serving Size:
1 serving
Calories:
410cal
Protein:
38 gg
Fat:
16 gg
Saturated Fat:
0g
Trans Fat:
0g
Cholesterol:
0mg
Sodium:
0mg
Potassium:
0mg
Total Carbs:
29 gg
Fiber:
0g
Sugar:
0g
Net Carbs:
0g
Vitamin A:
0
Vitamin C:
0mg
Calcium:
0mg
Iron:
0mg
Nutrition Disclaimers
Number of total servings shown is approximate. Actual number of servings will depend on your preferred portion sizes.
Nutritional values shown are general guidelines and reflect information for 1 serving using the ingredients listed, not including any optional ingredients. Actual macros may vary slightly depending on specific brands and types of ingredients used.
To determine the weight of one serving, prepare the recipe as instructed. Weigh the finished recipe, then divide the weight of the finished recipe (not including the weight of the container the food is in) by the desired number of servings. Result will be the weight of one serving.
Did you make this recipe?
Please consider Pinning it!!