If we were neighbors, I’d hand you a warm slice on the doorstep and say, here, this is the loaf that finally made me stop side eyeing sourdough. The first time I baked this, the crust sang as it cooled and I did that awkward happy shuffle in the kitchen while the dog stared at me like, that’s bread, mate, relax. Anyway, this is my beginner’s sourdough bread recipe, but it reads like we’re texting. A bit messy, very doable, and it tastes like a bakery loaf had a cozy weekend at home.
Why I keep making this loaf
I make this when the house feels too quiet, or when I want something honest on the table with soup. My family goes slightly bonkers for the crackly crust and the chewy middle. Also, I used to be weirdly nervous about sticky dough, and this one taught me that wet hands fix almost everything. I swear it. And if the dough looks like a shaggy pillow at frist, good sign. It comes together.
Plus, it doesn’t need a bunch of gear, though I’ll say a Dutch oven is magic. Actually, I find it works better if I chill the shaped loaf overnight, but when I forget, a room temp proof is fine and faster. Little wins.
What you need in the bowl
- Active sourdough starter, 100 g, bubbly and smelling like apples. If yours is sleepy, feed it and wait till it doubles. I like this simple guide from King Arthur Baking.
- Warm water, 330 g, around body temp. A scant 1 and 1/3 cups if you’re using cups.
- Bread flour, 450 g. I sometimes use all purpose when I’m out and it’s fine, just a touch less chewy.
- Whole wheat flour, 50 g, for flavor. My grandmother always insisted on her favorite brand, but honestly any version works fine.
- Fine sea salt, 10 g, about 1 and 3/4 teaspoons.
- Rice flour or extra flour for dusting the towel in your proofing bowl. Cornmeal works in a pinch.
Optional add ins: a handful of seeds, 1 tablespoon honey, or 20 g olive oil. I don’t usually add fat, but honey gives a lovely color.
Let’s actually bake, step by step-ish
- Mix starter and water: In a big bowl, whisk the 100 g starter into 330 g warm water till it looks milky. This is where I usually sneak a taste, because I’m a weirdo and like tangy things.
- Add flours: Tip in 450 g bread flour and 50 g whole wheat. Stir with a spoon or your hand until no dry bits remain. It will look rough, like a messy sweater. Cover and rest 30 to 45 minutes. This rest is called autolyse, but we can just call it a nap.
- Salt time: Sprinkle on 10 g salt. Wet your fingers and pinch and fold the dough to work in the salt for a minute. It will tighten slightly.
- First hour of folds: Every 30 minutes for the next hour, do a set of gentle stretch and folds. Grab one edge, lift and fold to the center, turn the bowl, repeat 4 times. If it tears, be gentler, no need to wrestle.
- Bulk ferment: Cover and let the dough rise at room temp until puffy and about 60 to 80 percent bigger. This can be 3 to 5 hours depending on your kitchen. Warm day, faster; chilly day, slower. Look for bubbles along the sides and a jiggly feel.
- Preshape: Turn the dough onto a lightly floured counter. Tuck the edges toward the middle to form a round. Let it rest 15 to 20 minutes uncovered. It relaxes, like us after a cup of tea.
- Final shape: Using a bench scraper, scoot and turn the dough to build tension, then flip and tuck for a snug round or a batard. On second thought, if it sticks, dust your hands, not the counter, and try again.
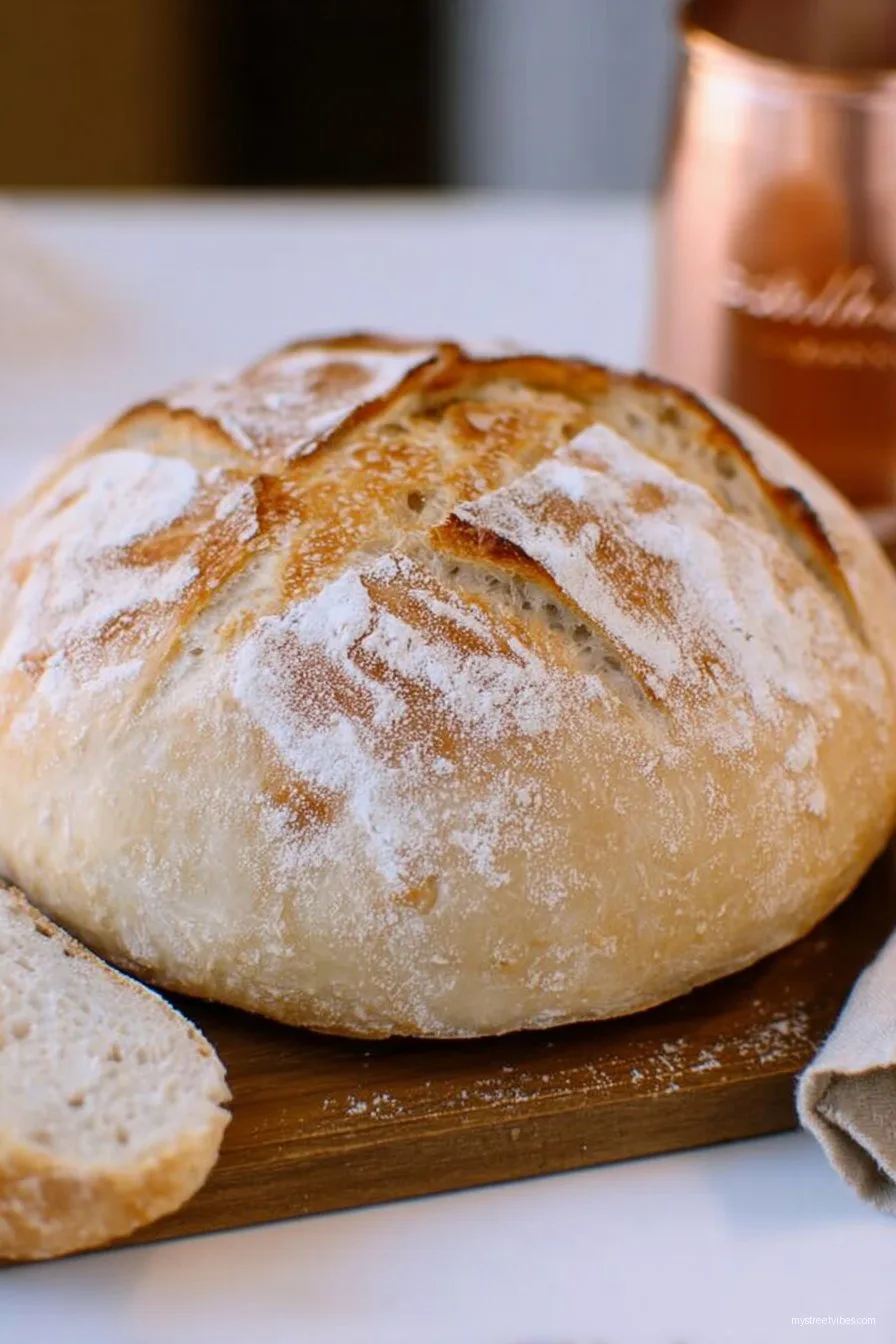
- Proof: Line a bowl or banneton with a well floured towel, rice flour works best to prevent sticking. Place the loaf seam side up. Cover and proof 45 to 75 minutes at room temp until it springs back slowly when poked, or pop it in the fridge 8 to 16 hours for better flavor and easier scoring. I tend to think overnight proofing makes the crust sing.
- Preheat: Put a Dutch oven and lid into your oven and preheat to 475 F, about 245 C, for at least 30 minutes. Yes, the preheat matters. I tried rushing it once and regretted it because the loaf spread like a sleepy pancake.
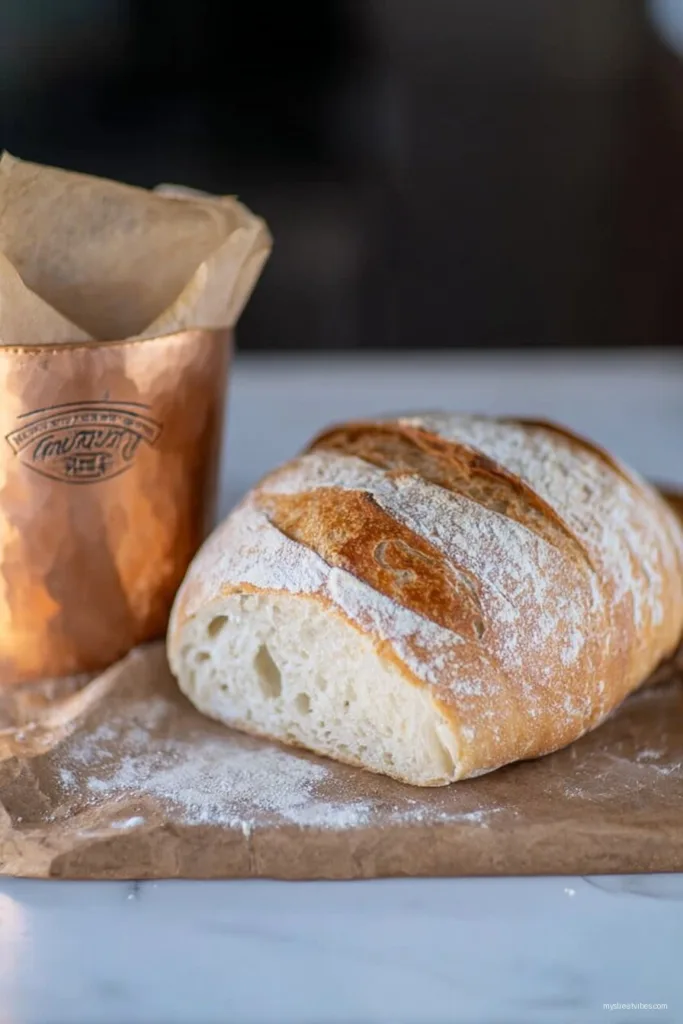
- Score and bake: Turn the loaf onto parchment, seam down. Dust the top with a whisper of flour. Use a sharp lame or a razor to score a confident slash. If you want shape ideas, The Perfect Loaf has great visuals here Beginner tips and scoring. Lift the parchment, set the dough in the hot pot, cover, and bake 20 minutes.
- Finish: Uncover and bake another 20 to 25 minutes until deep brown and crackly. Internal temp should be around 205 F, about 96 C. If it looks a bit weird at this stage, it always does, and then it turns beautiful.
- Cool: Cool on a rack at least 1 hour before slicing. I know, waiting is rude. But cutting early squishes the crumb and lets out steam you want to keep. Listen for the crust to crackle as it cools. Best sound.
Quick detour because I can’t help it. There’s this tiny moment when you lift the lid and the steam clears and the loaf has bloomed like a secret you were hoping to tell. That little puff of surprise is why I bake.
Little notes I scribbled in my notebook
- Sticky dough is normal, water on your hands is better than flour on the counter. Flour tightens the dough and can make it tough.
- If your starter smells sharp and is collapsing, bake sooner rather than later. Overripe starter makes a more sour loaf, which I love, but it can slow the rise.
- Actually, I find it works better if I score at a shallow angle, almost like shaving the surface, instead of straight down.
- When in doubt, longer bulk and shorter final proof saves the day. Overproofed dough is floppy and tricky to score.
Variations I tried so you do not have to
- Seeded loaf: Mix in 40 g toasted sesame and sunflower seeds during the last fold. Crunchy, nutty, very good with butter.
- Garlic and herb: A handful of chopped parsley with 2 cloves roasted garlic, mashed. The kitchen smells like a tiny bistro.
- Half whole wheat: Use 250 g bread flour and 250 g whole wheat. Add 10 to 20 g more water. The crumb is a touch tighter but more flavor.
- What did not work: I tried adding cold cheese cubes. They leaked, smoked, and made the bottom burn. Tasty bits, messy pan, not worth the cleanup.
Tools I actually use
- Dutch oven, 4 to 5 quart. I called it essential earlier and, yeah, it’s my favorite for steam and spring.
- No Dutch oven, no problem: Use a preheated baking sheet, slide on the loaf with parchment, and put a metal pan on the lower rack with a cup of hot water to make steam. Not perfect, still lovely.
- Bench scraper, bowl, kitchen scale. If you do cups, that’s fine, but a scale keeps things consistent.
- Razor or very sharp knife for scoring. Food52 has a friendly video on scoring basics here how to score bread.
How I store it, though it barely lasts a day
Let it cool completely, then wrap in a clean towel or keep it cut side down on a board. Room temp is best for the crust. After day two, I slice and freeze, then toast straight form the freezer. Honestly, in my house it never lasts more than a day.
How we like to eat it
- Warm with salted butter. Simple, borderline perfect.
- With tomato soup on rainy nights, or with olive oil and a pile of pepper.
- Breakfast toast with peanut butter and sliced banana. The kiddo calls it the fancy toast.
- I think this tastes better the next day for sandwiches, but fresh wins for soup dunking.
Pro tips I learned the slightly hard way
- I once tried rushing the preheat and regretted it because the loaf spread and the crust stayed pale. Give the oven time.
- I once let the final proof go too long watching a game, the dough deflated when scored. If the poke springs back fast, bake now.
- Use parchment the first few times. I tried without and peeled dough off the pot, not fun.
- If the crust is getting dark but the inside is not done, lower the temp to 450 F and keep going 5 to 10 minutes.
FAQ I actually get
Do I need a super active starter for this Beginner’s Sourdough Bread Recipe
Pretty active, yes. It should double in 4 to 6 hours after a feeding and look bubbly. If it’s sluggish, do two feedings back to back and try again.
Can I use only all purpose flour
Yup, and it will still be great. Reduce the water by about 10 to 20 g if the dough feels too loose. Or just embrace a stickier dough and use wet hands.
Why is my loaf flat
Usually underproofed or overproofed, annoyingly they can look similar. Check the dough during bulk. It should be airy with visible bubbles. Also, score deep enough and bake hot. And keep that lid on for the first part so steam does its job.
How do I get bigger holes
Hydration, gentle handling, full bulk fermentation. Do not add too much flour during shaping. And do a cold overnight proof, I get nicer crumb that way.
Can I add spices or sweet stuff
Yes, but go light or it slows the rise. Cinnamon and lots of sugar make yeast a bit sleepy. If you want cinnamon swirl, proof longer and keep an eye on it.
My crust is too hard, help
Bake a few minutes less uncovered, or let the loaf rest wrapped in a towel as it cools to soften the crust slightly. But still let it breathe, so it does not get soggy.
If you want to go deeper down the rabbit hole, I learned a ton from The Perfect Loaf. Clear, kind, nerdy in the best way. And again, the King Arthur guide above is friendly for troubleshooting.